|
|


 Arabic
 Bengali
 Chinese
 English
 French
 German
 Hebrew
 Hindi
Hindi Italian
 Japanese
 Korean
 Malay
Malay Polish
 Portuguese
 Spanish
 Turkish
 Ukrainian
 Vietnamese
|
BUILDER, HOUSEHOLDER
Electric boiler. Tips for the home master
Directory / Builder, home master The proposed boiler is designed for heating cold water (up to a temperature of 60 ° C) in apartments with central or local water supply. The conveniences associated with the operation of the boiler will undoubtedly be appreciated by any housewife. Principle of operation Figure 1 shows the boiler assembly (without cover). It is mounted on the wall next to the sink or above the faucet. Dimensions - 134x604x45 mm.
The principle of operation of the boiler is quite simple. Cold water from a water tap through a rubber tube enters the pressure sensor; its rubber diaphragm becomes convex and presses upward on the rocker. The latter, with the opposite end, presses on the movable mechanism of the switch, which connects the heating element (hereinafter referred to as the heating element) to the network. At the same time, the indicator lamp lights up, signaling that the heating element is energized. Water, passing through the pressure sensor, enters the heater, and then - to the place of its use. In the design of the boiler, a water-heating heating element of a rather high power - 3 kW was used. In this case, the current consumed by the heater is about 15 A. Therefore, the switching device must withstand a load of at least 15 A and be as fast as possible. The phase must be supplied to the switching element, and "O" must be connected constantly. In this design, two microswitches for 16 A and 380 V are used. (The electrical circuit diagram of the boiler is shown in Fig. 2.)
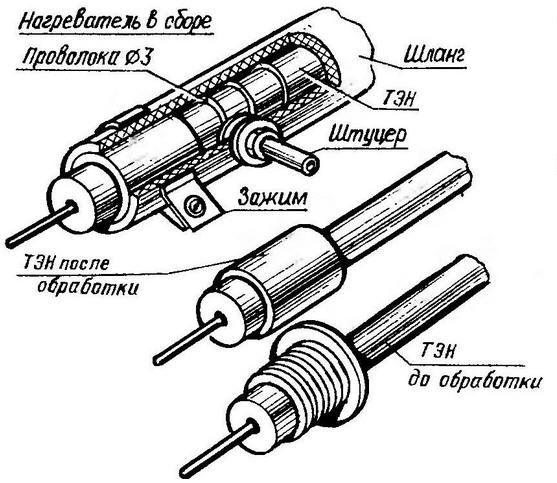
Details and construction To make a water heater you need: 1. Water heating element (heater 3-220). 2. Wire diameter 3 mm and length 10 m. 3. Rubber hose with an inner diameter of 22 mm and a length of 1300 mm. 4. Rubber tube with an inner diameter of 8 mm and a length of 1000 mm. 5. Two fittings. 6. Two washers diameter 12x20 mm. 7. Two nuts M 12x1,25. 8. Two clamps made of 0,5 mm thick sheet metal. 9. Pressure sensor assembly. Preparation of parts for assembly is carried out as follows. The water heating element must be bent at an angle of 50 - 60°. File the flanges and the threads on the heads (Fig. 3). Tightly wrap the heating part of the heating element with wire along the entire length in increments of 10 mm. Now, a hose is to be pushed onto the heating element with a winding, on which, stepping back from the edge by about 50 mm, it is first necessary to make a hole for the fitting. After inserting the latter, secure it with a nut, placing a washer under it. Next, pull the free end of the hose onto the wire-wrapped heating element (to facilitate work, the wire can be lubricated with grease) and align the edges of the fitting washer with the edge of the turned head of the heating element. At the opposite end of the hose, mark a hole for the second fitting. After pulling off the hose, make a hole, insert a fitting into it and secure with a nut and washer. Install the hose in place, cut off the ends along the edges of the heating element and tighten them tightly with clamps. Bend the heating element to its original position. (Figure 3 shows one end of a mounted water heater.) Base, cover, rocker bracket, rocker itself and clamps are made of 0,5 mm thick galvanized sheet. All parts are attached to the base. You need to cut them strictly in size, then drill holes and bend along the fold lines.
The body of the pressure sensor is made of brass. The washer ring can be made of steel, and the inner part must be rounded (chamfered). Crimp sleeves and tubes are suitable for automotive. It is important that the inner diameter of the tubes be at least 4 mm. The diaphragm can be cut from a car camera. It is advisable to supply electrical power with a separate cable with a cross section of at least 3 mm2. After installation, it is necessary to isolate all exposed current-carrying parts. Now you can start assembling the boiler (see Fig. 1). Its adjustment comes down mainly to checking the microswitches: without connecting the heater to the mains, supply water from the tap through the hose to the pressure sensor and, bending the rocker, try to achieve simultaneous operation of both switches. After adjustment, fix the boiler on the wall, cut holes in the cover for the input and output of hot and cold water hoses. After grounding the boiler body, check its operation. If it is not possible to purchase powerful microswitches, then use a small-sized low-power one that will actuate a magnetic starter that feeds a heating element with a 220 V starting coil. In this case, however, the on-off mechanism of the heating element and its circuit diagram will change somewhat. It should be remembered that after the cessation of work, the heating element does not cool down immediately, therefore it is not recommended to abruptly turn off the water, but wait 30 seconds with the heating element de-energized until cool water flows out of it. This can be achieved again by adjusting the rocker arm. With low pressure, the diaphragm does not touch the rocker arm (there should be a gap of 3-5 mm between them). By adjusting the water flow at the boiler inlet with a tap, you will achieve the desired outlet temperature. In this case, the amount of heated water will change from 1 to 1,5 l / min. Author: V.Karavaitsev
Machine for thinning flowers in gardens
02.05.2024 Advanced Infrared Microscope
02.05.2024 Air trap for insects
01.05.2024
▪ Current behaves like a liquid ▪ Ultra-budget smartphone Infinix Smart 7 HD ▪ Coal will save humanity from thirst ▪ Samsung Compute Express Link (CXL) 512 GB memory module
▪ site section Parameters of radio components. Article selection ▪ article Camping refrigerator. Tips for the home master ▪ article Which galaxy is closest to us? Detailed answer ▪ Poncirus article. Legends, cultivation, methods of application ▪ article Electrostimulators. Encyclopedia of radio electronics and electrical engineering ▪ article Copier with fluorescent lamps. Encyclopedia of radio electronics and electrical engineering
Home page | Library | Articles | Website map | Site Reviews
www.diagram.com.ua |


 See other articles Section