 Free technical library
Assembling the Rubik's Cube
At leisure / Assembling the Rubik's Cube

A simple guide to solving the Rubik's Cube with detailed illustrations
 Comments on the article
Rubik's cube for beginners.
The instruction consists of 7 steps
Stage 1. Assembling the yellow cross on the top face.
Stage 2. Arranging the corners on the top layer in their places.
Stage 3. Assembly of the middle layer.

Stage 4. Assembly of the "wrong" white cross on the last layer.
Stage 5. Assembly of the "correct" white cross.

Stage 6. Arrangement of the corners of the upper layer in its place.
Stage 7. Turning the corners with the right colors.
Attention! Your cube may have been taken apart and reassembled incorrectly (by accident or as a joke). In this case, you will not assemble the cube using formulas. We strongly recommend that you disassemble the cube into parts and assemble it by color mechanically.
Preparatory stage
Basic concepts
Introduction to the Rubik's Cube 3x3. To successfully complete our first Rubik's cube, we need to know what the cube is made of, how it rotates, and what its elements are called. So, elements Rubik's Cube:

Cube centers - 6 pcs. One sticker of one color. The centers do not move relative to each other.
Cube edges - 12 pcs. The edge elements of the cube have two colors.
Cube corners - 8 pcs. Corner elements have stickers in three colors.

cube frame. The centers are rigidly fixed on the crosspiece and cannot move.
Cube faces. 9 elements that can be rotated at the same time:
U - Up, top face. Similarly: D - Down, bottom edge.
L - Left, left side - 9 elements of the cube, located on the left.
F - Front, front face - 9 cube elements located in front.
R - Right, right side - 9 cube elements located on the right.
Designation of turns. All turns are 90° clockwise or counterclockwise.

L - rotation of the left side by 90° clockwise. R - rotation of the right side.

U - rotation of the upper face by 90° clockwise. D - rotation of the bottom edge.
F - rotation of the front face by 90° clockwise.
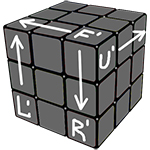
' - the dash indicates that the rotation is counterclockwise.
Tip: you need to rotate the face to face you in order to orient in the direction of rotation - clockwise or counterclockwise. In what follows, the formulas will also use the notation R2, U2, F2 ... - this means turning the face 2 times, i.e. 180 degrees.
We train! The first formula called "four"

Find the corner with the colors red-blue-yellow. Take the cube so that this corner is on the top right. Pay attention to the center of the cube, which is facing you (we have it yellow).

R'D'RD. Make this combination and look at the result. Our corner is down. The yellow (in our case) center is still looking at us - keep it up.
R'D'RD. Do this combination again and look at the result again. Our corner jumped up, but now it's twisted with other colors.
Conclusion: the corner jumps up and down and turns in different colors. If we do the combination 4 more times, we will come to the original situation. Try it!
Assembly of the first layer in 2 stages: cross + corners.
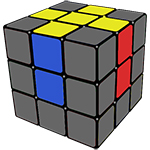
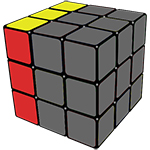
Stage 1. We collect the yellow cross on the top face
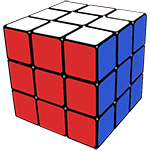
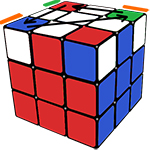
Fig.1. Attention! Not just a yellow cross at the top, but the correct arrangement of the edges, taking into account the other centers of the cube.
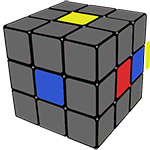
Fig.2. Let's start with the Yellow-Blue Rib. Let's find it first. We hold the cube blue towards us, yellow towards the top.
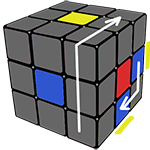
Fig.3. The first step is to move the edge down so that it is on the bottom face. In our case, do R.
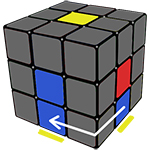
Fig.4. The second step is to align the edge now at the bottom with the blue center of the cube. Do D'.
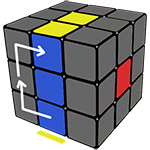
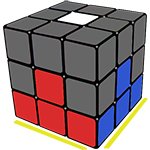
Fig.5. The third step is to lift the rib into place. For this you need to do F2. Now our edge is in place, but...
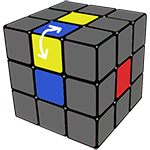
Fig.6. There could be such a situation when the edge is "opposite", in order to deploy it, you need to do FU'RU.
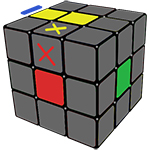
Fig.7. We turn the cube with the next (red) center towards us and collect the Yellow-Red edge. Everything is similar. Then Yellow-Green and Yellow-Orange.
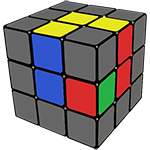
Fig.8. You have collected several ribs, and the next one is in such a way that by lowering it, we will break the top. Combination: R'D'R - this is the same, just with the return of the right side to its place.
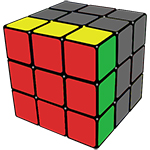
Stage 2. Putting the corners on the top layer in place
Ris.9. Experience the Power of Effective Resultsto be achieved at this stage. All corners and edges of the upper face are in place.

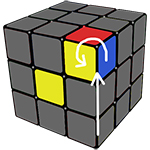
Fig.10. Let's start with the Yellow-Red-Blue corner. Hold the yellow center at the top and look for it. The first option is Fig. 10 - our corner is at the bottom.
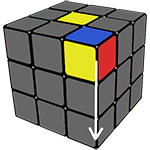
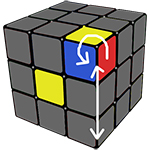
Fig.11. The second option - our corner is at the top. Let's take the cube so that the corner looks at us and is on the right. We lower the corner down with an already known combination R'D'RD.

Fig.12. We twist the bottom so that the desired angle becomes under its place, as in Fig. Then we do R'D'RD 1 to 5 times until the corner is in place correctly. Next is the next corner.
So, the strategy of the second stage: lower the desired element down, twist the bottom so that the element fits its place, raise the element up to its place with one of the formulas.
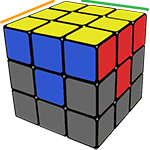
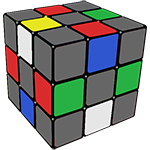
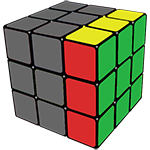
Stage 3. Assembly of the middle layer of the Rubik's cube. We put 4 ribs in their places in the middle layer.
Ris.13. Experience the Power of Effective Results 3 stages. We need to place only 4 edges in their places.
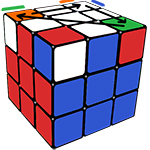
Ris.14. Let's flip the cube. Now the assembled yellow face is at the bottom and the white center is at the top. So we will keep until the end of the assembly.
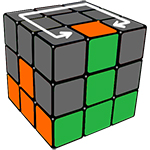
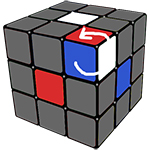
Fig.15. Let's find the edge on which no white sticker, for example, Green-Orange. Twist the center so that the green sticker of our edge coincides with the green center.
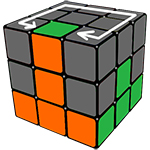
Fig.16. It is possible that the green sticker cannot match, then match the Orange sticker with the Orange Center. Those. we have 2 options.
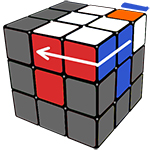
Ris.17. We keep green. U' L' ULUFU' F'. The edge jumps down and to the left - to its place.

Ris.18. We keep orange. URU' R' U' F' UF. The edge jumps down and to the right - to its place.
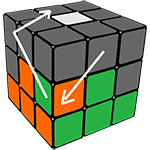
Fig.19. A typical situation is that the desired edge is already in its place, but rotated incorrectly. We make the formula in Fig. 17 or 18 - and we "knock out" the edge from its place.
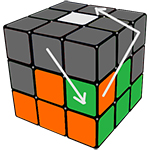
Fig.20. Our edge will jump up and you can already do everything to put it in its place correctly.
Strategy of this stage: we are looking for the desired edge, by turning the top we position it correctly, we put the edge in its place with one of the formulas. We do this algorithm for all 4 edges.
Attention! When assembling the second layer, the first layer (bottom) is kept assembled!
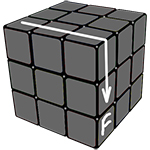
Stage 4. We collect the "wrong" white cross on the last layer
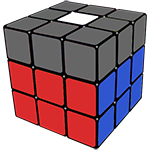
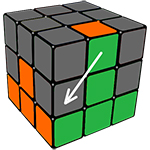
Ris.21. FRUR'U'F' - 1, 2 or 3 times. If you pay attention to the cross at the top of the cube (the cross is 5 stickers, except for the corner ones, as in Figure 24.), then the white stickers in this cross form one of 4 situations. Our goal is to reach the situation in Fig. 24, collect the "white cross". The transition from the previous situation to the next is done THE SAME formula FRUR'U'F'.
Attention! Hold the cube as shown. For example, if you have rice. 22, then the corner of the white stickers should look away from you and to the left.
On fig. 23 the white line should be horizontal.

Ris.22

Ris.23
Ris.24
What to do?! I collected 2 layers, but on the third layer, none of the situations in fig. 21-24. This should not happen on a normal cube. This means that your cube was taken apart mechanically and put back together incorrectly. Take the cube apart, put it back together correctly, and start again.
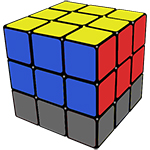
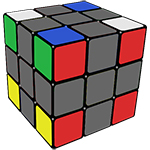
Stage 5. Making the "correct" white cross
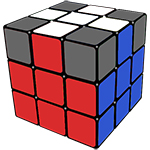
Ris.25. Experience the Power of Effective Resultsto be reached in this step. The top ribs match the colors of the centers.
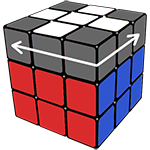
Fig.26. Rotate the top layer so that any TWO the ribs matched in color with the centers from the middle layer. One of two situations can happen.

Fig.27. Two opposite edges fall into place (we have white-blue and white-green), the other two need to be swapped. The combination will take you to fig. 28. RUR' UR U2 R'.

Fig.28. Two assembled ribs, stand at an angle * (we have white-blue and white-orange), the other two need to be swapped with a combination, while holding the cube so that the corner * looked away from you and to the right. RUR' UR U2 R' U.
Stage 6. Putting the corners of the top layer in place
We have not assembled only 4 corner elements on the upper face. Consider the cube, perhaps one of the centers is already in place, as in fig. 30, or all the corners are not in place, as in fig. 27. It doesn't matter how the corners are turned, only their location matters.
Ris.29. URU' L'UR'U'L. Make this combination, and one of the cubes will definitely fall into place, i.e. you will come to the situation in fig. thirty.
Fig.30. One corner is in its place. The rest need to be swapped by moving each of them counterclock-wise, as in fig. 31 or clockwise, as in fig. 32.
Ris.31. Option 1. The three unassembled ribs move counterclockwise and fall into place. We hold the collected angle towards us and to the right, as in the figure. URU' L'UR'U'L.
Ris.32. Option 2. The three unassembled ribs move clockwise and fall into place. We hold the collected angle towards us and to the left, as in the figure. U' L' URU' LUR'.
Frequent question at this stage: THE FORMULA IS INCORRECT!
This scheme has been around for many years, everything has been tested a thousand times, all schemes and formulas are working, we guarantee! Be careful before executing the formula, read under the formula what color you need to keep the cube towards you. Pay close attention to the previous tips!
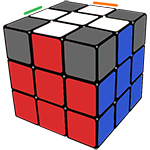
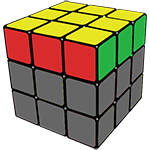
Stage 7. Final! Expanding the corners with the right colors
All the corners are in place, you just need to turn them around. It's very simple - one short formula will help us. Yes, the same "four" R'D'RD. At this step, only attentiveness is important, and you also need to hold the cube correctly.
Ris.33. R' D' R D. Let's start with Red-Blue-White. Hold the cube so that this corner looks at you and is on the right. Let's make a four 2 or 4 timesuntil the corner turns around.
Ris.34. U. Red-Blue-White turned around. But the cube "collapsed" - do not panic, it should be so. Turn the top - now you have the next corner in front of you. Attention! We keep the cube itself all the time with the red center towards us, the white one - up.
Ris.35. R' D' R D. Here is the next White-Blue-Orange corner. Again we unfold it with the "four". If it so happens that the next corner is already assembled correctly, then just turn the top AGAIN and collect the next corner.
Ris.36
When you turn all 4 corners with the correct colors, a small miracle will happen - the rest of the cube elements will fall into place! Do not rush, hold the cube correctly, turn the formula to the end.
Rubik's Cube Solved!
Read and write useful comments on this article.
 Latest news of science and technology, new electronics:
Artificial leather for touch emulation
15.04.2024
In a modern technology world where distance is becoming increasingly commonplace, maintaining connection and a sense of closeness is important. Recent developments in artificial skin by German scientists from Saarland University represent a new era in virtual interactions. German researchers from Saarland University have developed ultra-thin films that can transmit the sensation of touch over a distance. This cutting-edge technology provides new opportunities for virtual communication, especially for those who find themselves far from their loved ones. The ultra-thin films developed by the researchers, just 50 micrometers thick, can be integrated into textiles and worn like a second skin. These films act as sensors that recognize tactile signals from mom or dad, and as actuators that transmit these movements to the baby. Parents' touch to the fabric activates sensors that react to pressure and deform the ultra-thin film. This ... >>
Petgugu Global cat litter
15.04.2024
Taking care of pets can often be a challenge, especially when it comes to keeping your home clean. A new interesting solution from the Petgugu Global startup has been presented, which will make life easier for cat owners and help them keep their home perfectly clean and tidy. Startup Petgugu Global has unveiled a unique cat toilet that can automatically flush feces, keeping your home clean and fresh. This innovative device is equipped with various smart sensors that monitor your pet's toilet activity and activate to automatically clean after use. The device connects to the sewer system and ensures efficient waste removal without the need for intervention from the owner. Additionally, the toilet has a large flushable storage capacity, making it ideal for multi-cat households. The Petgugu cat litter bowl is designed for use with water-soluble litters and offers a range of additional ... >>
The attractiveness of caring men
14.04.2024
The stereotype that women prefer "bad boys" has long been widespread. However, recent research conducted by British scientists from Monash University offers a new perspective on this issue. They looked at how women responded to men's emotional responsibility and willingness to help others. The study's findings could change our understanding of what makes men attractive to women. A study conducted by scientists from Monash University leads to new findings about men's attractiveness to women. In the experiment, women were shown photographs of men with brief stories about their behavior in various situations, including their reaction to an encounter with a homeless person. Some of the men ignored the homeless man, while others helped him, such as buying him food. A study found that men who showed empathy and kindness were more attractive to women compared to men who showed empathy and kindness. ... >>
| Random news from the Archive Fuel cell in your pocket
02.08.2009
One American company has launched a pocket fuel battery for recharging a cell phone, PDA, music player and other portable electronics where it is impossible to connect to the network.
In order for the battery to work, it must be activated: remove the fuse, stretch the flexible walls slightly with your hands and shake, then chemical reactions begin. Liquid fuel based on boron hydride is oxidized by atmospheric oxygen, a current of 3,7-5,5 volts and a power of up to 200 milliamps is generated.
An inactivated battery can be stored without losing its properties for a year and a half, an activated battery can be stored for three months. The fuel is completely safe, non-toxic, non-flammable and non-explosive. The energy of one charge is enough for 30 hours of talking on a mobile phone.
After exhaustion, the battery is sent to the company, where it is refilled with fuel.
|
Other interesting news:
▪ Posture sensor
▪ Olympus Tough TG-870 rugged camera
▪ Video recorder filters ads
▪ How dinosaurs ran
▪ Packaging affects the properties of water
News feed of science and technology, new electronics
Interesting materials of the Free Technical Library:
▪ section of the site Sites of amateur radio equipment. Article selection
▪ article Rare bird. Popular expression
▪ article What is a waking dream? Detailed answer
▪ article Boxwood. Legends, cultivation, methods of application
▪ article Fan control device. Encyclopedia of radio electronics and electrical engineering
▪ article Universal charger. Encyclopedia of radio electronics and electrical engineering
 All languages of this page
Home page | Library | Articles | Website map | Site Reviews

www.diagram.com.ua
2000-2024


 Arabic
 Bengali
 Chinese
 English
 French
 German
 Hebrew
 Hindi
Hindi Italian
 Japanese
 Korean
 Malay
Malay Polish
 Portuguese
 Spanish
 Turkish
 Ukrainian
 Vietnamese