|
|


 Arabic
 Bengali
 Chinese
 English
 French
 German
 Hebrew
 Hindi
Hindi Italian
 Japanese
 Korean
 Malay
Malay Polish
 Portuguese
 Spanish
 Turkish
 Ukrainian
 Vietnamese
|
ENCYCLOPEDIA OF RADIO ELECTRONICS AND ELECTRICAL ENGINEERING Electronic clock from the details of the radio designer. Encyclopedia of radio electronics and electrical engineering
Encyclopedia of radio electronics and electrical engineering / Clocks, timers, relays, load switches For radio amateurs who are interested in digital technology and who want to get acquainted with large integrated circuits in practice, some industrial enterprises of the country produce sets of parts for self-assembly of electronic clocks - for example, "Electronics-1". A functional diagram of an electronic clock that can be assembled from such a radio designer even at home, with only a soldering iron and some experience in installing, testing and adjusting amateur radio designs of medium complexity, is shown in Fig. 1.
The basis of the clock is a large integrated circuit DD (indicated by dash-dotted lines), containing a block of reference frequency of a quartz oscillator G and an operational device of an op-amp, to which digital indicators HG1 - HG4 are connected, a clock control unit BU and an acoustic transducer HA. The PN voltage converter provides power to all circuits and clock components from one common 12 V DC source. The quartz oscillator unit is similar in its functional purpose to the reference frequency units of amateur electronic watches assembled on microcircuits of an average degree of integration. And the operating device that controls the sign-synthesizing indicators provides work as a stopwatch and an alarm clock. The design kit "Electronics-1" includes: a multifunctional microcircuit KA1016HL1 (or ChB-32), a quartz resonator RK-72CHA-17BU, a piezoceramic bell of the ZP-1 type, IV-ZA (or IV-6) sign indicators, a printed circuit board and other necessary details and materials. The owner of the kit only needs to figure out the purpose of the components and elements of the watch, mount the parts on the board and make a case for them to your liking. The power source can be a 12V battery (if the clock is to be installed in a car) or a rectifier with the same DC output voltage. The current consumption from a 12 V source does not exceed 200 mA. The accuracy of the clock is not worse than ± 1 s per day. Schematic diagram of the clock Shown in fig. 2.
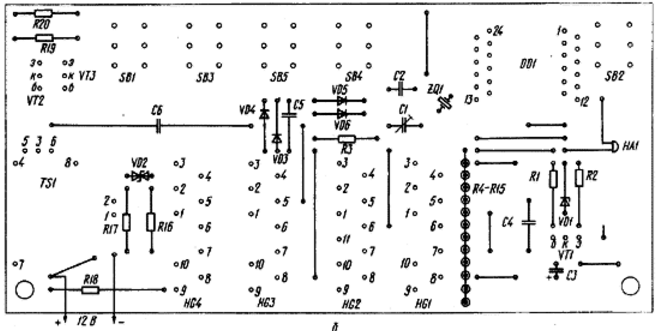
The power source of the DD1 microcircuit is the voltage regulator on the Zener diode VD1 and the transistor VT1. A stabilized voltage of 15 V is applied to pins 15 and 12 of the microcircuit. Its common power circuit is pin 12. The natural frequency of the ZQ1 quartz resonator, and hence the reference frequency generator, is 32 Hz. It is divided by the elements of the frequency divider, which is part of the microcircuit, up to 768 Hz, which corresponds to 1 s of time. Pushbutton switches SB1 - SB1 form a control unit for the operating device of the microcircuit, which provides control of digital indicators HG2 - HG1. The sign-synthesizing indicator IV-ZA is an electronic lamp with a direct-heated cathode (pins 7, 8), eight anodes with separate pins (1-6, 10 and 11) and a common control grid (pin 9). Seven anodes are made in the form of narrow strips forming a stylized number 8, and the eighth one is in the form of a dot. The anodes are coated with a thin layer of phosphor. When a positive voltage is applied to the grid and the anode elements of the indicator, a flow of electrons occurs between the cathode and anodes, causing the phosphor to glow. In the clock, the anodes of the same name-elements of digital signs of all indicators are interconnected and connected to the corresponding pins of the microcircuit. At certain moments of time, an encoded signal is fed to them from the operational device, synthesizing one of the elements of the numbers. At the same time, a control signal is applied to the indicator grids. As a result of the simultaneous action of the code and control signals, the indicators display numbers from 0 to 9. Indicators HG1 and HG2 highlight hours, and HG3 and HQ4 - minutes of the current time. The dot sign in the second indicator, which separates the hours from the minutes, is permanently lit. Similar signs are not used in other indicators. By pressing the button SB1 "K" of the control unit, the indications of the current time and the time of automatic activation of the alarm sound signal are corrected. The SB5 "H" button sets the hours, and the SB4 "M" button sets the minutes of the current time. The SB2 "C" button is used to switch the clock to the mode of counting seconds of the current time and to work as a stopwatch from zero time values. Button SB3 "B" turn on the standby mode of the alarm clock; if the pre-set and current time coincide, the piezoceramic bell HA1, connected to pin 10 of the microcircuit, emits a sound signal with a frequency of about 2 kHz. With a tuned capacitor C1, which is included in the reference frequency quartz oscillator, it is possible to correct the accuracy of the "run" of the clock. The filaments of sign indicators are designed for a voltage supply of 0,85 ... 1,15 V at a current of 45 ... 55 mA. In the clock, they are connected in parallel and are powered by a common 12 V source through a quenching resistor R18. The voltage divider R16R17 and the two-anode (symmetrical) zener diode VD2 form the middle point of the filaments, relative to which the negative voltage is applied to the indicator elements through the resistors R4-R15, taken from the output of the rectifier of the voltage converter, to eliminate the flicker of the switched off elements of the indicating digits. Transformer TS1 and transistors VT2, VT3 form a push-pull converter of direct voltage from an external power source into alternating voltage with a frequency of about 2 kHz. The negative voltage of the external source is supplied directly to the emitters of the transistors, and the positive voltage to their collectors through the windings III and IV of the TS1 transformer. The voltage taken from the resistor R20 of the divider R19R20 is fed through the windings I and II to the bases of the transistors and creates a positive (relative to the emitters) bias on them and thereby ensures the start of the converter. As a result of the action of positive feedback between the collector and base circuits of the transistors, the device is excited. In this case, an alternating voltage of a rectangular shape is induced in the winding V of the transformer, which is rectified by diodes VD2 - VD5, connected in a bridge circuit, and then stabilized by a zener diode VD1 and a transistor VT1. The appearance of a clock mounted on a printed circuit board, a sketch of the board and a diagram of the placement of parts on it are shown in fig. 3 - fig 4.
Solid lines indicate additional wire jumpers (12 pieces) installed on the board from the side of the parts. Resistors R4 - R15 are mounted in a vertical position. Their upper terminals are connected by a piece of mounting wire, which is soldered to the contact pad of the printed conductor going to the anodes of the diodes VD3 and VD4, the two-anode zener diode VD2 and (through a wire jumper) to the collector of the regulating transistor VT1 of the voltage stabilizer. To prevent the indicator leads from connecting to each other, pieces of an insulating tube are put on them. A textolite washer is placed under the quartz resonator. The magnetic circuit of the transformer TS1 of the voltage converter is a M2000NM ferrite ring of size K1bX10X4,5 (included in the kit). Windings I and II contain 20 turns each, III and IV - 65 turns each, winding V-225 turns of wire PEV-2 0,14. In the diagram, the beginning of the windings are indicated by dots. The wires of the windings I-IV are wound on the body of the ring in one direction, while the winding II must be a continuation of the winding I, and the winding IV must be a continuation of the winding III. To avoid turning on the windings, it is recommended to wind each pair of windings (I and II, III and IV) with one piece of wire of the appropriate length, folded in half, then cut and connect its parts so that one of them is a continuation of the second. The junction will be a tap from the middle of a series-connected pair of windings (for windings I and II - tap 4, for windings III and IV - tap 7). First, the ferrite ring must be wrapped around the entire diameter with a strip of varnished cloth 5 mm wide, fasten its end with BF-2 glue and, using a wire shuttle, wind the wire of windings I and II. Then, wrapping them with a strip of varnished cloth, windings III and IV are wound. The winding wire V is wound last, having previously wrapped the previous windings with varnished cloth, and then the V winding. The finished transformer is fixed on the board with BF-2 glue (it is not recommended to use metal brackets, clamps or studs for fastening) and the leads of its windings are soldered to the corresponding current-carrying pads of the printed circuit board. The microcircuit is mounted on the board last, while taking measures to exclude its possible failure due to electrostatic charge on the terminals or overheating during soldering. In order to prevent accidental breakdown of the microcircuit by static electricity, it is necessary that the electrical potentials of the circuit board, the soldering iron and the body of the installer himself be the same. To do this, several turns of bare wire are wound on a plastic (or wooden) handle of the soldering iron or a tin plate is fixed on it and connected (wire or plate) through a resistor with a resistance of 100 ... 200 kOhm to the tip and all other metal parts of the soldering iron. When mounting with your free hand, hold on to the current-carrying power conductor of the circuit board. During soldering, the duration of the soldering iron touching each output of the microcircuit should not exceed 3 s, and the soldering iron itself is disconnected from the mains at this time. Failure to comply with these generally simple requirements can adversely affect the microcircuit. After completing the installation, carefully compare it with the circuit diagram of the clock, a metal needle or a clean lint-free cloth remove dirt, flux residues, solder droplets from the printed circuit board between current-carrying printed conductors and pads, and only after that connect the power source to the clock. An external power source can be almost any full-wave rectifier with an output voltage of about 12 V at a load current of at least 200 mA. Immediately after connecting the power supply, random numbers should appear in the indicators, which is a sign that the watch is working. To reset and start the clock, you must simultaneously press the SB1 "K" and SB2 "C" buttons, and then release the "K" button. From this moment, the countdown of seconds begins - the clock works like a stopwatch. Next, you need to press the button SB2 "C" and simultaneously or separately pressing the buttons SB5 "H", SB4 "M" set the hours and minutes of the current time on the indicators. If you then press the SB2 "C" button again, the indicators will show seconds of the current time. To set the time for the sound signal (alarm clock), you must press the SB3 "B" button, alternately pressing the "H" and "M" buttons, set the desired time on the indicator block and release the "B" button. If the current time coincides with the set value, an intermittent alarm signal should appear, which can be turned off by pressing the "B" button. To use the clock as a stopwatch, while pressing the "C" button, press and immediately release the "K" button. But at the same time, the current time is also reset, the value of which is restored with the "H" and "M" buttons. If in the process of operation the clock will run away or, conversely, lag behind, you can correct their course by adjusting the frequency of the generator with capacitor C1. The design of the watch case is arbitrary. It is advisable to cover a rectangular hole in its front wall through which indicators are visible with organic glass or blue or green film. It may happen that the luminous elements of the indicator digits of the mounted clock will flicker, and the piezoceramic bell will emit incessant erratic sounds. The reason for this is the excitation of the microcircuit. To eliminate this phenomenon, it is necessary to block the power supply circuit of the microcircuit with a ceramic capacitor with a capacity of 0,047 or 0,068 μF, connecting it between its terminals 12 and 15 or in parallel with the output of the voltage regulator (in Fig. 2 - capacitor C7 shown by dashed lines). The second minor drawback found in the operation of the watch is the audible sound of an unplugged piezoceramic bell. Its cause is insufficient smoothing of the current ripple at the output of the full-wave rectifier VD3 - VD6. To eliminate this phenomenon, it is necessary to replace the electrolytic capacitor C3 or connect a capacitor with a capacity of 5 ... 10 μF in parallel to it for a voltage of at least 50 V. The most significant drawback of the clock assembled from the parts of the Elektronika-1 radio designer is the large unproductive energy loss of the power source. The fact is that the transistor converter, together with a voltage stabilizer that feeds the microcircuit and the anode circuits of sign indicators, consumes a current not exceeding 12 mA from a 15 V source, and the filaments of all indicators - no more than 190 mA. . Total rounded 200 mA or, in terms of power, 2,4 watts. But in order for the voltage on the filaments of the indicators to be within 0,85 ... 1 V, they are powered through resistor R18, which extinguishes an excess voltage of about 11 V. So it turns out that most of the power consumed by the clock from the power source is useless is spent on heating this resistor. How to avoid these unproductive losses of power supply energy? If the clock is supposed to be operated in a car and powered by its battery, then an additional secondary winding can be provided on the transformer TS1 of the converter, designed to directly power the filaments of sign indicators from it. Resistor R18 turns out to be an extra part that is removed.
To power the clock at home, it is necessary, of course, to use a power supply unit designed for separate power supply of the circuits of the microcircuit and the filaments of the indicators, which will also eliminate the resistor R18. The calculation of network power supplies has been repeatedly described in the Radio magazine and VRL collections (see, for example, B. Ivanov's article "Homemade Power Supply" in the VRL collection, No. 84).
Machine for thinning flowers in gardens
02.05.2024 Advanced Infrared Microscope
02.05.2024 Air trap for insects
01.05.2024
▪ section of the site Medicine. Selection of articles ▪ article Our brother Isakiy. Popular expression ▪ article editor-in-chief. Job description ▪ article Electronic game library. Encyclopedia of radio electronics and electrical engineering
Home page | Library | Articles | Website map | Site Reviews
www.diagram.com.ua |


 Leave your comment on this article: