|
|


 Arabic
 Bengali
 Chinese
 English
 French
 German
 Hebrew
 Hindi
Hindi Italian
 Japanese
 Korean
 Malay
Malay Polish
 Portuguese
 Spanish
 Turkish
 Ukrainian
 Vietnamese
|
ENCYCLOPEDIA OF RADIO ELECTRONICS AND ELECTRICAL ENGINEERING About connecting apartment calls. Encyclopedia of radio electronics and electrical engineering
Encyclopedia of radio electronics and electrical engineering / Calls and audio simulators If the old apartment bell is out of order or just tired of the monotony of the sound signal, it is tempting, keeping up with the times, to install an electronic one instead - industrially made or homemade. The cost-effectiveness of such devices even allows the use of autonomous battery power for them. At the same time, direct replacement of an old call with a new one is often impossible. The author of the article shares his experience in solving emerging problems. In order to understand the difficulties that arise when connecting an electronic bell to the wiring available in the apartment, we will consider the schemes according to which conventional electric bells powered by 220 V are connected during the construction of the house. The most common variant shown in Fig. 1a. It is simple, but quite dangerous, since the button contacts are directly connected to the network. According to the four-wire circuit shown in Fig. 1,b, increased security bells were connected with a magnetic system arranged in such a way that the supply of mains voltage to one of the windings does not yet cause an audible signal. To make it sound, it is necessary to close the circuit of an additional, control winding, isolated from the network, with the button. The voltage between the open contacts of such a call is no more than a few tens of volts. If the "ringing" wiring in the apartment is made according to this scheme, replacing the bell with any other usually does not cause difficulties.
Unfortunately, the four-wire circuit is quite rare. Even if it was such when building a house, over the years and even decades that have passed since then, many residents, trying to get rid of the shortcomings of a "safe" call - constant energy consumption and quite noticeable, especially at night, acoustic noise (hum), managed to replace calls in their apartments as usual, modifying the connection scheme accordingly. It can be difficult to understand the alterations, since most of the wiring (it is shown in Fig. 1, a and b with dashed lines) after repeated repairs is hidden under the wallpaper, or even immured into the wall. Only wire ends connected directly to the bell and button are available. Acquaintance with the publications of the magazine "Radio", concerning electronic apartment calls, and the study of the range of these products on the market allows us to conditionally divide them into two groups. The first group includes those whose signal sounds at the moment the supply voltage [1-4] is supplied from a low-voltage galvanic battery or accumulator. The bells of the second group are permanently connected to the power supply, the signal is turned on by a short circuit of a special control circuit [5-7]. Direct connection of low-voltage power supply and electronic bell control circuits to the network is unacceptable. In order not to search for old or lay new wires, you can make a switch that provides the necessary galvanic isolation between the newly installed electronic bell and the network. On fig. 2 shows a diagram of one of its simplest options. The principle of operation of the switch is simple. When you press the SB1 button, a current rectified by the diode bridge VD1 flows through the emitting diode of the optocoupler U1, the value of which depends on the mains voltage and the value of the resistor R1. The opened phototransistor of the optocoupler closes the power supply or bell control circuit. A signal sounds.
The AOT127A optocoupler was chosen because of its high sensitivity (in most cases, a current of 5 mA is sufficient in the emitting diode circuit) and a significant, up to 70 mA, output current. It is capable of switching the power supply circuit of almost any electronic call at a voltage of up to 30 V. It is possible, of course, to use other optocouplers. To switch a high-resistance control circuit, an optocoupler can even be a diode one, for example, AOD130A. When connecting the switch to the bell, the polarity indicated in the diagram must be observed. It is easy to determine by measuring the voltage between the wires coming from the bell and connected to the output circuit of the switch with a voltmeter. If the emitting diode of the optocoupler requires a current of more than 6 mA, it is advisable to replace the quenching resistor R1 with a capacitor, similar to what is done in the device considered below. Its scheme is shown in Fig. 3. Instead of an optocoupler, a small-sized relay K1 (RES10, RES15, RES49, RES55, RES60, RES80 or other similar) is installed here. Relay contacts can switch bell circuits with any polarity. The element that limits the current through the relay winding is capacitor C1. Its capacitance is chosen in direct proportion to the actuation current of the applied relay based on the ratio of 1 μF - 60 mA [8, 9]. The capacitor must be small, suitable for operation on an alternating voltage of 220 V, 50 Hz. For example, K73-16 or K73-17 - for a voltage of at least 400 V. Resistor R1 limits the charging current of the switch capacitors at the moment the SB1 button is pressed, capacitor C2 is discharged through resistor R1 in the pauses between pressing it.
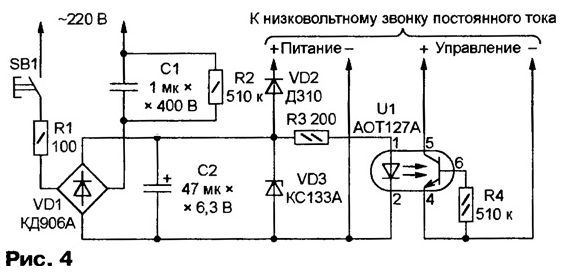
Unfortunately, when managing an electronic call with a mains-powered switch, one of the main advantages of self-powered power is lost - the call does not work if the network is out of order. Resigned to this, you can go further and power the call itself from the network by assembling the switch according to the diagram shown in Fig. 4. The device is universal, one or another of its outputs is activated as needed. The voltage generated to power the bell depends on the VD3 zener diode used. When indicated on the KS133A circuit, it is approximately 3 V, since part of it falls on the VD2 diode. If you need a different voltage, you should set the appropriate Zener diode VD3 and capacitor C2 to the desired voltage. The current of the emitting diode of the optocoupler U1, if necessary, is adjusted by selecting the resistor R3.
After pressing the button SB1, the voltage across the capacitor C2 increases relatively slowly. For this reason, the current through the emitting diode of the optocoupler U1 reaches a value at which the output circuit of the optocoupler is closed, after the supply voltage has become sufficient to bring the bell into operation. For most calls, this is normal. But there are also those that, as a result of applying the supply voltage with an open control circuit, reproduce only the first of the melodies available in the memory, regardless of the position of their switch. In such cases, in order to take advantage of the full functionality of the call, it is necessary to feed it from a galvanic battery, without turning it off between the signals. And with the voltage generated by the switch when the button is pressed, this battery can be recharged, which will significantly increase its service life. As an apartment, you can successfully use electromagnetic calls from old telephones. Their sound is quite pleasant, the volume is adjusted mechanically. Exotic lovers can also keep the body of the phone by placing it on the wall or on the nightstand by the door. Although the ringing voltage in the telephone line is variable with a frequency of 25 Hz, the bell works normally also from the mains frequency of 50 Hz. The amplitude value of the voltage applied to the winding should not exceed 120 V, while the current consumption is 5 ... 20 mA. Connect a telephone call according to the diagram shown in Fig. 5. The diode bridge VD2 with the zener diode VD1 included in the diagonal form a two-way voltage limiter at a level of ± 120 V. If the bell winding heats up noticeably, the zener diode of the limiter must be replaced with another one with a lower voltage, for example, from the D817 series.
The limiter can also be made without the VD2 bridge. It is enough to connect a circuit of two identical zener diodes connected in anti-series in parallel with the bell winding. Suitable and special limiting diodes for the desired voltage. Sometimes it may be necessary to increase or decrease the operating current by changing the capacitance of the capacitor C1 accordingly. When connecting a call according to any of the above schemes, at least one of the contacts of the SB1 button is directly connected to the network. But in the one shown in Fig. 6 of the four-wire modification of the previous circuit, quenching capacitors (C1 and C2) are present in the circuit of each button contact. Therefore, if you accidentally touch any contact, the current flowing through the human body will not exceed the permissible value [10]. Capacitors must be designed for an operating voltage of at least 600 V. It is unacceptable to increase their capacitance, so the HA1 bell must be sensitive enough.
A diagram of a high-security switch suitable for managing any calls, both low-voltage and those intended for power from a 220 V network, is shown in fig. 7. When choosing relay K1 for it, you should pay attention that the current of holding its armature in the triggered state does not exceed the safe value for a person, and that the contacts withstand the voltage and current necessary for the call. The RES-54 relay with a trip current of 3 ... 4 mA, a holding current of less than 1 mA, and a winding resistance of 4 kOhm has proven itself to be excellent. Each group of its contacts allows a load of up to 0,1 A. Using such a relay, it is possible to reduce the capacitance of the quenching capacitors, and with it the dangerous current of closing the contact of the SA1 button to the ground, more than twice as compared with the switch according to the circuit shown in fig. 6.
The operation of the device requires some explanation. In the initial state, the voltage limited by the zener diode VD1 on the filter capacitor C3 is slightly higher than the operating voltage of relay K1. Therefore, when the button SB1 is pressed, the relay is activated and the capacitor C3 is discharged through its winding. However, the "recharge" of the current flowing through the circuit C1-VD2 - the winding of the relay K1 - the closed contacts of the SB1-C2 button remains sufficient to keep the relay in the triggered state. After the button is released, the current through the relay winding stops, after 1 ... 2 s the voltage on the capacitor C3 reaches its previous value and the switch is ready for re-operation. If necessary, you can reduce the capacitance of capacitors C1 and C2 by a factor of two, replacing the half-wave rectifier with a full-wave bridge. This will double the average value of the current flowing through the coil of relay K1 when the SB1 button is pressed. To reduce the load on the contacts of the relay or button that closes the AC bell circuit, you can connect capacitor C1 in parallel with the HA1 bell, as shown in Fig. 8. The reactance of the capacitor at a frequency of 50 Hz must be equal and opposite in sign to the inductive component of the resistance of the bell winding. The capacitor of the required capacity is selected according to the minimum readings of the temporarily connected AC milliammeter PA1.
Due to the small number and small size of the elements, you can use the free space always available inside the electronic call to accommodate any of the switches. It should be emphasized that correctly assembled and serviceable switches are practically safe in operation, but when installing and setting them up, one should not forget that some elements are directly connected to the network. Care must be taken and protective measures against electric shock must be taken. Attention! None of the devices proposed in the article can be considered completely safe. According to existing standards, in addition to limiting the current, it is required that the insulation between connected and not connected to the network circuits withstand a voltage of several kilovolts, and the distance between the wires related to them, hanging or printed, exceeds the permissible value (usually at least 5 mm ). Literature
Author: A. Lataiko, Dnepropetrovsk, Ukraine
Artificial leather for touch emulation
15.04.2024 Petgugu Global cat litter
15.04.2024 The attractiveness of caring men
14.04.2024
▪ Virtual reality cures fear of heights ▪ No.1 N3 Advanced tablet phone with 21 MP camera ▪ Apes cloned for the first time ▪ MATSUSHITA ELECTRIC introduced fur lamps
▪ section of the site Electrician in the house. Article selection ▪ article Pediatric surgery. Crib ▪ article Why is Singapore called a fine city? Detailed answer ▪ article Helmet-shaped orchid. Legends, cultivation, methods of application
Home page | Library | Articles | Website map | Site Reviews
www.diagram.com.ua |


 Leave your comment on this article: