|
|


 Arabic
 Bengali
 Chinese
 English
 French
 German
 Hebrew
 Hindi
Hindi Italian
 Japanese
 Korean
 Malay
Malay Polish
 Portuguese
 Spanish
 Turkish
 Ukrainian
 Vietnamese
|
ENCYCLOPEDIA OF RADIO ELECTRONICS AND ELECTRICAL ENGINEERING Car lamp controller. Encyclopedia of radio electronics and electrical engineering
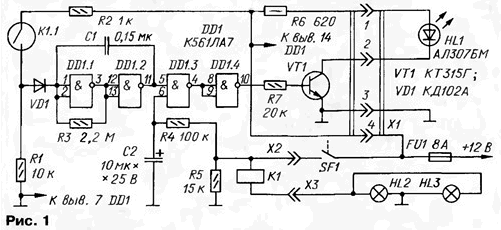
Encyclopedia of radio electronics and electrical engineering / Automobile. Electronic devices The sensor in control devices is usually a current-measuring resistor [1; 2], which often limits their use, for example, due to a large voltage drop in the controlled circuit and useless power dissipated by the current sensor. In [3], these shortcomings are minimized, but by complicating the circuit. In the proposed device, a different method of controlling the current in the lamp circuit is used - a relay method that uses the hysteresis of an electromagnetic relay and the starting current pulse inherent in an incandescent lamp when it is turned on. This method allows you to reduce the voltage drop in the controlled circuit to a negligible value. Unlike the devices described earlier, it indicates three states of the lamps. Schematic diagram of the brake lamp controller is shown in fig. one.
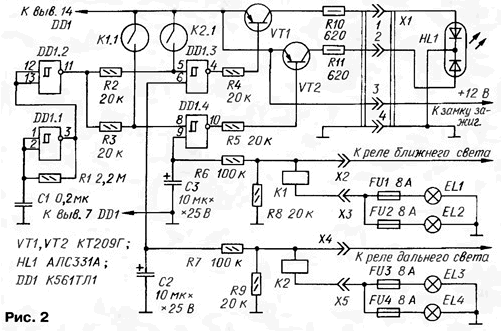
The current sensor is a reed relay K1, the winding of which is connected in series to the circuit of signal lamps HL2, HL3. A controlled pulse generator with a period of about 1.1 s is assembled on the logic elements DD1.2, DD0,5. Element DD1.3 is an electronic switch that operates with a time delay. Transistor VT1 is a current amplifier loaded with LED HL1. When the brake pedal is not pressed and the SF1 contacts associated with it are open, only the pulse generator works. The lower input of the DD1.3 element according to the diagram is connected to a common wire through resistors R4, R5. Therefore, pulses do not pass through this element and its output is high. The low level at the output of the inverter DD1.4 closes the transistor VT1 - LED HL1 is off. When you press the brake pedal, it closes the contacts SF1 and the current from the on-board network begins to flow through the fuse FU1 of the car, the winding K1 and the lamps HL2, HL3. If at the same time both lamps are working, then their starting current, although brief, but almost ten times greater than the nominal one, leads to reliable operation of relay K1. The contacts K1.1 of the reed switch close, the supply voltage from the resistive divider R1R2 through the diode VD1 is supplied to the combined inputs of the DD1.1 element and blocks the operation of the generator, and a high level is fixed at the output of the DD1.2 element. The values of the resistors R1, R2 are chosen in such a way that, at a relatively small current through the reed switch, the voltage taken from the divider corresponds to a unit level. After a short period of time, the current in the lamp circuit will decrease to the nominal value, but the reed switch K1.1 remains closed, since the rated current of the two lamps HL2 and HL3 is greater than the release current of relay K1. After the time Τ=R4-C2 (about a second) from the moment the brake pedal is pressed, the voltage across the capacitor C2 increases to the switching threshold of the element DD1.3. A low level appears at the output of the element, and a high level appears at the output of the inverter DD1.4, opening the transistor VT1. The LED turns on, indicating the health of the lamps. After releasing the pedal, the lamps HL2, HL3 go out, the winding K1 is de-energized and the reed switch opens, allowing the generator to work. Its pulses periodically close the transistor VT1, so the LED blinks. Capacitor C2 is discharged through resistor R4, relay winding K1 and lamps HL2, HL3, and after a while, when the voltage across it decreases to the switching threshold of element DD1.3, the pulses will stop passing to the input of the inverter. The transistor will not open, the LED will turn off. This display mode allows you to make sure that the lamps are working and at the same time that the generator is working. If, when pressing the brake pedal, one lamp turned out to be faulty (the contact in the cartridge burned out or the contact was broken), then the relay will first work under the action of the starting current of the second - serviceable - lamp. But the rated current of one lamp is not enough to keep the reed switch closed, and it opens. This process lasts several tens of milliseconds and does not affect the display in any way. After a second, the DD1.3 element will start to pass pulses from the generator and the LED will start flashing. When the brake pedal is released, the process is similar to that discussed above. In the event that both lamps fail one after another or their power circuit is broken, the reed switch will not close at all and the LED will flash, as with one faulty lamp. It happens that the FU1 fuse blows (or its contacts are oxidized). Then the supply voltage is not supplied to the device and when you press the brake pedal, the indication is completely absent. Of course, an incandescent lamp can also be used as an indicator, but the reliability of the LED is higher. The controller uses resistors S2-ZZN, OMLT; capacitors - ceramic, KM-5, KM-6, and oxide - K50-35. Instead of K561LA7, the KR1561LA7 chip is suitable. We can replace the KT315G transistor with any silicon np-p transistor, for example, KT501G-KT501E. Reed switch - KEM-1; its winding contains nine turns of copper winding wire PEV-2 0,8. If a smaller reed switch is used, then the number of turns must be reduced, approximately 1,5 ... 2 times. The socket of the X1 connector is RGN-1-3, and the insert is RSh2N-1-17. When replacing a connector with another, it is necessary to take into account the conditions of its operation - vibration and shock, high humidity and temperature. X2 and XZ connectors, designed for high current, are used for automobiles; it is permissible to replace them with screw terminals. It is better to replace the AL307M LED with a brighter L-53SRC-E from Kingbright. Structurally, the device is assembled on a circuit board wired with MGTF wire with a cross section of 0,07 mm2 and placed in a suitable insulating box. Connector block X1 is fixed in its end part. For the manufacture of the relay, a tube is selected or glued from thick paper so that the reed switch can easily enter it. Rigid tubes are also suitable from any other non-magnetic material - metal or plastic. A winding is wound around the tube so that the axial length of the winding is somewhat less than the length of the reed switch bulb, and coated with epoxy glue. The conclusions are shortened to 8 ... 10 mm and serviced for mounting on the board. The conductors connecting the relay winding to the vehicle's electrical system must have a cross section that is not less (or better, a little more) than that of the wires to the lamps. The controller should be placed as close as possible to the SF1 contacts and securely fastened. The LED is mounted on the dashboard. When adjusting the controller connected to the car, the necessary sensitivity of the relay is selected by moving the reed switch relative to the winding. The reed switch in the optimal position is fixed in the tube with drops of glue. On fig. 2 shows a diagram of a similar controller for dipped and main beam lamps.
Here, on the Schmitt trigger DD1.1, a clock generator with a repetition period of about 0,5 s is assembled, on the trigger DD1.2 - a buffer inverter, on triggers DD1.3, DD1.4 - electronic switches with a time delay, similar to those used in the previous device, for high and low beam channels, respectively. Transistors VT1, VT2 serve as current amplifiers, their load is a two-color LED HL1. Current sensors K1 and K2 are the same reed relays. The generator operates continuously, regardless of the state of the reed switches K1.1 and K2.1. Since both channels are the same, we will consider the operation of only the low beam channel. From the pulse generator, the clock sequence through the inverter DD1.2 is supplied to the upper input of the trigger DD1.4 according to the scheme. Since the lower trigger input is connected to the housing through the relay winding K1, fuses FU1, FU2 and dipped beam lamps EL1, EL2 (as well as through resistors R5, R8), its output is high. Transistor VT2 and LED HL1 are off. When the lamps EL1, EL2 are in good condition, turning on the dipped beam leads to the appearance of voltage at the X2 connector, as a result of which they turn on. From their starting current, the relay K1 is activated, and through the reed switch K1.1, the voltage is supplied to the upper input of the Schmitt trigger DD1.4, but the trigger does not change its state. After establishing the rated current through the lamps, the reed switch remains closed. After about a second, the voltage on the capacitor C3, increasing, reaches a high level at the input of the trigger, it switches to the zero state. Transistor VT2 opens and turns on the "green" LED assembly HL1. When the dipped beam is turned off, the supply voltage at connector X2 disappears, the lamps turn off, the relay opens the reed switch K1.1. Pulses from the generator periodically switch the trigger DD1.4, which causes the LED to flash green. After some time, the capacitor C3 will be discharged and the Schmitt trigger DD1.3 will again block the passage of pulses from the generator to the base of the transistor VT2. If at least one lamp (or its fuse) burns out, turning on the low beam will cause a green signal to flash after a second, indicating to the driver that a malfunction has occurred. This controller cannot accurately indicate the reason for the absence of the glow of the lamp. The second channel - high beam - works similarly, only the "red" LED of the HL1 assembly serves as an indicator. Instead of KT209G, any transistor from the KT503 series can be used in the device. It is advisable to replace the ALC331A LED with an analogue of increased brightness, for example, L-59EGC from Kingbright. With the KR1561TL1 chip, which allows a higher supply voltage, the controller will work more reliably. Relays K1 and K2 use the same KEM-1 reed switches. The relay winding K1 contains 6 turns, and K2 has 2 turns, wound with PEV-2 wire with a diameter of at least 1,5 mm. The circuit board of the device is placed in an insulating box of suitable dimensions, which is fixed near the high and low beam relay of the car. Relays K1 and K2 are connected to the electrical system with four flexible insulated wires with a cross section of at least 2 mm2. The operation of the described controllers on a VAZ-2106 car for several years has shown their reliability and ease of use. Literature
Author: V. Khromov
Artificial leather for touch emulation
15.04.2024 Petgugu Global cat litter
15.04.2024 The attractiveness of caring men
14.04.2024
▪ Glasses will always be clean ▪ Images are projected onto clean air ▪ Dental prosthesis in the service of linguistics ▪ Multi-standard DVD-RAM/-RW/-R recorder
▪ site section Electric meters. Article selection ▪ article Family in modern society. Basics of safe life ▪ article How did forks appear? Detailed answer ▪ article Actinidia delicacy. Legends, cultivation, methods of application
Home page | Library | Articles | Website map | Site Reviews
www.diagram.com.ua |

 Leave your comment on this article: