|
|


 Arabic
 Bengali
 Chinese
 English
 French
 German
 Hebrew
 Hindi
Hindi Italian
 Japanese
 Korean
 Malay
Malay Polish
 Portuguese
 Spanish
 Turkish
 Ukrainian
 Vietnamese
|
ENCYCLOPEDIA OF RADIO ELECTRONICS AND ELECTRICAL ENGINEERING STM32 microcontrollers and debug boards for them. Encyclopedia of radio electronics and electrical engineering
Encyclopedia of radio electronics and electrical engineering / Ham Radio Technologies For many years, radio amateurs have been using eight-bit microcontrollers from the PIC and AVR families. They are popular due to their low price, detailed documentation, ease of programming and ease of installation. However, quite often there are cases when the power of such a microcontroller is not enough to solve the task. The simplest example is a frequency meter or signal generator on a microcontroller, where the maximum measured or generated frequency directly depends on the speed of processing or outputting information. In addition to speed, eight-bit microcontrollers have other limitations, for example, in many AVR models there is only one hardware serial port, which does not allow receiving information from an external device and simultaneously sending the results of its processing to the consumer. Not to mention such "banal" things as displaying information on a graphical indicator, which requires large resources, both speed and memory. After analyzing a number of such limitations, the author came up with the idea of switching to microcontrollers of the STM32 family. For example, consider two microcontrollers of the same price category - STM32F103C6 and ATmega328P. Table 1
Their comparative parameters are given in table. 1. The comparison results are even somewhat surprising. A 32-bit microcontroller is not only more powerful than an eight-bit microcontroller in almost all respects, but it is also cheaper. Of course, soldering a microcontroller with a pin pitch of 0,5 mm at home is not so easy. Fortunately, in most cases this is not required - there are many varieties of debug boards with microcontrollers of the STM32 family on the market, sufficient for various applications. Let's consider them in more detail. STM32F4-DISCOVERY This board (it is shown in Fig. 1) is perhaps the most convenient for beginners to study STM microcontrollers. First, it has a large set of peripherals. In addition to the microcontroller, the board has a microelectromechanical accelerometer, a microphone, an audio DAC, two USB connectors, a button and four LEDs.
The microcontroller outputs are brought to the contact pads for mounting pin connectors at the left and right edges of the board, which makes it easy to connect all the necessary external devices to them. The STM32F407VGT6 microcontroller installed on the board has very good parameters: 1 MB of FLASH memory, 192 KB of RAM and a clock frequency of 168 MHz. And finally, the board is equipped with a built-in ST-LINK/V2 debugger, which can be used to debug programs not only on the microcontroller on the board, but also on microcontrollers of the same family that are on other boards. Switching to them is performed using a removable jumper and an SWD connector. The price of the board is about 800 rubles, which can be considered quite acceptable. STM32F103RBT6 Development Board The next interesting option is a debug board with an STM32F103RBT6 microcontroller (Fig. 2).
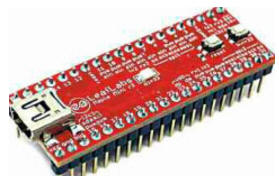
It is somewhat weaker than the one installed on the previous board - a clock speed of 72 MHz, 128 KB of FLASH memory and 20 KB of RAM, but the peripherals are very interesting. 320x240px 2.8' TFT touchscreen, built-in USB port for PC communication, SD memory card slot, 32768Hz clock quartz, real-time clock battery compartment and ST-LINK connector for debugging programs. The price of this board is also about 800 rubles, but it should be noted that there is no built-in debugger on it. To download programs, you must either purchase a separate ST-LINK debugger, or use the STM32F4-DISCOVERY board discussed above instead Maple Mini The external similarity of this board (Fig. 3) with the well-known Arduino modules is striking. And this is no coincidence.
The Maple Mini board was designed as a replacement for the Arduino Nano. The programming language and development environment for Arduino-installed microcontrollers of the AVR family have been adapted to the STM family. See http://leaflabs.com/docs/maple-q uickstart.html for more information on the Maple IDE programming language and development environment. The development board has an STM32F103CBT6 microcontroller running at 72 MHz, with 128 KB of FLASH and 20 KB of RAM, which is undoubtedly more than in any Arduino module. And the greater plus is that the development environment has not changed much. Separately, we note that despite the miniature size, Maple Mini provides a very diverse peripheral: 34 I / O lines, two SPI interface channels and two I2C, three serial ports. This allows you to successfully apply it in various amateur developments. Due to its small size, Maple Mini can be built directly into the device under development. The original Maple Mini board can be purchased for $35 on the original Maple Mini website. Another $5 will cost shipping. A copy of the board made in China will cost half as much. Software There are several options for development environments that can be used to prepare programs for microcontrollers of the STM32 family: - commercial IAR Embedded Workbench, AtollicTrueSTUDIO, Keil, etc. These full-featured products are quite expensive, with a license price of 1000 euros, but there are also free demo versions with a limitation on the amount of the program being developed, they are quite enough for most simple projects; - free Eclipse with ARM-GCC compiler requires non-trivial compiler setup before use. The only plus today is the ability to work not only in Windows, but also in Linux; - free CooCox IDE (CoIDE) based on the same Eclipse editor. Performs loading and debugging of programs via ST-LINK. Unlike the previous version, CoIDE does not require any special settings and works immediately after installation. This option is the most convenient and should be used. Let's use CooCox IDE to create an example program for the STM32F4-DISCOVERY board that implements the classic for the first program for any microcontroller blinking LEDs. There are four LEDs on the STM32F4-DIS-COVERY board, they are connected to the PD12-PD15 pins of the microcontroller. Let's make them flash alternately. Step 1. We launch the CoIDE development environment, create a project. From the dropdown list shown in Fig. 4, select the STM32F407VG microcontroller.
Step 2. As shown in fig. 5, select the components that will be used in the project. The main ones are GPIO (input-output), C Library (basic C language functions) and M4 Core (processor core functions). When one or another component is activated, CoIDE automatically copies the necessary files to the project folder, which is very convenient.
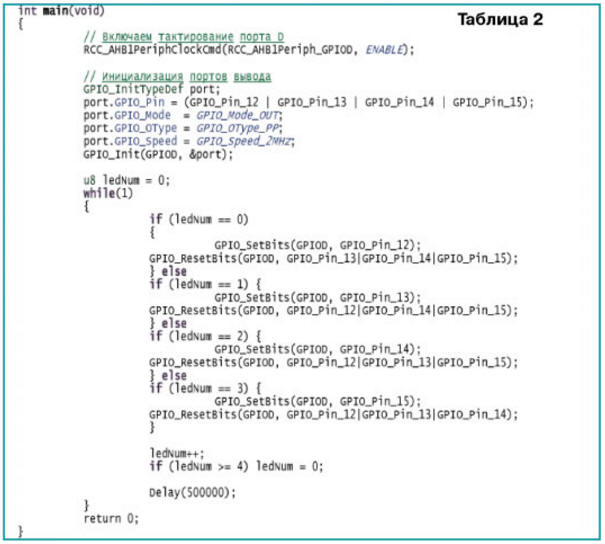
Step 3. Entering program text. It is quite short and is shown in Table. 2.
As you can see, everything is simple and obvious. Those who wrote programs for AVR microcontrollers will surely see familiar constructions - initialization of ports indicating the direction (input or output), the main loop in which the necessary actions are performed. In general, the syntax of the program is fully consistent with the C language, the literature on which is more than enough. There are also a lot of articles on programming for STM32 on the Internet. Many examples come with the development board and can be used as samples too. After entering the text of the program by pressing the on-screen button "Download to flash", it is loaded into the microcontroller. The LEDs on the board start flashing. Separately, it is worth noting the debugging capabilities - a breakpoint can be set anywhere in the program, you can run the program step by step, viewing the values of variables. Of course, this example is not perfect. For example, to control the blinking of LEDs, you can use timer interrupts, which frees up the main program loop for other tasks. Those who wish can deal with this on their own. Conclusion In general, after the first acquaintance, the microcontrollers of the STM32 family left a very pleasant impression. Everything turned out to be not so difficult, and the convenience of the development environment, the debugging process and a large number of standard functions even somehow reminded me of the transition from Ms DOS to Windows - the general points seem to be the same, but everything is much more convenient and functional. But the main disadvantage of this family for amateur development is still too small a step of conclusions. Designing and soldering a board with a lead pitch of 0,5 mm at home is a very non-trivial task. But at current prices, debug boards with already mounted microcontrollers are quite accessible to every radio amateur. Is it worth redoing everything to STM and 32-bit architecture? Of course not. There are tasks for which ATtiny is enough. But, for example, to analyze the spectrum in a homemade SDR receiver or to receive and transmit large amounts of information over a network, it is much more efficient to immediately use a powerful microcontroller so as not to run into a lack of memory or performance when improving the device. Author: D. Elyuseev
Artificial leather for touch emulation
15.04.2024 Petgugu Global cat litter
15.04.2024 The attractiveness of caring men
14.04.2024
▪ Samsung steps up its work in the digital camera market ▪ Toshiba Efficient Thin Film Organic Photovoltaic Module ▪ Vegetarianism could save millions of lives ▪ Reservoir bombarded with balloons ▪ This gum was chewed 5000 years ago
▪ section of the site Winged words, phraseological units. Selection of articles ▪ article by Edmund Husserl. Famous aphorisms ▪ article How is wax obtained? Detailed answer ▪ Capsicum article. Legends, cultivation, methods of application ▪ article Simple metronome. Encyclopedia of radio electronics and electrical engineering
Home page | Library | Articles | Website map | Site Reviews
www.diagram.com.ua |


 Leave your comment on this article: