|
|


 Arabic
 Bengali
 Chinese
 English
 French
 German
 Hebrew
 Hindi
Hindi Italian
 Japanese
 Korean
 Malay
Malay Polish
 Portuguese
 Spanish
 Turkish
 Ukrainian
 Vietnamese
|
ENCYCLOPEDIA OF RADIO ELECTRONICS AND ELECTRICAL ENGINEERING Fast battery charger
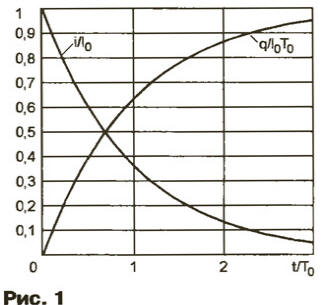
Encyclopedia of radio electronics and electrical engineering / Chargers, batteries, galvanic cells The device described in the article is designed for accelerated charging of Ni-Cd and Ni-MH batteries with an exponentially decreasing current. Its advantages include the ability to select a charging time ranging from 45 minutes to 3 hours, ease of manufacture and setup, no heating of the batteries at the end of charging, the ability to visually monitor the charging process, automatic recovery of the process when the power supply is turned off and then turned back on, and ease of use. The device can be used as a stand for measuring the charging and discharging characteristics of batteries. When charging with a large constant current (0.5 E or more, where E is the battery capacity), the battery begins to heat up after 75...80% charge, and Ni-MH batteries heat up more than Ni-Cd batteries [1]. After the battery is fully charged, the temperature increases rapidly [1], and if this process is not stopped in time, it ends in the battery igniting or exploding. The recommended charging termination temperature is +45 °C [2]. However, this criterion is only suitable as an emergency criterion: the combination of overcharging and overheating reduces the battery capacity and, therefore, shortens its service life. Reaching a certain voltage on the battery is also not a satisfactory criterion for the end of the process. The fact is that its value corresponding to a full charge is not known in advance, since it depends on the temperature and the "age" of the battery. An error of a few millivolts leads to the fact that the battery charging never ends or ends too soon [3]. When charging with a constant current, it is easy to control the charge - it is directly proportional to the duration of the process. In particular, its value can be set equal to the nominal capacity of the battery. But over time, its capacity decreases and at the end of its service life it is approximately 80% of the nominal value. Therefore, limiting the charge to the nominal capacity does not guarantee the absence of overcharging and overheating of the batteries and, therefore, cannot be the only criterion for the end of charging. The most difficult criterion for the end of the process is the moment when the battery voltage reaches a maximum and then begins to decrease. The maximum voltage on the battery corresponds to a full charge, but in [2] it is shown that it is a consequence of heating the battery during the charge recovery process. The maximum value is very small, especially for Ni-MH batteries (about 10 mV), so ADCs or voltage-to-frequency converters are used to detect it [2]. When charging a battery, the maximum voltage of its different elements is reached at different times, so it is advisable to control each of them separately. In addition, there are batteries with an anomalous charging characteristic in which this maximum is absent. In other words, monitoring only the voltage is not enough; it is also necessary to control both the temperature and the amount of charge passed through the battery. Thus, when charging a battery with a large constant current, it is necessary to control each of its elements according to several criteria, which complicates the charger. Only charging with a low current (not more than 0,2E) does not cause emergency overheating of the batteries even with a large recharge. In this case, the state of each element does not need to be monitored, the charger turns out to be very simple, but its disadvantage is also obvious - a long charging time. There are chargers in which the initially large charging current decreases over time [4-6]. In this case, it is also not necessary to monitor the status of each battery element. But in these devices there is no control of the amount of charge, and the achievement of a certain voltage is used as a criterion for full charge, which, as mentioned above, is not satisfactory. In [7] a charger is described in which the battery is charged as a capacitor from a constant voltage source through a resistor. In this case, the charging current should theoretically decrease exponentially over time with a time constant equal to the product of the equivalent battery capacity and the resistance of this resistor. In practice, the dependence of the charging current on time differs from exponential, since the equivalent capacitance and output resistance of the source change during the charging process. But even if we neglect this difference, the most important parameter - the charging time constant - is unknown, as a result of which it is impossible to control the charge passed through the battery. Therefore, charging ends again when a certain voltage is reached... In the proposed device, the charging current in the form of an exponentially decreasing pulse is chosen because it is easy to implement using the simplest RC circuit. It ends naturally, eliminating the need for a timer to turn off the batteries after a predetermined time, and the charge is limited even if the batteries are in the charger for a long time. It is essential that the charging current is generated by a current generator, so its value and form do not depend on the voltage on the batteries, or on the nonlinearity of their charging characteristics. During charging, the current through the batteries I decreases exponentially: I = l0exp(-t/T0), (1) where t is time; l0 - initial charging current; T0 is the charging time constant. In this case, each battery receives a charge q, which is estimated by the expression q = I0T0[1 - exp(-t/T0)] = (I0 - I)T0. (2) Graphs of dependences of I and q on time t are presented in fig. one.
It can be seen that during the time 0Т0,95 the charge reaches a value of 0I0Т0 and then approaches the value I0Т0. It is recommended to select the values of I0 and TXNUMX according to the formulas I0 \u0d nE, T1 \u1.2,3,4d 3 h / n, where n \uXNUMXd XNUMX. (XNUMX) The most convenient value is n = 1. The initial charging current in this case is equal to the electrical capacity E, the charging time is 3 hours (You can practically leave the batteries in the charger overnight, and by morning they will be fully charged). If this charging time is too long, the value of n is increased. At n = 2 it will be 1,5 hours with an initial charging current of 2E. This mode is suitable for Ni-Cd and Ni-MH batteries. Increasing n to 3 reduces the charging time to 1 hour, but the initial charging current increases to 4E. Finally, when n = 45, the charging time is reduced to 4 min, and the initial charging current is increased to XNUMXE. Values of n equal to 3 and 4 are acceptable for Ni-Cd batteries, since their internal resistance is low (less than 0,1 Ohm). As for Ni-MH batteries, their internal resistance is several times higher, so a high current can heat them up at the beginning of charging, which is unacceptable. Values of n greater than 4 are not recommended. You can choose I0 5% greater than that determined by formula (3). Then the exact charging time will be 3 h/n, and a further 5% recharge is insignificant. The principle of operation of the device is illustrated in Fig. 2.
A capacitor with a capacitance C1, pre-charged to a voltage U0l, is discharged through a current amplifier A1 with an input resistance Rin and a current gain Ki. The current in the input circuit of the amplifier Iin |P is determined by the expression lin = U0exp(-t/RinC1)/Rin. (four) The current in the output circuit of the amplifier I = Kilin charges the battery GB1: I = KlU0exp(-t/RinC1)/Rin = SU0exp(-t/RinC1), (5) where S = Ki/Rin is the slope of the amplifier gain, if it is considered as a voltage-to-current converter. Comparing (2) and (5), we have Т0 = RinC1, I0 = KU0/Rin = SU0.(6) It is convenient to choose U0 = 1 V, C1 = 1000 μF, then from (3) it follows that Rin = 3,6 MOhm/n, S = nE, Ki = SRin = 3600000E. (7) For example, with E = 1 Ah and n = 1 the following parameters should be: Rin = 3,6 MOhm, S = 1 A/V, K = 3600000 = 131 dB. The schematic diagram of the device is shown in fig. 3.
The current amplifier is assembled using op-amp DA2.1 and transistors VT2 and VT3. The op-amp supply voltage is stabilized by the DA1 microcircuit. The node on transistor VT1 controls the magnitude of this voltage. When it is normal, this transistor is open, current flows through the winding of relay K1, the contacts of relay K1.1 are closed, the LED HL1 lights up, signaling the normal operation of the device. Switch SA1 selects the charging mode: direct current (when its contacts are closed) or exponentially decreasing (when they are open). Resistors R2 and R3 form a voltage divider. The voltage across the motor of variable resistor R3 determines the charging current. In the “Constant” mode, this voltage is supplied to the non-inverting input of the op-amp through resistor R1 and the closed contacts of relay K1.1. Its output current is amplified by transistors VT2, VT3 and is set so that the voltages on resistors R11 and R5 become the same. The current gain K, = R5/R11 and with the ratings indicated on the diagram is approximately equal to 107, and the slope of the voltage conversion b tok S=1/R11=ZA/V. In the "Decreasing" mode (the contacts of the SA1 switch are open), the capacitor C2 with a capacity of 1000 μF is discharged through the resistor R5 with a time constant selected by formula (3). The exponentially decreasing current through this capacitor is amplified by the op-amp DA2.1 and transistors VT2, VT3 and charges the batteries connected to the X1 connector ("Output"). Diode VD2 prevents them from discharging when the supply voltage is turned off. Ammeter PA1 is used to control the current value of the charging current. Capacitor C5 prevents self-excitation of the device. Resistors R4, R8-R10 - current limiting. They protect the op-amp and transistor VT2 in emergency situations, for example, when the resistor R11 breaks or the transistor VT3 breaks down, preventing the failure of other elements. When the power is turned off in charging mode with a decreasing current, transistor VT1 closes and the relay opens contacts K1.1, preventing further discharge of capacitor C2. The HL1 LED goes out, signaling a power failure. When power is restored, transistor VT1 opens, relay K1 closes contacts K1.1 and battery charging automatically continues from the current value at which it was interrupted. The HL1 LED lights up again, signaling that charging has resumed. By pressing the SB1 button, you can briefly stop charging when removing the charging characteristics. In this case, capacitor C4 prevents network noise from penetrating the op-amp input. The device is assembled on a universal printed circuit board and housed in a housing measuring 310x130x180 mm. AA size batteries are placed in a trough on the top cover of the case. The contact sockets are made in the form of pieces of tape made of tinned sheet metal, which are pressed against the batteries by a spring from a standard compartment for an AA-size element. No current flows through the spring. It should be noted that commercially available plastic compartments are only suitable for currents not exceeding 500 mA. The fact is that the current flowing through the contact springs heats them up, and the batteries also heat up. Already at a current of 1 A, the springs heat up so much that they melt the wall of the plastic housing of the compartment, making its further use impossible. Transistor VT3 is installed on a finned heat sink with a surface area of 600 cm2, diode VD2 is installed on a plate heat sink with an area of 50 cm2. Resistor R11 is made up of three MLT-1 resistors connected in parallel with a resistance of 1 Ohm. All high-current connections are made with pieces of copper wire with a cross-section of 3 mm2, which are soldered directly to the terminals of the corresponding parts. The K1446UD4A (DA2) op amp can be replaced with a K1446UD1A chip or another of these series, but from the two op amps, you need to choose the one with the lower bias voltage. The second op-amp can be used as part of a temperature-sensitive bridge [8] for emergency shutdown of batteries in case of overheating during charging with direct current (no overheating of batteries was observed when charging with decreasing current). In the case of using other types of op-amp, it should be borne in mind that in this design its power supply is unipolar, so it must be operational at zero voltage at both inputs. The KR1157EN601A (DA1) microcircuit is replaceable by the stabilizer of this series with index B, as well as by the K1157EN602 series microcircuit, however, the latter has a different "pinout" [9]. Transistor VT1 - any of the KP501, VT2 series must have a static base current transfer coefficient h21E of at least 100. Transistor KT853B (VT3) is different in that its h21E exceeds 1000. Transistors of other types can be used as VT2, VT3, but the overall gain the current must exceed 100. Capacitor C2, which sets the charging time constant T0, must have a stable capacitance, not necessarily equal to the nominal one indicated in the diagram, since the required value of T0 is set during setup by selecting resistor R5. The author used a Jamicon oxide capacitor with a large voltage reserve (25 times). Relay K1 is a reed switch EDR2H1A0500 from ECE with a voltage and operating current of 5 V and 10 mA, respectively. A possible replacement is a domestically produced relay KUTS-1 (passport RA4.362.900). The PA1 ammeter must be designed for the maximum charging current (in the author’s version, the M4200 device for the current is used). Fuse FU1 is a self-resetting MF-R300 from BOURNS [10]. Setting up the device comes down to setting the required value of the charging time constant T0, selected according to formula (3). The resistance of resistor R5 is chosen equal to Rin according to formula (7), assuming that the capacitance of capacitor C2 is exactly equal to 1000 μF. Instead of batteries, a digital ammeter is included. Before turning on the power, both when charging batteries and when setting up the device, the variable resistor R3 slider is moved to the lower (according to the diagram) position and the contacts of switch SA1 are closed (this is necessary to discharge capacitor C2). Then turn on the power and, by moving the slider of resistor R3, set the initial current l0 to about 1 A. Next, SA1 is moved to the “Decreasing” position. After time T1 (approximately equal to T0), current i1 is measured. The adjusted resistance value of resistor R5* is calculated using the formula R5* = R5[ln(l0/I1)]. Finally, install resistor R5 with a resistance equal to this adjusted value. Before charging, batteries must be discharged to a voltage of 1...1,1 V in order to prevent them from overcharging and the manifestation of the memory effect [2]. If the batteries become hot during discharging, then before charging they should be cooled to ambient temperature (0...+30 °C [2]). Before connecting the batteries to the charger, you need to make sure that it is de-energized, the resistor R3 slider is in the lower (according to the diagram) position, and SA1 is in the “Constant” position. Next, observing the polarity, install the batteries, turn on the power and, using variable resistor R3, set the initial current l0 according to formula (3). After this, SA1 is switched to the “Decreasing” position, and after the ZTO time, the batteries are ready for use. To power the device, you need a voltage source from 8 to 24 V, which can be unstabilized. You can charge from one to ten cells at the same time. The minimum supply voltage, taking into account ripple, should be 2 V per cell plus 4 V (but within the specified limits). The device can be used as a stand for taking not only charging, but also discharging characteristics of batteries. In the latter case, the battery under test must be connected to the device in reverse polarity. The voltage on its electrodes must be constantly monitored with a voltmeter. It should not be allowed to change its polarity, so as not to cause emergency destruction of the battery. For this reason, it is not recommended to discharge a battery of several series-connected cells in this way, as it is possible to miss the moment of failure of the cell with the smallest capacity. Literature
Author: M. Evsikov, Moscow
Machine for thinning flowers in gardens
02.05.2024 Advanced Infrared Microscope
02.05.2024 Air trap for insects
01.05.2024
▪ Gardening is one of the best antidepressants ▪ Smartphone Gigabyte GSmart GX2 ▪ ODROID-GO Advance Retro Game Console ▪ New miniature PWM controller
▪ section of the website Audiotechnics. Article selection ▪ article There is neither Greek nor Jew. Popular expression ▪ article How much air is on Earth? Detailed answer ▪ Abacus article. Legends, cultivation, methods of application ▪ article Triangle connection. Encyclopedia of radio electronics and electrical engineering
Home page | Library | Articles | Website map | Site Reviews
www.diagram.com.ua |


 Leave your comment on this article: