|
|


 Arabic
 Bengali
 Chinese
 English
 French
 German
 Hebrew
 Hindi
Hindi Italian
 Japanese
 Korean
 Malay
Malay Polish
 Portuguese
 Spanish
 Turkish
 Ukrainian
 Vietnamese
|
ENCYCLOPEDIA OF RADIO ELECTRONICS AND ELECTRICAL ENGINEERING Automatic charging of galvanic cells and batteries with asymmetric current. Encyclopedia of radio electronics and electrical engineering
Encyclopedia of radio electronics and electrical engineering / Chargers, batteries, galvanic cells Readers are presented with two designs of chargers that differ in the amount of charging current, but have a single recovery method - asymmetric current. As you know, the recovery of galvanic cells and batteries is best done by charging with an asymmetric current. In this case, the charging current is 10 times greater than the discharge current, and the duration is two times shorter [1, 2]. The devices can be charged with long interruptions, for example due to a power failure. When power is applied, charging will automatically resume. Devices are not afraid of accidental short circuits of the output jacks. When storing batteries for a long time, devices can be used to keep them in a charged state. Charging is terminated automatically upon reaching the set voltage on the element being charged. The devices allow you to set within a wide range without instruments (with sufficient accuracy for practice) the charging and discharging current, as well as the charging termination voltage. First design designed for charging individual small batteries type D-0,1; D-0,25; D-0,55; TsNK-0,45; NGCC-1,8 or their imported counterparts and batteries made up of them, as well as galvanic cells of the type 316, 322, 343, 373, batteries made up of them, and batteries 3336, "Krona", "Korund", etc. . The number of simultaneously charged galvanic cells - 7 pcs., and rechargeable batteries - 9 pcs. Schematic diagram of the device is shown in Fig.1. It consists of a power supply on a transformer T1, a rectifier bridge on diodes VD1-VD4 and a filter capacitor C1.
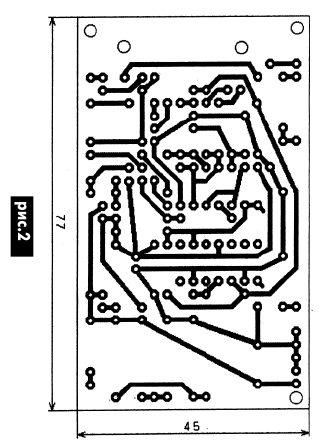
The charging current stabilizer is made on transistors VT2, VT4, together with the Zener diode VD9 and resistor R22, is a current source. The current value is regulated by resistor R18. The discharge current stabilizer is made on transistors VT1, VT5 and LED HL2, which simultaneously serves as a source of reference voltage supplied to the base of the transistor VT5, and an indicator of the discharge current. The discharge current is set by resistor R23. Charging current (in amps) usually corresponds to 0,1, and discharging - 0,01 of the capacity in amp-hours. For example, for cells 316, 332 or batteries of them, the charging current is 60 mA, and the discharge current is 6 mA, for cells 343, 373 or batteries of them, 200 mA and 20 mA, respectively. A rectangular pulse generator that generates pulses of charging and discharging currents is assembled on elements DD1.2 and DD1.3, resistors R9, R10, diodes VD7, VD8. The ratio of the duration of high-level pulses and pauses between them is 1:2. The duration of the pulses is determined by the resistor R9, and the duration of the pause depends on the resistor R10. The oscillation frequency is about 100 Hz (depending on the capacitor C5). The generator starts when there is a high level signal at the output of the element DD1.1. On the integral comparator DA1, a unit for automatically turning off and on charging (AOD and AVZ) is made. It compares the reference voltage (taken from the R4 engine) of the VD5R2 or VD6R3 parametric stabilizer supplied to the inverting input with the varying voltage on the divider R20, R21, proportional to the voltage of the charged galvanic cell or battery, which is applied to the non-inverting input DA1. Since the reference voltage is taken from another parametric stabilizer VD5R2, for the first range (1 ... The AOS voltage is set by resistor R6. For convenience, the limits of the automation unit are divided into two ranges: 4 ... 1 V and 6 ... 6 V. The range is selected by switch SA13. Device operation. When connecting a discharged galvanic cell or battery, the voltage at the non-inverting input DA1 is less than the reference at the inverting one, which is set by resistor R4. Therefore, the open-collector output (pin 9) of the comparator is set to a low-level voltage, and the output of the inverter DD1.1 is set to a high-level voltage, which allows the pulse generator to work. At the same time, a high-level signal appears at the output of the DD1.3 element, opening the key transistors VT2 and VT3. The opening of the transistor VT2 will lead to the appearance of voltage on the zener diode VD9, which means that the transistor VT4 will open, and a pre-set charging current will flow through the element being charged. At the same time, a low-level signal from the DD1.2 output will go to the lower input of the DD1.4 element according to the circuit. At the top input of the element DD1.4 according to the scheme, there is a high level signal, which is maintained until the end of charging. As a result, a high level signal appears at the output of the DD1.4 element, which will close the transistor VT1. Accordingly, the transistor VT5 will also close, which makes it impossible for the discharge current to flow. With the appearance of a low-level signal at the output of element DD1.3, transistors VT2 and VT3 will close. The charging current will stop. At the same time, a high-level signal will be received from the output of the DD1.2 element to the lower input of the DD1.4 element (the high-level signal continues to be received at the upper input), which will open the transistors VT1 and VT5. This allows the discharge current to flow. The arrival of the next positive pulse from the output of the generator will make it possible for the charging current to flow and the impossibility of discharging. Thus, the charging-discharging process will continue until the voltage on the element being charged reaches the value of the operation of the AOD unit. As a result, the comparator will switch, and at its output the voltage will change from low to high. The output of the inverter DD1.1 will be a low level signal. The generator will stop working. For this reason, a low level signal will be set at the output of DD1.3. Transistors VT2 and VT4 will close and charging will stop. Due to the operation of the AOD unit and the generator stop, a high-level signal is set at the output of element DD1.2, and hence the lower element DD1.4 according to the circuit. Since there is a low-level signal at the output of the DD1.1 element, and therefore at the top input of the DD1.4 element according to the circuit, the output of the DD1.4 element will be a high-level signal. VT1 and VT5 will be closed. Discharging will stop. When the charging pulse current flows, the voltage on the galvanic cell or battery rises to a value exceeding the threshold for the operation of the AOD unit, which will lead to premature shutdown of the charger. This can cause significant undercharging. To prevent this from happening, the voltage on the charged element is compared with the reference one in the absence of charging current, which allows charging to full capacity. At the time of charging, the transistor VT3 opens and shunts the resistor R21, which increases the switching threshold of the comparator. When discharging occurs, transistors VT2 and VT3 are closed. The comparator compares the actual voltage on the element being charged with the reference voltage. When the set voltage value of the AOS is reached, the charging current will completely stop. The discharge current through the divider R20, R21, VT3 and the transistor VT5 is insignificant and for one element of 1,5 V is only 10 μA, and for 7 elements - 200 μA. However, as the chemical processes complete, the voltage on the electrochemical cell or battery being charged slowly decreases, which will trigger the comparator, as the reference voltage exceeds the output voltage. To exclude such inclusion of the charger, a resistor R7 is introduced, which serves to create a hysteresis - the difference between the voltages of the AOD and AVR. The hysteresis ensures that the charger restarts when the battery is discharged more deeply. When choosing the value of R7, it should be taken into account that when the voltage on the discharged element is less than the AVZ voltage, the generator starts when the charger is connected to the network, regardless of whether the element being charged is connected before or after the device is connected to the network. When the voltage on the discharged element is greater than the AVZ voltage, the generator starts only when the device is connected to the network, followed by the connection of the element or battery. For stable operation of the comparator and generator, their power supply is stabilized by the VD5R2 parametric stabilizer. Diode VD10 prevents discharging through the charger in the event of a power failure in the supply circuit. Capacitors C3 and C4 protect the device from false operation when impulse noise occurs in the network. The device is assembled on a printed circuit board made of foil fiberglass with a thickness of 1,5 mm. The drawing of the board is shown in Fig.2.
On the front panel there are LEDs HL1-HL3 and variable resistors R4, R18 and R23 with scales printed on them, as well as a switch SA1. The VT4 transistor is mounted on a heat sink plate 40×25 mm in size and 6 mm thick. TS-10-ZM1 was used as a network transformer, any other one that provides a voltage of 16 ... 18 V on the secondary winding at a current of at least 250 mA is also suitable. Details. The device does not contain homemade or hard-to-find parts. Switch SA1 can be of any type. Capacitors C1, C2 type K50-6; C3-C5 type KM. Fixed resistors of the MLT type, variables PP3-11 of group A. The DD1 microcircuit is replaceable by K561LE5, the DA1 comparator is K521CA3. Instead of the green LED AL307V, AL307G, AL307NM will do, and instead of the red LED AL307B - AL307K, AL307BM. Diodes D9B can be replaced by D220, D311, KD503, KD509 with any letter index. Instead of the KS512A zener diode, two KS156A connected in series can be used. The KT3102B transistor will replace the KT315G or KT3117 with any letter index, and instead of the KT3107B transistor, you can use the KT361 with any letter index, except for A. KT814B can be replaced with KT814V, G, KT816B, G. Adjustment. If the installation was completed without errors, then when the device is connected to the network, the HL1, HL2, HL3 LEDs should light up. You can observe the pulses by connecting an oscilloscope to the output of the DD1.3 generator. By temporarily increasing the value of the capacitor C5 to 1 ... 2 μF, the generator frequency is reduced and fluctuations can be seen by the blinking of the LEDs. Then AOP is established. This will require a stabilized power supply with a load current of at least 0,2 A and a voltage of 0 ... 15 V. The output voltage is controlled by a DC voltmeter. First of all, the limits for regulating the voltage of automation are set in the range I (6 V) and II (13 V). To do this, solder the cathode of the VD10 diode. Resistor R15 is soldered from R14 and DD1.3, and resistor R12 is from element DD1.4 and connected to the negative power terminal. At the same time, VT5 opens, and VT3 closes, which corresponds to the discharge mode, when the element being charged is monitored. The resistor slider R23 is set to the lower position according to the diagram in order to reduce the load on the stabilized unit. We supply voltage from the auxiliary source to the sockets XS1, XS2. Resistor R4 is first placed in the uppermost position, and then in the lowermost position according to the circuit, and, applying voltage from the source, make sure that the voltage regulation limits of the automation are within 1 ... 6 V (I range) and 6 ... 13 B (II range). The lower voltage limit of the AOD is specified by a selection of resistors R5 and R6 (depending on ranges I and II, respectively), and the upper limit is determined using VD5 and VD6. The comparator switches correspond to the voltage value at which the HL3 LED goes out (the HL2 LED is constantly on during the adjustment). Next, the scale of the resistor R4 "Voltage of the end of charging" is calibrated in both ranges by supplying various voltages from the auxiliary power supply. For this, the engine of the resistor R4 is transferred to the upper position according to the scheme. The voltage corresponding to the setting value is set at the output of the auxiliary source, and the slider of the resistor R4 is slowly moved to the lower position according to the diagram. The AOZ voltage corresponds to the position of the resistor R4 slider, at which the HL3 LED goes out. By slightly increasing the voltage, and then gradually decreasing it, the actual switching threshold of the comparator is checked. If necessary, these operations are repeated. By smoothly reducing the voltage of the source, the voltage of the AVZ is checked by the lighting of the HL3 LED. If necessary, select the resistor R7. After that, they proceed to the graduation of the scale of the resistor R23 "Discharge current". By connecting a milliammeter with a measurement limit of at least 1 mA into the gap of the XS20 socket and the positive output of the auxiliary power source, voltage is applied and, by changing the resistance of the resistor R23, the scale is calibrated according to the value of the current through the device. Then calibrate the scale of the resistor R18 "Charging current". To do this, R14 is soldered from DD1.3 and connected to the positive output of the stabilizer (+12 V). Connect a milliammeter with a limit of at least 10 mA to the cathode of the VD2 diode and the XS200 socket and, by changing the value of the resistor R18 according to the value of the current through the device, calibrate the scale. After that, the resistors R12, R14, R15, as well as the VD10 diode, are soldered into place. During operation, the AOS voltage is set at the rate of 1,7 ... 1,9 V per one charged galvanic cell and 1,35 ... 1,45 V per one battery. Second design Designed to charge car batteries. Its difference lies in the use of a powerful stabilizer for charging current and discharging current. The schematic diagram is shown in Fig.3. Let's just focus on some of the features. Resistor R4 increases the hysteresis. A simple powerful current source is used as a charging current stabilizer [3]. However, power is supplied to the operational amplifier through VT2, since when Uin = 0, a small output voltage remains at the output of DA2, which leads to the opening of the transistor VT4.
The electronic device is assembled on a printed circuit board made of one-sided fiberglass 1,5 mm thick. The drawing of the board is shown in Figure 4. Diodes VD1-VD4 and transistor VT6 are installed on heat sinks with an area of at least 100 cm2, transistor VT4 is installed on a heat sink with an area of at least 200 cm2.
Transformer T1 serial TN-61220 / 127-50 or another with a voltage on the secondary winding of 15 ... 18 V at a current of 7 ... 8 A. Transformer T1, capacitor C1, resistors R18, R23, diodes VD1-VD4, VD5, as well as transistors VT4 and VT6 are mounted separately. Variable resistors R15, R19 and R22, as well as LEDs HL1, HL3 are placed on the front panel. Details. Diodes D231 can be replaced by D243, D245, KD213A and others for a current of at least 5 A. Capacitors C1, C2 of type K50-6, K50-16. Instead of the D818E zener diode, you can use the KS191 zener diode with any letter index. Resistor R18 type C5-16MV, R20 type PEV15. We will replace the K553UD2 operational amplifier K153UD2 or KR140UD18. It is important that the input voltage range is up to the positive supply voltage. Power circuits are made with copper wire with a cross section of at least 0,75 mm2. Establishment is similar to the first design. They start with the automation unit (AOZ and AVZ). For this, the VD10 diode cathode, the R10 resistor are soldered from the DD1.4 element and the R13 resistor from the R12 resistor and the DD1.3 element. Resistors R10 and R13 are connected to the negative power wire. Resistor R22 is placed at the bottom, and resistor R19 at the top according to the position diagram. A stabilized source is connected to the output terminals with a load current of at least 0,5 A and an output voltage of 10 ... 15 V. The output voltage is controlled by a DC voltmeter. The required voltage value is supplied (14,2 ... 14,8 V) and the R19 slider is slowly rotated to the lower position according to the diagram until the HL3 LED goes out. This value is noted on the scale R19 "Voltage of the end of charging". Then, gradually reducing the voltage of the source, they check that the device is turned on at 12,4 ... 12,8 V (if necessary, select R4, R5). After that, the scale of the resistor R22 "Discharge current" is calibrated. To do this, a milliammeter for a current of 0 ... 500 mA is included in the gap between the positive terminal and the auxiliary power source and, by changing the value of the resistor R22, the required current is set and the scale is calibrated. Next, calibrate the scale of the resistor R15 "Charging current". To do this, the resistor R12 is soldered from the DD1.3 element and connected to the positive wire of the +12 V voltage regulator. The battery is connected to the minus of the charger with a negative terminal. An ammeter with a measurement limit of at least 5 A is connected to the cathode of the VD10 diode and to the positive wire of the battery. Turn on the device and, by changing the value of the resistor R15, set the required current and calibrate the scale. After that, the diode VD10, resistors R10, R12 and R13 are restored. The discharged battery is connected to the device. Then the required charging and discharging current is set, as well as the AOD voltage, and then the device is connected to the network. If desired, you can enter an LED for incorrect battery connection. References:
Author: N.I. Mazepa
Machine for thinning flowers in gardens
02.05.2024 Advanced Infrared Microscope
02.05.2024 Air trap for insects
01.05.2024
▪ Memory chip based on magnetoresistive structures ▪ Smart lens monitors glucose levels ▪ Crosswords help keep your mind clear
▪ section of the site History of technology, technology, objects around us. Article selection ▪ article Everything is back to square one. Popular expression ▪ Liji Chinese article. Legends, cultivation, methods of application ▪ article Flasher on solar cells. Encyclopedia of radio electronics and electrical engineering ▪ article A simple HF band regenerator. Encyclopedia of radio electronics and electrical engineering
Home page | Library | Articles | Website map | Site Reviews
www.diagram.com.ua |


 Leave your comment on this article: