|
|


 Arabic
 Bengali
 Chinese
 English
 French
 German
 Hebrew
 Hindi
Hindi Italian
 Japanese
 Korean
 Malay
Malay Polish
 Portuguese
 Spanish
 Turkish
 Ukrainian
 Vietnamese
|
ENCYCLOPEDIA OF RADIO ELECTRONICS AND ELECTRICAL ENGINEERING The LED lawn light includes electrical appliances. Encyclopedia of radio electronics and electrical engineering
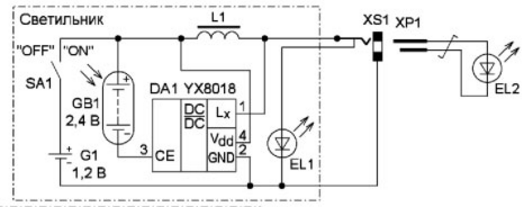
Encyclopedia of radio electronics and electrical engineering / Lighting Today in stores you can buy stand-alone LED lawn lights. In most cases, each such lamp contains a solar battery, a battery (Ni-Cd with a nominal voltage of 1,2 V) and a pulse boost voltage converter on a specialized microcircuit, from which the lighting LED is powered. The battery and solar battery are connected to the input circuits of the microcircuit, and the LED is connected to its output circuit. In the daytime, when the solar battery generates energy, the microcircuit connects the battery to it and it is charged. With the onset of darkness, the voltage of the solar battery decreases, the battery charging stops and the voltage converter turns on. Thus, the solar battery, in addition to the source of electricity, is also used as a light sensor. The lower the cost of such a lamp, the smaller, as a rule, the area of the solar battery (and hence its power), battery capacity, brightness and duration of the LED. The price of cheap lamps does not exceed 40 rubles. Such lamps often fail, because they are not highly reliable, and they are operated outdoors. There are also mechanical failures or battery failure. In this case, correct elements will be useful in other amateur radio devices. In addition, a serviceable luminaire or its parts, due to its low cost, can be used in various amateur radio designs. For example, "force" him at night to provide emergency lighting to the front door, staircase or veranda. And if you modify such a lamp by adding a few radio components, it will be able to control lighting or other devices with mains power. At the same time, its main function will be preserved. A prerequisite for the operation of lawn lamps - they must be placed in a place that is illuminated by the sun for the longest possible time. Otherwise, charging the battery from the solar panel will be difficult. Therefore, such lamps should not be installed indoors. To ensure battery charging and lighting, such as verandas, the lamp must be placed outdoors, and the lighting LED should be installed indoors. To do this, the LED can be unsoldered from the board and then connected to it with a cable of the required length. But you can install a socket on the lamp body and connect an external lighting LED to it. On fig. 1 shows a diagram of a lawn lamp and its refinement for this option.
XS1 socket and XP1 plug can be used from headphones. Since the conversion frequency is several tens of kilohertz, it is desirable to use a "twisted pair" as a connecting cable. As noted above, the lamp itself is placed in a place well lit by the sun. But at the same time, light from other lighting devices should not fall on it. To protect against atmospheric precipitation, it is advisable to close the upper part of the lamp with a solar battery with a lid, which can be made from a transparent colorless plastic bottle.
In order for the lawn lamp to be able to control lighting fixtures or other loads powered by the mains, it is being finalized in accordance with the diagram in Fig. 2. The total load power must not exceed 20 W, for example, it can be a low-power incandescent lighting lamp or a compact fluorescent lamp (CFL). The XS1 jack and its corresponding XP1 plug can be any that provide an unambiguous connection option (a headphone jack will do). Diode VD1 - any low-power small-sized pulse. A triac optocoupler U2 is installed in the body of the XS1 power outlet, into which the switched load is connected. Since the nominal supply voltage of the emitting diode of the optocoupler is about 1,2 V, so that a direct current from the battery does not flow through it, the voltage of which may exceed the above value, a VD1 diode is installed in the lamp. Therefore, during battery charging, no current flows through this diode and the optocoupler emitting diode. With the onset of darkness, the voltage converter is turned on, and voltage pulses are formed at the output of the microcircuit (pin 1), which feed the lighting LED EL1. The amplitude of the pulses depends on the type of LED used and is approximately equal to 3 ... 3,3 V. When the XP1 plug is connected, the output pulse current flows through the diode VD1 and the emitting diode of the optocoupler U1, while the amplitude of the voltage pulses decreases to 1,8.2 V, therefore LED EL1 practically does not consume current (maybe its barely noticeable glow). Since the frequency of the supply pulses is hundreds of times greater than the frequency of the supply network, the phototriac of the optocoupler will open at the beginning of each half-cycle and the supply voltage will be supplied to the load.
The appearance of the device is shown in fig. 3. According to the scheme of fig. 2, the lamp of the Wolta Solar trademark was finalized with a solar battery size of 25x25 mm and a Ni-Cd battery with a capacity of 300 mAh. The duration of continuous operation of the device at night depends on the capacity and state of charge of the battery. Please note that not all lamp models are equipped with a switch that disconnects the battery. Therefore, it may need to be installed.
In order to be able to connect a load of greater power to the device, it is necessary to additionally introduce a triac VS1 and two resistors (Fig. 4). Additional elements are also placed in the socket housing. If the triac is not installed on a heat sink, the load power should not exceed several tens of watts, with an effective heat sink, the load power can reach several hundred watts. If you use a block containing a socket and two switches, and modify the circuit in accordance with Fig. 5, it is possible to implement both automatic mode and manual switching on and off of lighting.
In the absence of a triac optocoupler, a pulse transformer can be used to galvanically isolate the lamp from the mains. A variant of such a scheme is shown in Fig. 6. In this case, when the XP1 plug is connected to the XS1 socket, the standard L1EL1 circuit is disconnected from the microcircuit output (pin 1) and the primary winding of the T1 transformer is connected.
The pulses of the secondary winding open the triac VS1, and the mains voltage is supplied to the load. The pulse transformer is wound on a ring magnetic circuit from the CFL transformer and contains two identical windings of ten turns of wire PEV-2 0,2 ... 0,3. The windings are wound on opposite sides of the magnetic circuit. Author: I. Nechaev
A New Way to Control and Manipulate Optical Signals
05.05.2024 Primium Seneca keyboard
05.05.2024 The world's tallest astronomical observatory opened
04.05.2024
▪ WiMAX Infrastructure Development Platform ▪ SHARP Announces Millionth Contrast LCD Display ▪ The mobile phone recognizes the owner by gait ▪ Efficient quantum dot solar panels
▪ section of the site Audio and video surveillance. Selection of articles ▪ article Apparent figures. Encyclopedia of visual illusions ▪ article Parker. Job description ▪ Thomson effect article. Encyclopedia of radio electronics and electrical engineering
Home page | Library | Articles | Website map | Site Reviews
www.diagram.com.ua |


 Leave your comment on this article: