|
|


 Arabic
 Bengali
 Chinese
 English
 French
 German
 Hebrew
 Hindi
Hindi Italian
 Japanese
 Korean
 Malay
Malay Polish
 Portuguese
 Spanish
 Turkish
 Ukrainian
 Vietnamese
|
ENCYCLOPEDIA OF RADIO ELECTRONICS AND ELECTRICAL ENGINEERING Code lock. Encyclopedia of radio electronics and electrical engineering
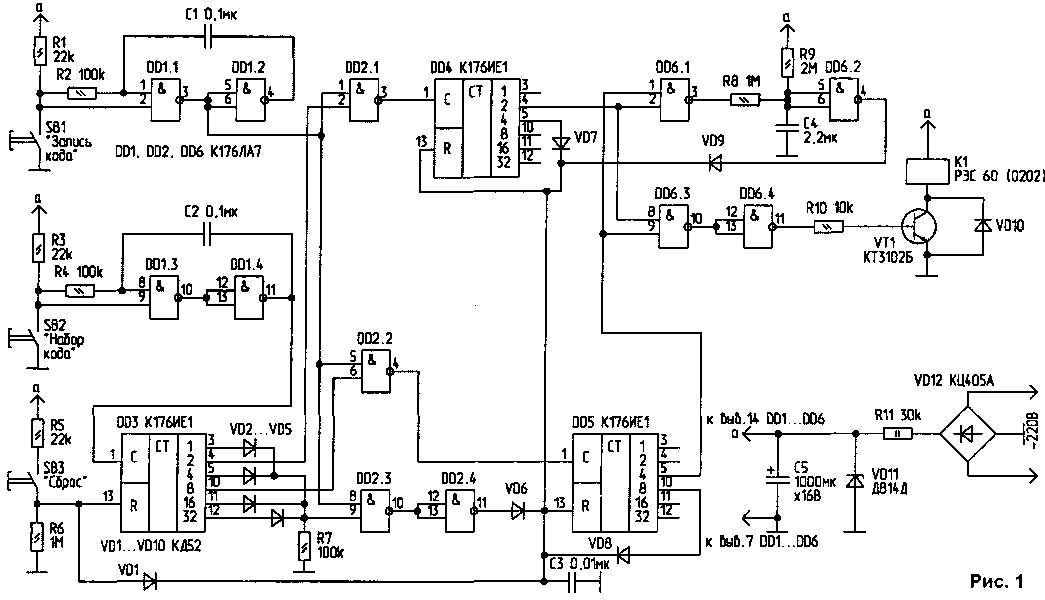
Encyclopedia of radio electronics and electrical engineering / Security devices and object signaling The proposed version of the electronic combination lock differs from similar three-button locks in simplicity and increased secrecy. Recording the code after it is dialed is carried out not by a single, but by pressing the corresponding button multiple times, and it is different for different codes. The scheme of the code lock is shown in Fig.1. It includes buttons: SB1 - code entry, SB2 - code entry, SB3 - reset, and on the elements R1, R2, C1, DD1.1, DD1.2 and R3. R4, C2. DD1.3. DD1.4 circuits are assembled to suppress contact bounce [1]. The DD3 counter has an encoder - the code is set by the appropriate switching of the outputs of the DD3 counter; outputs not involved in the code through the diodes VD2...VD5 using the elements DD2.3, DD2.4, VD6 form a "reset" signal to the inputs R of the counters DD4, DD5 in case of incorrect code entry. Elements DD2.1, DD2.2 are designed to write code to counters OD4, DD5. Diodes VD7, VD8 generate a "Reset" signal at the inputs R of counters DD4, DD5 in case of incorrect code entry. Elements of DD6.1. R8, R9, C4, DD6.2, VD9 form a "reset" signal delayed by 4 s. The delay is necessary for the actuator to operate. Elements DD6.3, DD6.4 open the transistor VT1 with a correctly typed and entered code. Relay contacts K1 switch the actuator. The power supply, consisting of VD12, R11, VD11, C5 (without a network transformer with a quenching resistor), is built according to the traditional scheme.
The code lock works as follows. First, you need to briefly press the SB3 button, while a high level appears at the inputs R of the counters DD3, DD4, DD5 - and the counters are reset. Then, by pressing the SB2 button, the code is entered according to the switching outputs of the counter DD3. In this case, the SB2 button must be pressed twice so that a high level appears on pin 4 of the counter DD3, and the remaining outputs must be low. Now the button SB1 is necessary to write to the counter DD4 signal from pin 4 DD3. To do this, the SB1 button must be pressed twice, and a high level will appear at pin 4 of the counter D04. Then again, with the SB2 button, the code is entered into DD3 by pressing it six times, while a high level will appear at pin 10 of the DD3 counter. Then, with the SB1 button, you need to enter the signal into DD5, for this it is pressed four times, and a high level appears at pin 5 of the DD5 counter. From the outputs of the counters, high levels are fed to pins 1, 2 and 8, 9 of the elements DD6.1, DD6.3. As a result, a high level appears at pin 11 of the DD6.4 element, which opens the transistor VT1. Relay K1 is activated, contacts K1.1 are closed, including the actuator. At pin 3 DD6.1 is set low. Capacitor C4, charged to the supply voltage through resistor R9, is slowly discharged through resistor R8. As soon as the voltage at C4 and at pins 5, 6 of the DD6.2 element reaches a low level, a high level is set at pin 4 of the DD6.2 element, which resets the counters DD4, DD5. Transistor VT1 closes, contacts K1.1 open. As an actuator, you can use a ready-made electromagnet of the MIS1100E43 type, which provides a traction force of 1.5 kg and a stroke of the working part of 15 mm. The actuator control scheme is shown in Fig. 2 [2].
Since the code lock is powered by a 220 V network without a step-down transformer, the device must be adjusted from an additional power source (10 ... 12 V). By selecting C4, achieve the required holding time of the electromagnet. In standby mode, the combination lock consumes 5 mA. During operation, the code lock consumes 40 mA (excluding the current consumed by the actuator with an electromagnet). Details and construction Buttons SB1...SB3 can be of PKNB-1 type. Chip K176LA7 is replaced by K561LA7. The KD522B diode is replaced by any of the KD520 series. KD521. Transistor KT3102B is replaced by KT315B. Diode block KTS405A is replaced by KTS407A or four diodes suitable for voltage. Zener diode D814D can be replaced with D814V, D814G. Relay K1 - RES60 (0202). The device must be placed in a metal case and fixed on a fixed door leaf or jamb indoors. Buttons SB1 ... SB3 must be brought out, connected to the device with conductors of minimum length. The sign "housing" (common wire) is used only to simplify the graphics of the circuit. Do not connect the common wire to the device case or ground it. Change the code by changing the switching of the outputs of the counters DD3, DD4, DD5 and changing the buttons SB1 ... SB3 in places. Literature
Author: M.Churuksaev, Kachkanar, Sverdlovsk region, RL 4/99; Publication: N. Bolshakov, rf.atnn.ru
Artificial leather for touch emulation
15.04.2024 Petgugu Global cat litter
15.04.2024 The attractiveness of caring men
14.04.2024
▪ Girls' brains develop faster ▪ Immunity of pregnant women reacts to the sex of the child ▪ New properties of black holes ▪ Mobile phones will last 10 times longer
▪ section of the site Normative documentation on labor protection. Article selection ▪ Parmenides article. Famous aphorisms ▪ article Who are vertebrates? Detailed answer ▪ article Swimming with a torpedo pump. Personal transport ▪ article How to choose a wind generator. Encyclopedia of radio electronics and electrical engineering ▪ article Coin from banknotes. Focus secret
Home page | Library | Articles | Website map | Site Reviews
www.diagram.com.ua |


 Leave your comment on this article: