|
|


 Arabic
 Bengali
 Chinese
 English
 French
 German
 Hebrew
 Hindi
Hindi Italian
 Japanese
 Korean
 Malay
Malay Polish
 Portuguese
 Spanish
 Turkish
 Ukrainian
 Vietnamese
|
ENCYCLOPEDIA OF RADIO ELECTRONICS AND ELECTRICAL ENGINEERING Cabinet speakers for acoustic design of the car interior. Encyclopedia of radio electronics and electrical engineering
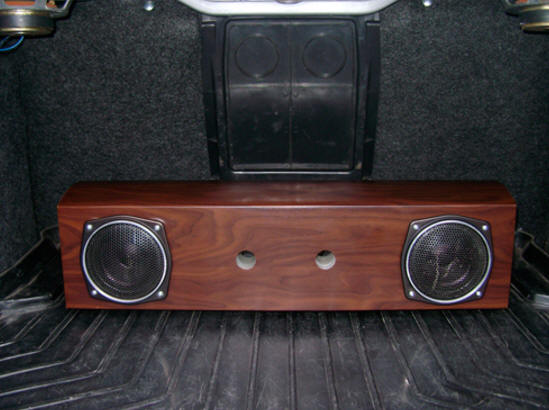
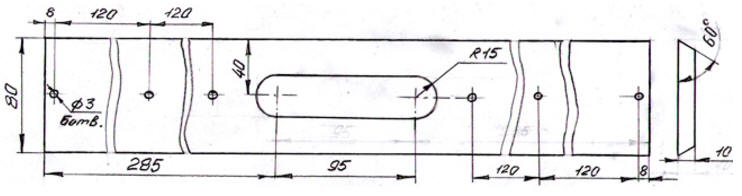
Encyclopedia of radio electronics and electrical engineering / Speakers The theme of acoustic design of the car is very popular. The developers of most vehicles do not pay due attention to it. The size of regular seats for speakers is usually limited to 10 - 13 cm, acoustic design is practically absent, so the lower frequencies are not reproduced efficiently enough. And if in sedan-type bodies it is possible to increase the efficiency of the heads at low frequencies by installing them in the rear panel, provided that the radiation from the front of the diffusers is directed to the passenger compartment, and the rear to the luggage compartment, then the station wagon, combi, hatchback, minivan and etc. are deprived of the possibility of such acoustic design. In the latter case, cabinet speakers are indispensable. The overall dimensions of such systems, based on the design features of vehicles, should be as small as possible. In the article "Small-sized loudspeaker" [1], the author O. Saltykov proposed the design of an acoustic system with a phase inverter, an internal volume of 8,5 liters, using low-frequency heads 6GD-6 or 10GD-34 (we will not consider the high-frequency link). The so-called "Saltykov cubes" are quite common in amateur radio literature and on Internet sites to this day. Among its positive design features, it should be noted weak standing waves inside the case, which eliminates the need to muffle its walls. Petrov A. A. in his book "Sound circuitry for radio amateurs" [2] modernized the development of O. Saltykov. Leaving the former internal volume, the dimensions of the phase inverter port, he used a drop-shaped case in cross section (a similar design by A. Petrov was published in Radio No. 12, 2001 under the name "Small-sized three-way loudspeaker"), thereby further minimizing the so-called standing waves. The described acoustics is designed for small rooms. It is inconvenient to use it in cars. However, it is not at all difficult to make a similar one (Fig. 1) for a car.
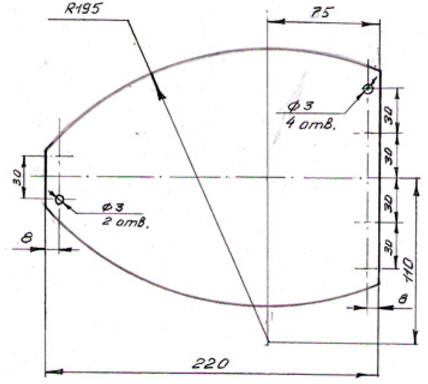
Available materials such as 16 mm chipboard, 3 mm fiberboard and 10 mm plywood are used to manufacture the speaker cabinet. Prepare parts for the frame from chipboard according to the drawings shown in fig. 2. For cutting, at home, it is convenient to use an electric jigsaw, which provides for changing the angle of the cutting element. This will make it possible to cut the workpieces c and d at an angle of 60º, which will reduce the complexity of work on rounding the edges. Cutting must be carried out carefully, slowly, do not cross the marking line. Irregularities after cutting (do not touch the edge with an angle of 60º, about it later) are removed using a board with coarse sandpaper, focusing on the markings. To reduce the complexity of work, it is good to use a power tool - a grinder (grinder). In the details, in the indicated places, holes are drilled for screws with a diameter of 3 mm. In the holes it is necessary to make recesses for the heads of the screws (sweat).
Assembling the frame The joints of the parts are smeared with "Nairit" glue (Fig. 3) or, closest to it, 88. Withstand 20 - 30 minutes. Reapply glue. After holding for 5 - 10 minutes proceed to the assembly. To do this, twist both sidewalls to the front wall with screws with a diameter of 3 mm and a length of 40 mm. Screws must be with countersunk heads. Then screw the back wall. Next, the partition, as shown in Figure 4, and leave the product to dry for 24 hours.
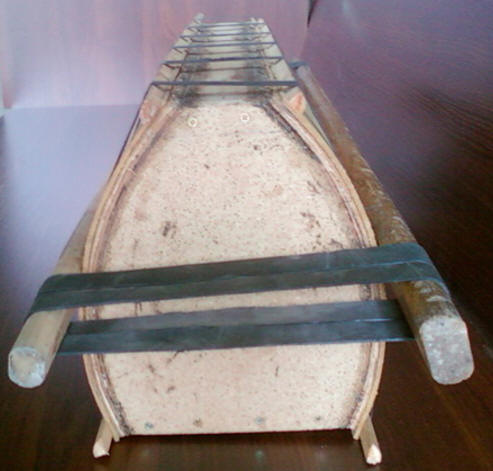
After the glue dries, they start rounding the edges cut at an angle of 60º. First, border lines are drawn on the details, to which it is necessary to remove the material, this is important, no matter what to remove the excess. Fix the product in a yew horizontally in one of the halves of the front or back part. This helps to maintain the integrity of the structure during work. Using a board with coarse sandpaper, the surface of half the length of the edge of the fixed part of the part is brought to a surface without crossing the marking line. Next, fixing the next half of the part in a yew, we finish the remaining share of the edge. After that, we turn the frame over and in the same order we bring the opposite edge. We do the same with the other part. For the manufacture of the lower and upper walls, 3 pieces are cut out of fiberboard, 670 mm thick, with dimensions of 245 x 8 mm. There are 4 blanks for each wall. To form a stable bend, with a radius of 195 mm, one of the surfaces is wetted with water using foam rubber or a piece of fabric. Withstand from 30 minutes to 1 hour. At the same time, uniform wetting is monitored. If necessary, dried places are additionally moistened. Next, apply the part to a suitable cylindrical surface with the wet side out and tie it with four rubber bands cut from the old passenger car chamber, evenly spaced over the entire surface. Wooden blocks 10 x 10 mm thick (window bead) are placed on the edges of the workpiece under the rubber bands - fig. 5. On the cylinder (barrel), you can bend 2 blanks at once, placing them symmetrically. To give the desired shape and complete drying, at an ambient temperature of + 15º, 24 hours is enough.
Bonding the first two wall blanks Places of gluing are smeared with "Nairit" glue and kept for 20 - 30 minutes. Re-lubricate. Withstand 5 - 10 minutes and glued to the frame. To prevent slipping of parts, each is baited with a pair of small nails. Ring-shaped rubber bands, cut from the same chamber of a passenger car, fit the frame with glued blanks, placing bars under the rubber bands on the edges of the walls. The middle of the walls is pulled together with the help of 2 bars, with cross-sectional dimensions of 40 x 40 mm, and rubber bands as shown in Figure 6, a.
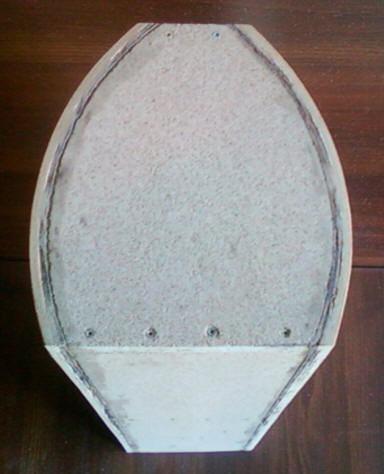
a)
To reinforce the structure, in the places of gluing (free from screeds) of the first two blanks (lower and upper) with the sidewalls of the frame, screws with countersunk heads are screwed in (after making a sweat) with a diameter of 3 mm and a length of 10 - 15 mm. The distance between the screws is kept within 50 mm. After the glue dries, after 24 hours, remove the gum and bars. Screws are also screwed along the perimeter of the frame and in the area of \uXNUMXb\uXNUMXbthe partition. When screwing in, do not use much force. It is convenient to use an electric screwdriver, while setting the minimum or close to the minimum torque. After that, the protruding edges of the walls are cut off with a knife. The blade of the knife should be sharp and hard enough. It should not bend, as the cut will be uneven. The subsequent gluing of the wall blanks is somewhat simplified. Copiously coat both surfaces with glue. Withstand 5 - 10 minutes, fold and tighten. Screws are not used. It is recommended to fasten the edges of the walls near the sidewalls with carnations for a tighter fit. After gluing all the parts, the cut edges are treated with a board with medium grit sandpaper. The edges of the sidewalls are also aligned in the front and rear planes (Fig. 6, b). The wall thickness was 13 mm. Curved shapes (in this case, the bottom and top walls) allow for an exceptionally rigid and durable hull structure. For systems with a power of 10 ... 35 W, the thickness of flat walls is usually 10 ... 12 mm (plywood, chipboard). It is preferable to make the body walls, especially the front and back, narrower and longer (p. 151 - 152 [3]). Glue "Nairit" was not chosen by chance, because, after drying, it has the property of elasticity, which has a positive effect on the vibration damping of the structure. According to the drawings of Figure 7, linings are made of plywood 10 mm thick. On the front wall, using the front pad as a template, markings are made for the holes for the speakers. Cut them out in the following order. Drill a hole for the cutting part of the jigsaw. A cut is made along the diameter. This is important, otherwise we will not be able to remove the cut out part from the case. Having set the jigsaw saw at an angle of 75º, make a cut along the circumference. The inside of the hole should be wider than the outside. We break the cut out element in half and take it out of the case. Lubricate the front and rear edges of the lower and upper walls with glue and incubate for 20 - 30 minutes. Then glue is applied to the front and back of the body and the lining, after 5 to 10 minutes, is connected. They are tightened with elastic bands and twisted with screws with a diameter of 3 mm with countersunk heads. In places of gluing with sidewalls, screws 40 mm long are used, the rest 20 mm. Leave the product for 24 hours. After drying, the edges of the linings are brought flush with the walls. Again, we adhere to the lines drawn on the overlays for reference. The edges must be strictly straight (Fig. 8).
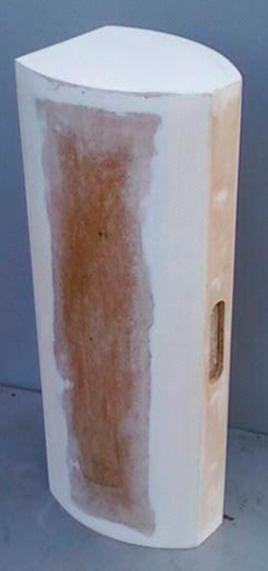
The work on the phase inverter port deserves special attention. In the acoustics of A. Petrov, it is made from the back. The use of such a design of a phase inverter in a car, with a dense arrangement of the rear wall of the speaker with body planes, will be ineffective. Therefore, install phase inverter ports on the front side. To do this, in the center of the front part of the body, 275 mm recede from the outer edges of the sidewalls and, using a compass, mark out for diameters of 32 mm. Cut holes with a jigsaw or drill with a ballerina. Following the recommendations of O. Saltykov, phase inverter ports are made with a length of 60 mm, an inner diameter of 30 mm and an outer diameter of 32 mm, from an aluminum pipe from a vacuum cleaner. The pipe is glued into a hole made for it with a diameter of 32 mm with epoxy glue. Other possibilities are not ruled out, of course. The product is sanded with medium-grained sandpaper, removing irregularities and roughness, covered with nitro-lacquer. Not earlier than after 24 hours, they are passed with fine-grained sandpaper. Then, with a universal two-component automotive putty, slightly diluted with solvent 647, bumps, chips, and junctions of parts are puttied. Excess putty, after hardening, is removed with a board with medium grit sandpaper. If necessary, repeat the process. After making sure that there are no defects, grind the putty places with fine-grained sandpaper. After that, the product is again covered with nitro-lacquer. After the varnish has dried, the entire body is again passed over with fine-grained sandpaper (Fig. 9).
The internal seams are abundantly coated with glue. From a sheet of self-adhesive vibroplast with a thickness of 1 mm (used for vibration isolation of car bodies, Fig. - 5), 10 pieces are cut out with dimensions of 4 x 300 mm and cover the lower and upper walls with them from the inside.
If the speakers will be used in a vehicle, it is desirable to make the external design of the case with carpet, upholstery used for interior trim, car trunks. This will not only give a pleasant aesthetic appearance to match the car upholstery, but also improve the damping properties of acoustics, minimize diffraction effects (reflection of sound waves), reduce the unevenness of the amplitude-frequency characteristic of sound pressure, and significantly improve sound perception [3]. One of the options for aesthetic design is pasting with a self-adhesive film. To do this, a blank is cut out of the film, the size of which is equal to the front, back and side walls (so that the case could be wrapped), leaving a margin of at least 20 mm on all sides. The side from which we begin pasting is moderately moistened with a spray bottle with window cleaning liquid, for example, the side wall. Before pasting, the film is separated from the paper from one edge and applied with an adhesive surface. Then, with a dry, clean cloth and a plastic scraper, smooth the self-adhesive film from the middle to the edges, thereby removing air and moisture. The resulting wrinkle can be smoothed out by gently pulling on the nearest edge, peeling it off and smoothing the surface. They go to the front side, and then the opposite side and finish at the back, cutting off the excess film. Near the side walls, a protruding edge of the film is left by 5 - 8 mm. From the front and back sides of the case, the film is wrapped on the sidewalls. From the sides of the upper and lower walls, heat it up with a hair dryer and gently bend it. From temperature, it shrinks, leaving no wrinkles. The folds at the corners are cut off. It is also recommended to heat it with a hairdryer in places of holes, bends, etc., pressing the heated areas with a cloth. The side walls are easier to glue. To do this, cut blanks 2 - 3 mm smaller than the dimensions of the sidewalls. Start from the front edge. Bend 10 - 15 mm of paper, attach the film to the product and carefully peel off the paper with one hand, smooth the film with the other. After gluing, the film is cut out with a knife in the holes (Fig. 11).
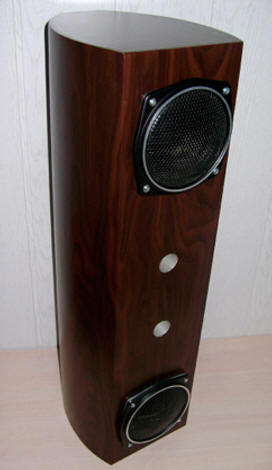
Installing the speakers Threaded 4 mm terminals are fixed on the back of the case, 4 pcs., 2 for each compartment. Connect wires 40 - 50 mm long to them. For convenience in connecting, the terminals and wires are selected in different colors or marked "+" and "-". At the ends of the wires connected to the speakers, knife terminals of the "mother" type are attached, commensurate with the contacts of the speakers, insulating them with a heat shrink tube. Mark out places for screws to mount the speakers. Drill holes with a diameter of 2 - 2,5 mm. The speakers are hermetically attached to the case, isolating the basket from the case. To do this, in a piece of rubber, for example, from a car camera, a hole with a diameter of 110 mm is cut out, applied to the back of the speaker, and places for mounting holes are marked. With a punch of the desired caliber or a sharpened tube, 4 holes are made. Having degreased the back side of the speaker basket and, having cleaned the glued side of the gum with sandpaper, grease it with Nairit glue. After surviving 5 - 10 minutes, connect. After that, the excess rubber is cut with scissors flush with the basket. Also, on the outside of the speakers, in the places of the mounting holes, rubber bands are glued, for example, from a bicycle chamber. Trimmings of a PVC tube are inserted into the holes, picking them up in such a way that they are tightly pressed against the walls of the holes, and allow the screws to freely enter. If necessary, the holes are drilled to the desired diameter. Install the speakers in the case. On top they put meshes with rims from the legendary S - 90 midrange speakers. They are fixed with screws. The product is ready for operation - fig. 12.
Petrov A. [2] emphasizes that the long-term operation of the loudspeaker by O. Saltykov [1] showed that the bass-reflex design, in the form of a case with a volume of 8,5 liters and a tunnel with a diameter of 30 and a length of 60 mm, is not critical to changing woofers. Recommends using speakers 25GDN-3-4, which, with the same installation dimensions, differs from 6GD-6 and 10GD-34 (new name 25GDN-1), lower frequency of the main resonance and greater sensitivity and power. In the article "Active subwoofer for a computer" (Radio No. 10, 2006), A. Petrov also suggested heads 25GDN-1-4 and 25GDN-3-4. The interchangeability of heads with suitable mounting dimensions, without making any changes to the structural elements, sets the speaker cabinet in front of a fairly wide range of applications, both for broadband, low-frequency and, if you can call it that, subwoofer. Let's start with the first one. Coaxial acoustics is a system of heads with separate bands, where additional ones are located on the same axis as the main, low / mid-frequency speaker. Speakers of this type are called coaxial (axis means axis) [4] - fig. 13. Most often, the physical separation of high- and low-frequency speakers is not required to sound the rear of the car. The front acoustics is entirely responsible for the sound panorama, and the back one plays an auxiliary role, which the coaxial one quite successfully copes with. Acoustic design in the form of a cabinet with a phase inverter will significantly increase its efficiency at low frequencies. Therefore, it is quite acceptable to use a housing made according to the above technology, with coaxial loudspeakers with a mounting diameter of 13 cm, in the rear of cars with station wagon, combi, hatchback bodies.
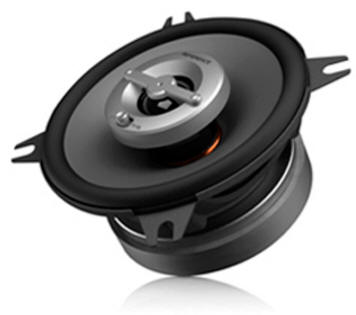
Option two for using, if necessary, the physical separation of midrange / treble and bass speakers. Broadband heads are installed in regular places of the car. To them, through crossover filters, connectors, connect the woofers installed in the case, and place it in a convenient place. The need to separate the heads may arise during the transportation of any goods. Having freed up the space occupied by the cabinet acoustic system, they do not get rid of the acoustic design of the rear of the cabin. When the system is disconnected, the filters are disabled. Third. Connect to a device with a subwoofer output. Another feature of the car is the on-board voltage of 12 volts, the value of which limits the output power of the audio systems. Some manufacturers, in order to increase the power, make audio devices designed for a load of 2 ohms. Pioneer DEH - 2300UB has 4 speaker outputs. For operation in normal mode with a power of 50 W with a resistance of 4 to 8 ohms per channel. When the subwoofer connection function is enabled, the 2 outputs (front) work in normal mode, and the rear 2 outputs work in subwoofer mode. The device provides cutoff frequency adjustment: 50, 63, 80, 100, 125 Hz, subwoofer volume level from -24 to + 6 dB, phase shift by 180º. As a load for the subwoofer channel, of course, you can get by with two low-frequency heads of 4 ohms connected to each channel, respectively. But, for its more efficient use, the developer recommends connecting a 70 W subwoofer with a resistance of 2 ohms to one specific output. Heads with a voice coil resistance of 2 ohms are very rare. However, two inexpensive widely available low-frequency heads 25GDN-1 or 25GDN-3-4 can be dispensed with. With the presence of 2 heads, we have the ability to manipulate the load. For example. To load two channels, we connect the head 25GDN-3-4 separately to each channel (4 ohms each). We create a load on one channel of 2 ohms with the same heads, connected in phase in parallel. In addition, we significantly win in the volume of the head acoustic design. Powerful low-frequency drivers have large-diameter diffusers, which, in turn, require cases with large volumes for them. For example, a 75GDN-1-4 speaker requires a case with a phase inverter, an internal volume of at least 40 liters! The internal volume of our product is only 17 liters. And the last, fourth option, for which, in fact, this product was made. Through the line output of the radio for connecting a subwoofer, an amplifier on the TDA1562Q chip is connected. The amplifier has a power of up to 70 W (as the manufacturer claims) and is designed for a load of 4 ohms. In this case, using two heads 25GDN-1L of 8 ohms, connected in phase in parallel, we have the corresponding load of 4 ohms, the required power and relatively small dimensions of the speaker system. Good results were shown by heads 25GDN-3-4. But for their parallel connection, 8-ohm voice coils are needed. Therefore, before installing these speakers, the movable speaker systems 25GDN-3-4 (4 Ohm) should be removed and replaced with systems from speakers 25GDN-1L (8 Ohm). Structurally, the dynamics are very similar - fig. Fig. 11. Amplitude-frequency characteristics of sound pressure speakers with speakers 25GDN-3-4 (coil 8 Ohm) and 25GLN-1L, with timbre coloration (enhanced reproduction of low and high frequencies by an audio device when operating in Rock and Activ Hyper Bass modes) and without corrective circuits shown in fig. 15.
Rice. 14. Dynamic low-frequency heads and their technical characteristics: a - 25GDN-1-4; b - 25GDN-3-4
Comparative listening of this development with an approximate design (the size of the woofer, the presence of a phase inverter, approximately the same volume, the case in the form of a parallelepiped made of MDF) showed that the speakers from JVC have a tiring effect on the listener when reproducing low frequencies. This is not observed in the described design. As a car subwoofer, it sounds good, especially with cutoff bands of 63 and 80 Hz, there are no overtones, when you put your palm on the walls of the case, no vibrations are felt. The acoustic system has undergone various improvements. For example, changing the size of the phase inverter port. Filling with sound-absorbing material. No improvements were achieved, which proves the ideality of the designs of the developers Saltykov and Petrov. Literature
Author: Vladimir Marchenko
Artificial leather for touch emulation
15.04.2024 Petgugu Global cat litter
15.04.2024 The attractiveness of caring men
14.04.2024
▪ Dual Layer Blu-rays Now Available ▪ Processor based on superconductors
▪ site section Power regulators, thermometers, heat stabilizers. Article selection ▪ article Tidy up your planet every morning. Popular expression ▪ article Why do bees buzz? Detailed answer ▪ Article Reliable head protection. Personal transport ▪ article GSM alarm. Encyclopedia of radio electronics and electrical engineering
Home page | Library | Articles | Website map | Site Reviews
www.diagram.com.ua |

")


 a)
a)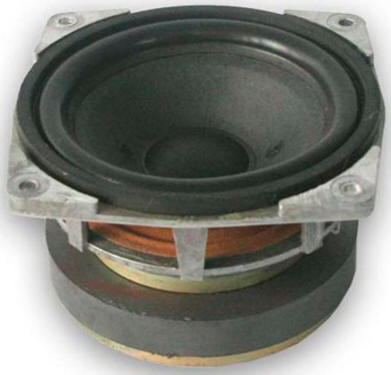 b)
b)
 Leave your comment on this article: