|
|


 Arabic
 Bengali
 Chinese
 English
 French
 German
 Hebrew
 Hindi
Hindi Italian
 Japanese
 Korean
 Malay
Malay Polish
 Portuguese
 Spanish
 Turkish
 Ukrainian
 Vietnamese
|
HOME WORKSHOP
Mini oven. home workshop
Soldiers, chess pieces, furniture fittings, original buttons, cufflinks, commemorative tokens and medals on the occasion of your friends' anniversaries are only a part of the list of products that you can make yourself, by casting. This work is quite within the power even for those who have not yet had such experience: it is enough to have imagination, be moderately accurate, and of course, acquire simple equipment for a home foundry workshop. The first link in the foundry technological chain is the metal melt. A home crucible can be made, for example, from a standard heating element from an electric fireplace or a reflector of the EKN-0,5 type. To do this, remove the spiral together with the fasteners, and seal the through holes in the upper part and base of the element body with refractory clay. It is better to burn it before the first heat! the element is sealed tighter. Then, in the plinth, it is necessary to continue the screw thread with a thin needle file or a metal hacksaw: this will increase the heating relative to the massive plinth part, which means a more uniform temperature field throughout the crucible. The heater will be a nichrome wire O 1 mm, laid in a groove. Wrap the knot tightly with 1-2 layers of quartz fabric with low thermal conductivity, or fiberglass, and bring the ends of the wire out. For the body of the furnace, use a metal can of a liter capacity: place a heating element in the center of it, and fill the remaining free volume tightly with asbestos chips. On top, apply a layer of refractory clay 5-10 mm thick. Both ends of the heater must be removed from the housing through a ceramic plug box from an electric stove or similar insulator, cutting an appropriate hole for it.
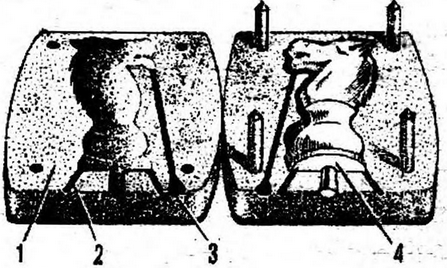
The stove lid is made from the same can as the body, only shortened to 50 mm. From the inside, it is also stuffed with crumbs and sealed with a layer of clay of the same thickness. In the middle of the lid, a small five-millimeter arch is selected so that the flux does not stick in case of possible ignition of the melt. The useful volume of the resulting crucible will be about 100 cm3. It provides a temperature of up to 1000-1200 ° with a heater power of 120-150 watts. Power from the network will be supplied through a transformer with a voltage of 18-24 V. When melting brass and bronze, which requires a temperature of 900-1000 °, the crucible withstands 10-12 cycles. Each heating time is about an hour. However, do not try to increase the melting speed - this will accelerate the failure of the furnace due to cracking of the ceramic element and may lead to premature burnout of the heater. When working with metals with a lower melting point, for example, tin, you can use a heating element with a standard spiral with a voltage supply directly from 127-220 V: there is enough power to warm it up, even if you do not isolate the element with a quartz cloth, but simply coat it with a thick layer the same clay. Now about the smelting of the products themselves. Usually yus is cast in a ready-made form, made of plastic, metal, wood. First, a flask is made - a wooden box without a bottom. Its dimensions depend on the size of the product, just keep in mind that the distance from the model to the walls should be at least 15-20 mm. It is better that the flask is detachable: for this, connect the opposite walls in pairs on hinges. Fill the lower half of the flask with plasticine - you will get the so-called model board. But at the corners, metal pins Ø 1-4 mm are inserted into it about half the length (for example, nails, knitting needles that are suitable in size): they serve to fix the position of the upper half-form. Getting started, grease the under-model board on the sides with a thin layer of petroleum jelly and clamp it into the flask. Level the plasticine, press the same lubricated model into it to the skid. Next, take the gypsum, wetting it with water, stirring it thoroughly, prepare the solution, bringing it to the density of liquid sour cream. The initial and subsequent layers of coating are applied to the model with a brush, preventing the formation of voids in the corners and folds, after which the solution is added to the top of the box. Wait until the plaster hardens. At room temperature, this will happen in about 15-20 minutes. Turning the flask upside down, remove the model board from it: this is when the advantages of the detachable box will especially affect. Repeat the whole process. If we now remove the flask, separate the halves of the plaster and carefully remove the model, then on both surfaces we will get its finished "imprints" - half-forms. They need to be dried well: just do it by gradually raising the heating temperature - first hold it in the sun or on a radiator, and then put it in the oven at home. Here they should be 3-4 hours at 150-200 °. Then, in the half-moulds, a sprue is prepared for pouring metal and an uplift, through which, when the mold is filled, air and gases "leave" occur. To do this, both half-moulds are connected and with a drill Ø 5-6 mm, a channel is made along the parting plane to the most voluminous part of the mold - the sprue, and an extrusion with a smaller diameter - about 1 mm - leads to the opposite side. The receiving edge of the sprue is reamed out to form a funnel. (Remember to remove the plaster crumbs with a soft brush after these operations.) Before pouring, putting a thin layer of release agent - turpentine mastic for floors - on all contact surfaces, as well as in the mold itself, fold the mold halves together and tie them tightly. Remember that molten metal must be poured into the sprue in a thin continuous stream. It is possible to disassemble the flask and remove the mold halves only after the casting has completely cooled down. For the manufacture of flat objects, say, plates, an easier-to-prepare method of so-called bas-relief casting is used. It differs from the described one - volumetric - in that the model is "embedded" in the plasticine of the model board completely, that is, the surface of the upper half-mould remains smooth: the latter - plaster - is simply superimposed on the model, only touching, covering it (it can be prepared in advance). In the same "opening method" half-mould, both the sprue and the sprue are cut out with a knife.
A few tips for processing demoulded products. They must be quickly cleaned of gypsum residues with a metal brush and burr. The last operation is carried out as carefully as possible with a chisel, or wire cutters, followed by cleaning with a needle file. Flux particles, burns, oxide films are released chemically: the part is etched in a weak (5-15%) solution of sulfuric acid. Small elements are finished with engraving chisels and chasers. Polishing is carried out with various pastes: for hard metals (brass, cupronickel, silver), use GOI paste, "Crocus", for soft ones (tin, lead) - tooth powder mixed in molten paraffin. To give the finished products a "fashionable" color now - like old silver, like old bronze, gold - and, in addition, in order to more fully reveal the relief of the drawings, they are subjected to electrochemical or chemical oxidation. The most common method is treatment with a solution of sulfuric liver, which is obtained by "fusing" sulfur and potash in a ratio of 1:2. You can also use oil paints, then covering them with a fixative or colorless varnish - for better preservation of the laid layers. And the last. All work with the crucible is carried out only by disconnecting it from the mains. Use canvas gloves, goggles or a mask. Start loading the charge only after the crucible has completely cooled down and dried. When handling chemicals, also observe safety precautions. Author: A. Talanov, V. Fedorov
▪ Trammel
Alcohol content of warm beer
07.05.2024 Major risk factor for gambling addiction
07.05.2024 Traffic noise delays the growth of chicks
06.05.2024
▪ Mathematical regular distribution of neurons in the human brain ▪ Car DVD players for Russian roads ▪ Mercedes-Benz C-Class with autopilot ▪ The prosthesis grows with the patient ▪ How many dinosaurs have not yet been discovered
▪ site section Lighting. Article selection ▪ article fool fool. Popular expression ▪ article When did the first houses begin to be built? Detailed answer ▪ article Truboklad. Standard instruction on labor protection ▪ article Watercolor paints - do it yourself. Chemical experience
Home page | Library | Articles | Website map | Site Reviews
www.diagram.com.ua |


 See other articles Section