|
|


 Arabic
 Bengali
 Chinese
 English
 French
 German
 Hebrew
 Hindi
Hindi Italian
 Japanese
 Korean
 Malay
Malay Polish
 Portuguese
 Spanish
 Turkish
 Ukrainian
 Vietnamese
|
PERSONAL TRANSPORT: GROUND, WATER, AIR
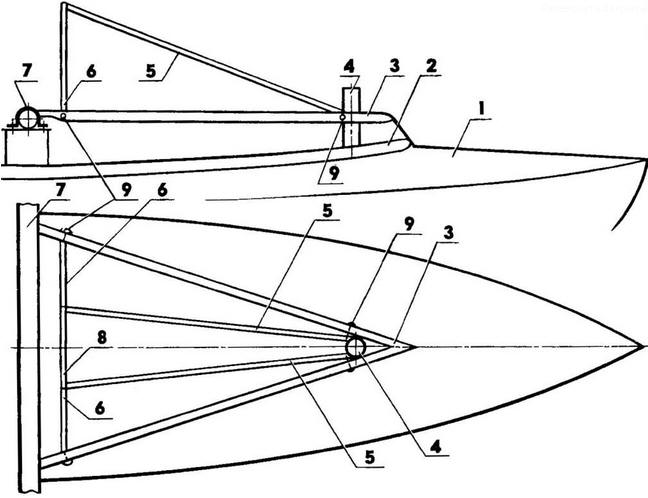
A trimaran schooner based on a kayak. Personal transport
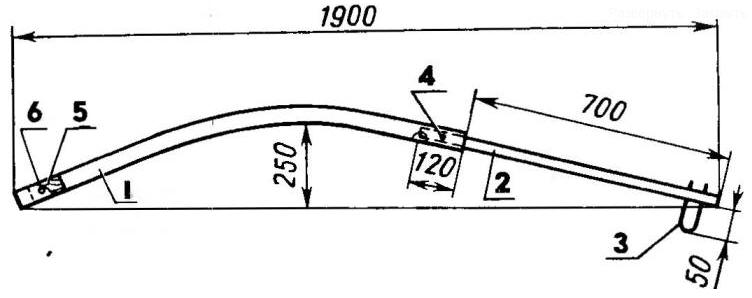
Directory / Personal transport: land, water, air Is it possible to build a yacht for a beginner in sailing, having at his disposal only materials from the assortment of DIY stores? The main problem that he will face at the beginning of his labors is the choice of the design of the future ship. Having found myself in a similar situation a few years ago, I decided that the easiest way was to make a sailboat from a serial collapsible tourist kayak. And of all the published kayak designs, the project of a schooner-trimaran seemed to me the most attractive. The main reason for this choice was purely romantic: the word "schooner" smelled of tarred ropes, the rustle of waves was heard, it was reminiscent of the southern seas, pirates and treasures. But my choice turned out to be successful in a practical sense: the vessel turned out to be very reliable, easy to assemble, with good operational and seaworthy qualities, suitable for both racing and hiking. The trimaran (Fig. 1) showed itself well in the spring rally Uglich - Konakovo - Sailing coast, in the campaign Selizharovo - Tver - Sailing coast (the crew consisted of one person), in two-three-day family trips, as well as in races held on Parusny shore. The kayak itself was practically not altered and is still suitable for ordinary rowing trips. The basis of the trimaran design is the power frame (Fig. 2), all parts of which are connected to each other by "pull-in", without backlash, providing rigidity and relieving excessive stress from the power set of the kayak. The rigidity of the frame allows the crew to freely tilt the vessel in a fresh wind, sitting on the side benches. Due to the fact that the frame is raised above the level of the bulwarks of the kayak by 150 mm, the side floats are also raised above the water. This makes it possible for the trimaran to run only on the central hull, and this mode is very beneficial, for example, in racing. Large-volume outrigger floats allow you to do without heeling, ensuring safe navigation even in strong winds. They are mounted on two transverse beams, the central sections of which are part of the power frame. Shvertsy, fixed on the bow transverse beam, are necessary when moving into a tack on sharp courses, while the leeward shverts is lowered into the water. The rest of the time they are raised and held by rope loops tied to the aft cross beam. In the working position, the shverts is pulled with a rubber band from the expander to the bow of the kayak. The area of each shverts is sufficient for the trimaran to tack with almost no drift.
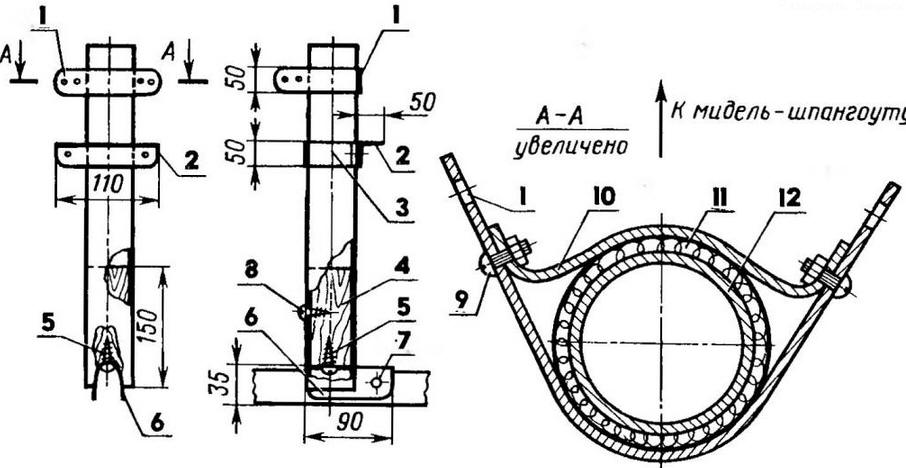
1 - section of the central transverse beam (for the bow - pipe 40x1,5, L1500; for the stern - pipe 45x1,5, L1500), 2 - section of the extreme transverse beam (for the bow - pipe 36x1,5, L750; for the stern coarse 40x1,5,1 ,750-3), 4 - bracket for fastening the cross beam to the bulwark, 5 - bulwark, 6 - Y-shaped post, 7 - fastening unit for screws on the bow beam, 5 - retainer (rod Ø8), 6 - hook (rod Ø 9), 10 - float stringer, 11 - float, XNUMX - wooden insert in the extreme section of the bow beam.
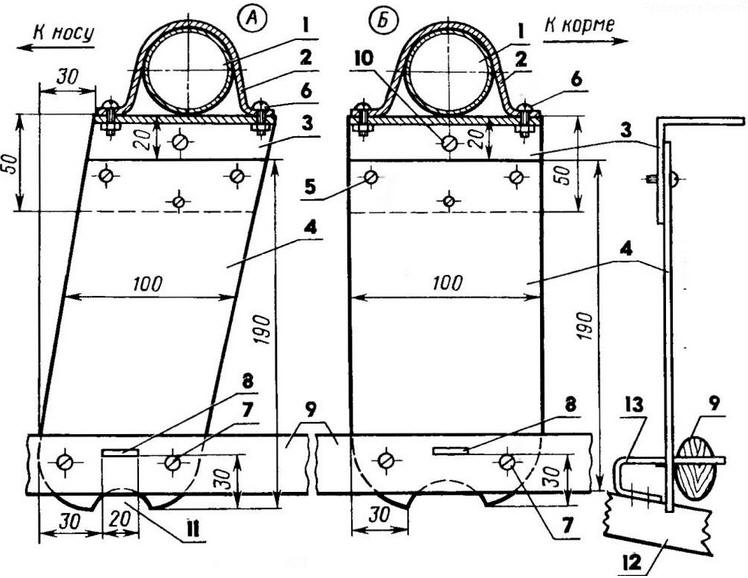
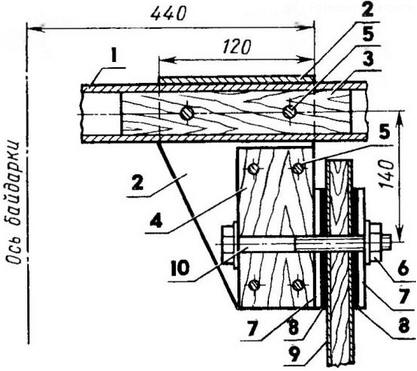
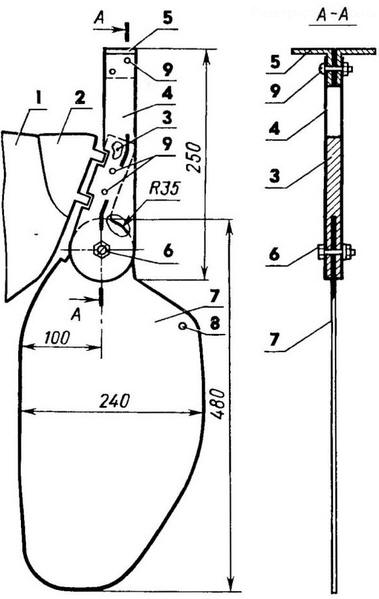
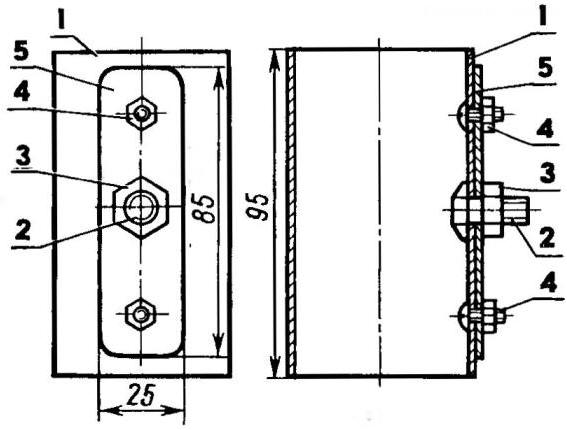
The trimaran is centered on bringing to the wind. The regular rudder blade of the kayak has been replaced with a self-made larger one. In a strong wind, the loads on the rudder and, accordingly, on the tiller are significant, therefore, for reliable fastening of the stern fitting to the kayak shell, a through hole is made in the first one, through which it is bolted to the sternpost. The regular tiller was replaced by a longer one made of a flattened duralumin tube. Rope tie rods have also been replaced with duralumin tubes that run over the bulwarks along the entire cockpit. This allows the helmsman to move freely in the cockpit and tilt without letting go of the controls. In calm weather, you can use the oar, sitting in the aft part of the cockpit on the bench. Fastening of the aft transverse beam allows rowing with both kayak and single-bladed oars. A cover with three children's inflatable "logs" is placed under the carcass keelson - this improves the driving performance of the trimaran, as well as increases the volume of the hull and ennobles its contours. When the ship's stern moves quickly, it usually warms up to the level of the deck, and so that water does not get into the cockpit, in the stern along the sides, between the shell and the power set, it is placed along the "log" in protective covers. They increase the height of the freeboard and increase the comfort of navigation - the boat is less splashed. "Logs" are laced with a nylon rope to metal rings on the deck. The trimaran is armed with two identical "swift" sails with the upper part of the mast bent back. Masts - free-standing in glasses-steps (Fig. XNUMX), which are elements of the power frame and are located in the bow and stern parts of the cockpit at the first and fourth frames. It is possible to install additional glasses, which makes it easy to change the windage scheme. So, in order to increase the efficiency of tacking on sharp courses, the mainmast is rearranged into an additional glass on the aft transverse beam at the third frame. To reduce the sail area with a persistent increase in wind, one mast is removed, and the second is rearranged into an additional glass installed on the bow transverse beam at the second frame. Sailing is not provided. Flurries are waited out with the sails set to the vane position. In light and medium winds, a light auxiliary staysail can be raised on the foremast, and the foremast itself can be reinforced with removable shrouds. When moving on a tack, only the windward shroud is attached, and the running end of the leeward shroud is automatically released. The sails are two-ply, with a small "sickle" on the leech, reinforced with short armor. Such a sail is put on the mast with a pocket, and then the boom is attached. Curved booms do not spoil the profile of the sail, and their design allows, when fine-tuning the sails, to change the location of the buzz of the sail along the height of the mast. In the bow of the cockpit between the first and second frames, a deckhouse can be installed - a convenient shelter from wind and rain. When moving against a wave on sharp courses, such a cabin reliably protects the cockpit from flooding, and the crew from splashes. Now in more detail about the main parts of the trimaran design. Mast fastening elements are mast cups (Fig. 4 and 1). They are included in the power set of the kayak and distribute the loads arising on the mast to the entire hull of the vessel. The fastening clamp to the frame is curved from a duralumin plate and screwed to the glass. To avoid slipping, a layer of textile tape is wound under the collar. A rectangular slot is cut out in the support corner, into which a bracket enters at the end of the waterway of the transverse set of the kayak. The corner is attached to the glass with an additional clamp. A wooden cork is tightly inserted into a glass on epoxy resin and fixed with a screw. When assembling the kayak, the glass is installed on the kilson with the help of a clamp-lodgment and fastened to it with a pin along with the frame. The order of installation of the mast cup is shown in Figure 4. The ends of the diagonal beams, forming the top of the L-shaped attachment, are flattened and tightened with a bolt. The transverse beams (Fig. 5) are attached to the bulwarks with brackets (Fig. 7). In order to remove excess stress in the frames and increase the rigidity of the structure, they are supported from below by U-shaped racks (Fig. 6), connecting the power frame with the keelson. The side seats (Fig. 8) are reinforced with duralumin pipes rigidly fixed on their lower planes. The seats are connected by transverse beams and clamps. Diagonal /1-shaped beams are also attached to the same collars. Shvertsy (Fig. 9 and 10) have an asymmetric profile and are made of two boards glued along the end with "epoxy". For the strength of gluing, sockets are drilled at the ends of the boards, into which metal pins are inserted. After processing, the screws are impregnated with drying oil and varnished. In order to increase the efficiency of their action, the wetted surface of each screw is polished. The rudder blade (Fig. 11) is riveted from two duralumin sheets 1,5 mm thick. The length of the regular tiller is increased by one and a half times, for this its ends are smoothed with a file and pre-flattened tubes 25x1,5 mm are pressed onto them. The ends of the new tiller are rounded and holes are drilled in them for attaching steering rods (made of duralumin tubes with a diameter of 10 mm), which stretch along the entire cockpit and pass through the guides on the brackets for attaching the beams to the bulwarks. The steering box is reinforced with additional overlays. The rivet axle of the standard rudder blade is drilled out, instead of it an M8 bolt is installed. Its nut is fixed with a cotter pin, preventing its spontaneous unscrewing. The side floats (Fig. 12) are glued from rubberized fabric. The gluing technology is described in detail in the book by V. Peregudov. Each mast (Fig. 13) consists of three sections inserted one into the other and secured with screws. Wooden inserts are inserted in the bottom section for half its length, as well as in the lower parts of the middle and upper sections, to increase strength. Several rings in the upper section serve to reduce bending loads on the mast from the halyard when setting the sail. Since it is very difficult to find pipes of the desired, theoretically calculated diameter, it is possible to use a "shirt" made of fiberglass impregnated with epoxy resin at the joints of the sections to ensure rigidity. The lower bail is designed for fastening the bowline of the lower luff of the sail, as well as for wiring and fastening the gear that regulates the belly of the sail. It is attached to the lower section of the mast with a clamp, which is curved from a 1 mm thick AMg soft alloy plate. For strength, the plates are duplicated. The upper bail serves to guide the halyard and fasten the upper end of the tokenant. This shackle is made removable and is fixed in the holes on the upper section of the mast with a pin. The boom (Fig. 14) is assembled from two sections inserted one into the other and fixed with a hairpin. For strength, the front section is profiled. The boom is attached to the mast through a glass freely sliding along its lower section (Fig. 15), while the front part of the boom is put on the glass bolt and pulled with a nut after the sail is put on the mast. Main technical characteristics6
The sails (Fig. 16) are home-sewn from teak-for-feather fabric. The choice of two-ply sails for beginners is preferable: they are much easier to get wrinkle-free. True, one has to put up with a large consumption of material: for two sails there is about 50 m of fabric 0,8 m wide. Usually on sails of the "swift" type, the leech is concave. However, the manufacture of the "sickle" version turned out to be not too difficult, but it made it possible to make sails of an increased area with a small length of the masts. The "sickle" is supported by five armor, which are inserted into the armor pockets and fixed in them with ordinary linen elastic bands. Armor is made of wooden student rulers and covered with electrical tape for strength. The location of the latpockets is determined depending on the quality of the fabric. In the manufacture of sails, it is advisable to constantly use the detailed recommendations contained in the book by V.M. Peregudov. It should be sewn directly on the power frame formed by the mast, boom and bowel cables of the rear and lower luffs. All final dimensions are determined empirically. The operations for sewing a two-ply sail are described below. 1. To make a spars, ropes-boulini luffs, lights at their ends, a device for adjusting the sail, halyard, ducks. Collect the entire frame, gear for adjusting the belly and check their work. 2. Put the frame in the zero belly position. Measure the length of the luffs and determine the dimensions of the future sail. 3. Mark the canvas, cut out individual pieces and sew the main panels with the appropriate margin along all the luffs (the panels must be flat). 4. On each panel, arrange a clew (sew reinforcing fabric overlays - bows, sew in eyelets, reinforce the edges of the panels with a fabric fold). 5. Arrange the head and tack angle of the sail (bend the lower and upper edges of the panels, reinforce them with a corsage tape or sling). 6. Without removing the bowlines from the mast, fold together the left and right panels of the sail and fasten the lower leg of the leech bowline and the upper leg of the leech bowline in its clew; Secure the upper part of the leech bowline with a hand seam so that the lantern protrudes above the upper edge of the sail. 7. Place the spar horizontally, adjust it for the position of the middle bunt of the sail, sweep in place of the luff of the sail, pinning both panels with pins. Try to ensure that there are no wrinkles and constrictions on the panels; if necessary, repeat the basting process from the beginning. The bulge of the belly should be 7%, its maximum - be at a distance of 40% of the width of the sail from the luff; at the leech the sail should be flat. 8. Set the sail to a small belly position (2-3%) and repeat the basting operation until a good sail shape is obtained in this mode of operation. Do the same procedure for the position of the big belly (12%). 9. By changing the position of the belly, check the smoothness of the surface of the sail in all modes. 10. Remove the sail from the spars. Remove the pins from the back and bottom leech, complete the front leech by sewing it with a machine seam. It is better to grab the leech bowline in several places with a hand seam. At the bottom of the luff, sew on a sail anchor. 11. Put the sail back on the spars and check its shape in all modes of operation. If shape distortions are found, unravel the basting seams and repeat the operation of basting the back and bottom leech. 12. Mark the places of the patch pockets. 13. Remove the sail from the spars and finally sew the panels along the line of the back and bottom leech and latpockets. During the operation of the sails, small wrinkles that could not be removed during tailoring may disappear as a result of stretching the fabric. And when determining the location of the clew of the sail, it must be taken into account that household fabric is quite stretched.
The auxiliary staysail can be sewn from any lightweight material, impregnated with some kind of composition that provides windproofness. As practice has shown, good staysails are obtained from polyethylene film, as well as from cheap percale soaked in a solution of bootswell in acetone. The installation scheme shown in the figure makes it easy to raise and remove the staysail on the go from the cockpit. The running ends of the removable shrouds are fixed on the bow transverse beam. To increase the comfort of traveling on a trimaran, as well as to provide additional security, inflatable bulwarks are fixed along the sides. They are made from inflatable children's "logs" (three on each side), which are placed in covers of light fabric and tied with a nylon cord passed through rings (metal "carpet" rings are suitable), sewn to the kayak deck. To give the ship a more aesthetic appearance from the bow and stern, the "logs" are covered with plumb lines made of fabric, which are sewn to the deck and laced from above to the beams of diagonal mounts. The cabin frame (Fig. 18) is made of duralumin pipes with a diameter of 16 mm. The design ensures its quick installation and removal. The cabin awning is fixed on the bow plumb lines with hooks or buttons. The fore mast passes through the pocket and is covered by a brace that prevents water from entering the cockpit. The process of operating a two-masted vessel is not much more complicated than a conventional one, and sailing experience comes literally after two or three training outings. Of great help in this can be the constant use of "sorcerers" - ribbons of bright nylon or polyethylene, located on wire racks on the bow transverse beam. From them, you can easily determine the true direction of the wind, regardless of the tack, and choose the optimal course of movement. When going on a long trip, you should take care of sealed bags for things and products, several spare inflatable "logs", an anchor, a mooring line, a repair kit and a first aid kit. A reminder of life jackets for all crew members will not be superfluous. Author: A.Efimov
The existence of an entropy rule for quantum entanglement has been proven
09.05.2024 Mini air conditioner Sony Reon Pocket 5
09.05.2024 Energy from space for Starship
08.05.2024
▪ Computer case with vacuum cleaner ▪ TPS65023 - new power controller for DaVinci ▪ Wearable biosensors from old CDs ▪ Virtual reality for pain relief
▪ section of the site Labor protection. Selection of articles ▪ article Orbital space station. History of invention and production ▪ article How did the caves appear? Detailed answer ▪ article plumber. Job description ▪ Article Optocouplers. Part 2. Encyclopedia of radio electronics and electrical engineering
Home page | Library | Articles | Website map | Site Reviews
www.diagram.com.ua |


 See other articles Section