 Free technical library
Entrance door upholstery. Tips for the home master

Directory / Builder, home master
 Comments on the article
How familiar and ordinary look the entrance doors of the apartments, upholstered in artificial leather or leatherette. All the difference is only in the color of the material and the location of the nails. And if one master passed through the entrance, then all the doors become "twins".
It happens that the outer side is sheathed with decorative slats. The appearance is elegant, but the sound-absorbing and heat-insulating properties of the door do not improve. In addition, the slats make the structure significantly heavier, which can weaken the fastening of the hinges and lead to skew. And it’s not easy to buy ready-made profiled rails, and not everyone can make them at home.
I offer a simple version of the upholstery of the front door, which solves the issues of heat and sound insulation and opens up the richest possibilities for decoration. Instead of the traditional leatherette, I used a sheet of fiberboard, pasted over with veneer and fixed with slats on the outer plane of the door over a heat-insulating material, which can be used as foam, foam rubber, etc.
The fiberboard sheet should be 15-20 mm smaller than the doorway so that the door closes freely.
Veneer from different types of wood is desirable to select the same thickness. Before starting work on gluing it, it is necessary to depict the selected drawing on graph paper on a scale of 1: 1. To simplify the work, it is desirable to divide the drawing into small elements that are simple in shape. Then, using carbon paper, the drawing is transferred to whatman paper or cardboard and cut out. In order not to make a mistake when gluing in the future, each element is numbered.
The most crucial moment is the selection of veneer. It is important that the color and texture of the veneer correspond to the purpose of the element of the picture and blend well with each other. Cardboard templates are placed on top, outlined along the contour, then the pattern is cut out with scissors. In places where the patterns have internal radii, a sharpened scalpel or shoe knife comes to the rescue. In this case, it is necessary to ensure that the direction of movement of the cutting tool does not lead to chips.
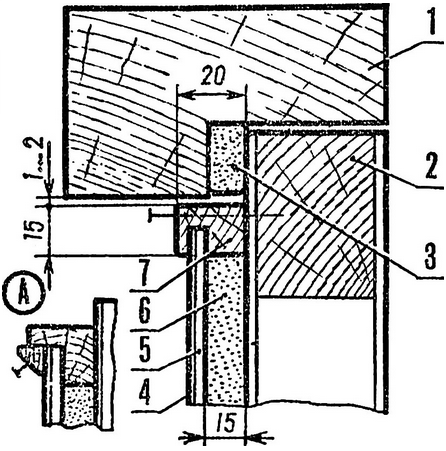
Rice. 1. The design of the entrance door insulation: 1 - door frame, 2 - entrance door, 3 - sealant, 4 - decorative veneer layer, 5 - fiberboard sheet, 6 - insulation, 7 - frame; A - a variant of sealing a fiberboard sheet with a glazing bead

Rice. 2. The design of furniture doors made of fiberboard: 1 - frame, 2 - glazing bead, 3 - fiberboard sheet, 4 - veneer

Rice. 3. Possible options for drawings: A - for the front door, B - for furniture doors
If there are a lot of straight joints in the drawing, then use a photo cutter to simplify and speed up the work.
It is better to start cutting the pattern with larger central parts, and then the mating parts. To make the joint less noticeable, since the overall quality of work depends on it, it is convenient to transfer the mate lines directly from the cut blanks.
When all the elements of the pattern are cut out, they are glued onto a sheet of fiberboard. For this purpose, it is better to use epoxy or carpentry glue, since casein glue leaves hard-to-remove stains when it gets on the front surface. The glued veneer must be pressed tightly and kept in this position until completely dry.
The next stage of work is sanding and varnishing. First of all, 1-2 layers of varnish (NTs-222 or NTs-228) are applied to the glued surface for fixing. Then they grind with fine sandpaper, wetting the surface with water when using epoxy glue or white spirit - when using casein and carpentry. The final finish is made with light parquet varnish, pouring it in 1-2 layers. The fiberboard sheet is installed strictly horizontally, about 1 liter of varnish is prepared and poured in portions over the entire surface of the sheet. To avoid leakage over the edges, a plasticine edge 2-3 mm high is installed around the perimeter.
When refilling, the side should be increased. Each layer is left to dry for about a day.
To install the sheet on the door, you will need rails with a section of 15x20 mm, in which a groove with a width corresponding to the sheet and a depth of 6-8 mm is selected with a tongue and groove. Then the outer edges are rounded, and the ends are sawn off at an angle of 45 °. The length of the rails should be 2-4 mm less than the linear dimensions of the doorway.
At the end of the work, the fiberboard sheet is installed on the door. To do this, it is removed from the hinges, handles and locks are removed. Two opposite rails are baited with nails and check whether the sheets fit snugly into the grooves. It is useful to hang the door in place to check the correct installation of the rails relative to the opening. Then the door is removed, the insulation is laid, the sheet is finally inserted and fixed with the two remaining rails. After that, door handles, locks are put in place, and the door is hung on hinges. The work will be simplified if the fiberboard sheet is not laid in grooves, but in quarters selected in the slats, and fixed with a glazing bead, like glass in window frames. In addition, the glazing bead, painted or stained, will itself serve as a decorative element of the pattern.
This finishing method can be used not only for apartment doors, but also for decorative overlays on home-made furniture, as well as on various doors if they are made of fiberboard: in this case, fiberboard is pasted over with veneer on both sides, inserted into a frame and fixed with a glazing bead.
Author: V.Leukhin
 We recommend interesting articles Section Builder, home master:
▪ Rainwater harvesting
▪ Graphite pot
▪ Vacuum cleaner-water pump
 See other articles Section Builder, home master.
Read and write useful comments on this article.
<< Back
 Latest news of science and technology, new electronics:
Machine for thinning flowers in gardens
02.05.2024
In modern agriculture, technological progress is developing aimed at increasing the efficiency of plant care processes. The innovative Florix flower thinning machine was presented in Italy, designed to optimize the harvesting stage. This tool is equipped with mobile arms, allowing it to be easily adapted to the needs of the garden. The operator can adjust the speed of the thin wires by controlling them from the tractor cab using a joystick. This approach significantly increases the efficiency of the flower thinning process, providing the possibility of individual adjustment to the specific conditions of the garden, as well as the variety and type of fruit grown in it. After testing the Florix machine for two years on various types of fruit, the results were very encouraging. Farmers such as Filiberto Montanari, who has used a Florix machine for several years, have reported a significant reduction in the time and labor required to thin flowers.
... >>
Advanced Infrared Microscope
02.05.2024
Microscopes play an important role in scientific research, allowing scientists to delve into structures and processes invisible to the eye. However, various microscopy methods have their limitations, and among them was the limitation of resolution when using the infrared range. But the latest achievements of Japanese researchers from the University of Tokyo open up new prospects for studying the microworld. Scientists from the University of Tokyo have unveiled a new microscope that will revolutionize the capabilities of infrared microscopy. This advanced instrument allows you to see the internal structures of living bacteria with amazing clarity on the nanometer scale. Typically, mid-infrared microscopes are limited by low resolution, but the latest development from Japanese researchers overcomes these limitations. According to scientists, the developed microscope allows creating images with a resolution of up to 120 nanometers, which is 30 times higher than the resolution of traditional microscopes. ... >>
Air trap for insects
01.05.2024
Agriculture is one of the key sectors of the economy, and pest control is an integral part of this process. A team of scientists from the Indian Council of Agricultural Research-Central Potato Research Institute (ICAR-CPRI), Shimla, has come up with an innovative solution to this problem - a wind-powered insect air trap. This device addresses the shortcomings of traditional pest control methods by providing real-time insect population data. The trap is powered entirely by wind energy, making it an environmentally friendly solution that requires no power. Its unique design allows monitoring of both harmful and beneficial insects, providing a complete overview of the population in any agricultural area. “By assessing target pests at the right time, we can take necessary measures to control both pests and diseases,” says Kapil ... >>
| Random news from the Archive Robots will be taught to more accurately follow the desired scenario
27.06.2019
Scientists at Stanford University have combined two different ways of setting goals for robots. This "centaur" turned out to be more effective than each of the methods separately from each other, both in simulations and in real experiments, according to the university's website.
"In the future, I have every confidence that there will be more autonomous systems in the world, and they will need some understanding of what is good and what is bad," said Andy Palan, a graduate student in computer science at Stanford University and one of the the first authors of the work.
The new robot training system combines a demonstration method with user surveys. The first method involves people showing the robot what to do, and in the second case, they answer questions about how they want the robot to behave in a certain situation: for example, when determining the trajectory of a self-driving car.
The demonstrations are informative, but they can contain a lot of superfluous content. Preferences, on the other hand, make up a maximum of one bit of information, but are much more accurate, the researchers note. These approaches complement each other perfectly - and it is very important to intelligently combine the data coming from both sources.
The new combinational system begins with a demonstration of behavior to the robot. This can give autonomous robots a lot of information, and they often struggle to determine which parts of the demonstration are important. A person also does not always want the robot to behave in the same way as he does. So, previous studies have shown that people want autonomous cars to be less aggressive in driving than they are.
The experiment showed that 80% of people were more willing to use the combined method. However, there were also difficulties. These people reported that they could not always understand the questions that the robot asked them. Sometimes they were asked to choose between two scenarios that seemed the same or were not relevant to the task. This is a common problem in preference-based learning. The researchers hope to address this shortcoming with simpler surveys that also provide faster response times.
|
Other interesting news:
▪ Emotions of the West and East
▪ New Zealand hit by 66 lightning strikes
▪ Portable atomic clock
▪ The internet is bad for trees
▪ CPU Cooler Zalman CNPS10X Performa Black
News feed of science and technology, new electronics
Interesting materials of the Free Technical Library:
▪ section of the site Mobile communications. Article selection
▪ article by Viet François. Biography of a scientist
▪ article What does the popular smiley with closed eyes and a blue bubble near the mouth mean? Detailed answer
▪ article Power supply electrician. Standard instruction on labor protection
▪ article Infrared light control system. Encyclopedia of radio electronics and electrical engineering
▪ article Turning one card into another. Focus Secret
Leave your comment on this article:
 All languages of this page
Home page | Library | Articles | Website map | Site Reviews

www.diagram.com.ua
2000-2024


 Arabic
 Bengali
 Chinese
 English
 French
 German
 Hebrew
 Hindi
Hindi Italian
 Japanese
 Korean
 Malay
Malay Polish
 Portuguese
 Spanish
 Turkish
 Ukrainian
 Vietnamese