|
|


 Arabic
 Bengali
 Chinese
 English
 French
 German
 Hebrew
 Hindi
Hindi Italian
 Japanese
 Korean
 Malay
Malay Polish
 Portuguese
 Spanish
 Turkish
 Ukrainian
 Vietnamese
|
BOOKS AND ARTICLES Editing in Canopus Edius Pro. Secrets known to all
Why did you choose Canopus Edius Pro (canopuscorp.ru)? After all, it is not as common among amateur editors as, for example, Adobe Premiere Pro, or Ulead MediaStudio Pro. The fact is that this program is one of the few in which you can really create in real time, and at the same time (most importantly) you do not need a two-processor station with an insane amount of RAM and arrays of high-speed disks. Of course, there is some exaggeration in the above example, but the average home user does not care at all: he still will not buy a computer of the power level that is enough to view a clip in real time in most video editors with two or three effects or transitions superimposed on it. While the program in question is quite capable of running on a computer with a Pentium III 800 MHz processor and 256 megabytes of RAM. Yes, it was on such a "dinosaur" that the author more than once had to (and still has to) mount short films about corporate events. If the hard drive on such a machine is regularly defragmented, and unnecessary processes are unloaded from memory during operation, then it becomes possible to view a clip with Emboss and Blur effects superimposed in real time. Try to achieve this by installing a six-year-old "freshness" on your computer, for example, Adobe Premiere Pro 1.5! Let me move on that note from excuses to action. This article is intended for those who have already worked in Edius Pro. If this is your first time hearing about this program, then we strongly recommend that you look for information about it, and practice a little yourself. In the articleCanopus Edius Pro. User's manual a review of this program was published, after reading which, and showing a share of ingenuity, you will be able to work. What is the most common concern for a home video editing user? Simple cutting/gluing? Of course not. To carry out such elementary operations in a program that can do almost everything is ignorance at least. And if you have a difficult cutting / gluing? Namely: montage of material shot simultaneously by several cameras. Difficult, at first glance, a task that only such professional packages as Final Cut Pro or multi-cam editing plug-ins that cost several hundred dollars can do. We will take advantage of the main advantage of Edius Pro - its speed with filters, and consider an example of editing material taken from two video cameras. What connection can there be between "multicam" and the vaunted speed of video processing - we'll see a little later. Create a new project, which must contain two VA tracks. We start capturing. In our case, it must be performed from each camera (cassette) in turn, after disabling automatic splitting into clips according to all signs. Simply put - uncheck all the boxes in the corresponding field of the program settings. We assume, of course, that both cameramen started filming at the same time and were filming without interruption.
After capture, the video files will be in the "piggy bank" of the project, otherwise - Bin. It is advisable to create several folders in it in advance and sort the files ready to take part in the project according to them.
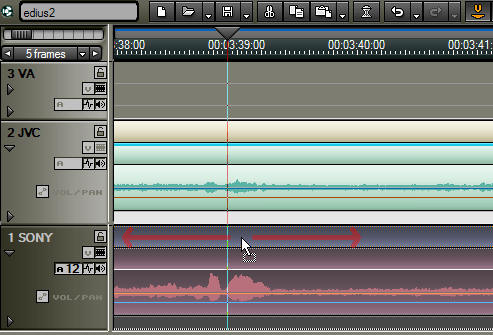
Let's drag the video captured from one camera to the first track, and to the second - from the other. Now the first task is to synchronize both clips in time, because the operators could not start recording at the same second. Synchronization is easiest to do using sound. Any sufficiently sharp sound that was recorded simultaneously on both cameras will be a guideline for us. But first, you need to bring the display of the sound track to the timeline into a divine form, because Edius displays it in decibels by default, and with this display, you will not visually find any obvious level changes with all your efforts. Open the program settings, and select the Linear (%) line in the Waveform field. The audio peaks will now appear as distinct bursts on the audio track.
Expand the audio track by clicking on the triangle below the track name. After a short analysis, the sound will be displayed as a wave. Visually determine the highest peak in this audio stream by zooming in or out on the track's display in the timeline. Now listen to what you found. To prevent the sound of the second track from intertwining with the first while listening, turn it off by pressing the Audio Mute button.
Once you've found a suitable burst of sound, try to find the same one on the clip from the second camera. After that, position them one above the other by moving one of the clips left/right with the mouse.
As you can see in the picture, the sound source was closer to the SONY camera, and yet JVC caught enough for us to sync the clips. Now, after the video from both cameras is positioned exactly in accordance with the surrounding sound, we will make it so that we can see the clips from both cameras at the same time. After all, what is the editing of material taken from two (or more) cameras? In cutting out unnecessary fragments from the first camera (the cameraman stumbled, his hand trembled) and leaving the necessary ones (the second cameraman caught a rare shot while his colleague stuck the lens into the toe of his own boot). Therefore, we should see in real time what both operators saw separately. Let's get started. In the Keyers section of the effects panel, find Picture in Picture.
Grab it with the mouse, drag it to the transition track of the first clip, and release the mouse button.
In the video window, the picture has decreased and moved up and to the left. This situation will not suit us, let's change the settings of this PiP. An item of the same name appeared in the track information window, double-click on it to open the effect settings window.
It should be noted that in this program each of the effects is unique in its own way, not only because of the full customizability and flexibility, but also because almost every such module has its own, different from the others, settings interface. So do not be surprised when you see that the settings of one effect are like a shuttle control panel, and the setting of another effect is reduced to a scanty window with a single slider. What are the capabilities of the module - such is the embodiment of the controls for them. But back to the PiP settings.
We need only one tab - Position, Size. It is here that we will arrange the picture as it will be convenient for us. You can explore other tabs, but there is no need to make any changes to them. Enter the values you see in the figure into the Position windows and close the effect properties window. Repeat the same trick with dragging the PiP, but this time on the transition track of the second clip. Keep in mind that you can drag and drop effects onto tracks not only from the Effect window, but also from the Information window of the selected clip. In this case, the effect will contain settings that are not set by the program by default (and, as a rule, are not suitable in most cases), but those that you have already worked on. So feel free to drag the Picture in Picture effect we just set up from the properties window of the first track onto the transition track of the second track and enter its settings (do not forget that the track information window is updated only if you have selected the desired clip, or one from its tracks in the timeline).
Change the values as shown in the figure, and the pictures from both cameras will be side by side. Now you understand that in this way editing can be carried out not only from two cameras, but from as many of them as your monitor and, of course, processor power are enough for. But so far, all that we have done is just preparation for the actual installation. Fortunately, the more thorough the preparation, the easier it is to work later. Close the PiP properties window and start playback. Concentrate on both pictures at once, and in those places where you want to make a transition from one camera to another, press the V key, thereby setting marks on the timeline.
If your material does not require a quick reaction, then you can start fast playback by clicking on the timeline with the middle mouse button and turning the wheel down the required number of times. By the way, if the cameras that shot synchronously were nearby, you can do an interesting trick: by changing the sound balance of each track, you will achieve the acoustic effect of presence in the place where the shooting was carried out. As if two microphones were suddenly smashed a certain distance from each other. Once you're done with tagging, go to the Information window of each clip and, with PiP selected, feel free to delete it. He did his job. At the same time move the mouse away from you, you will not need it in the near future. By the way, professionals who know Canopus Edius Pro inside and out, if they take a mouse in their hands during installation, then in the most exceptional cases, because this is exactly the program that, as they say, is "sharpened" to work with the keyboard and devices called "shuttles" (in professional programs, special devices can be used, similar to how joysticks, gamepads and steering wheels are used in games). I hope you made yourself a printout of the necessary hot keys in advance? If not, then you will have to open the program settings again and remember the combinations that we need now: go to the next label (SHIFT + PgDn) and cut the selected clip (CtrL + D). Not exactly convenient, right? So let's reassign to those that suit us. Let the transition to the next label be done by pressing the S key, and cutting the clip with the D key. We can always return the default settings. Next, we only need a quick work with two fingers, you can not even look at the screen - it's impossible to make a mistake. Just do not forget to select the top track before the execution, because that is what we will cut. Having finished cutting, admire your creation and start selecting with the mouse (we needed it again) on the upper track segments, holding the Ctrl key and jumping over one. Be careful, keep in mind: those segments that you select will later be included in the movie, and those that remain unselected will be destroyed. With all segments selected, make sure the timeline is set to Overwrite Mode.
After making sure, click on one of the selected segments with the mouse and lower the entire series down, blocking the bottom track.
You should get a kind of "accordion", consisting of sequentially arranged clips.
Now select with the mouse movement all the upper segments and delete them. Everything, the installation is finished, congratulations! But what is it? Are you dissatisfied with something? Let me guess: you're not happy with the butt transition, right? Of course, we are not reporting from the scene of the fire. Resolved: we insert transitions, only with the condition: no frantic mouse movements, no alignment of clips on top of each other. First, let's assign a transition that will be inserted between all segments. Expand the list of transitions in the Effect window, and select the appropriate one (you can do this by trying out the behavior of different transitions in the timeline). Now click on the selected transition with the right mouse button and select the Set as Default Effect command from the context menu.
After this transition is set by default, its icon will be crowned with a blue letter D. All that remains for us is to go to the beginning of the timeline, and sequentially press the S key assigned by us (go to the next label) and Ctrl + P (insert the transition at the cursor location). Keep in mind: the default transition lasts one second, and if this is not enough for you, you can use a different combination: Alt + 2 (3, 4, 5 - the numbers mean the number of seconds you need). If you are not satisfied with the fact that only one transition will be used throughout the movie, then you can do the following: insert the assigned transition only in the areas you selected, then assign another default transition and work with it further. A few words should be said about the sound: after all, the sound segments from one camera are now mixed with the sound of the second camera. Will there be unexpected sudden changes in the sound level? It will not work, because along with the video transition, an audio transition, also assigned by the program by default, was automatically inserted into the junctions of the clips. As you may have guessed, it can also be changed to the one that suits you.
The film is almost ready, but still something is missing. Perhaps subtitles? The titler Quick Titler is perfect for creating them. It is automatically invoked by pressing the Add Title button.
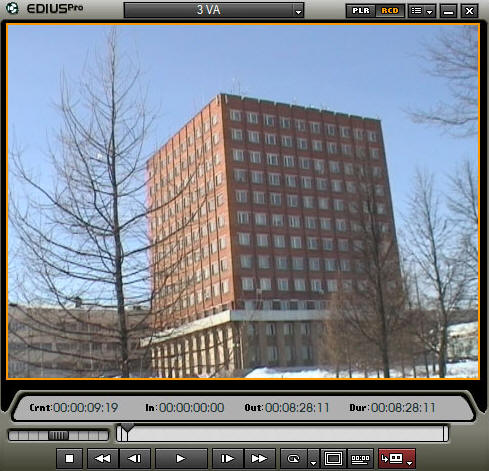
Titles can be inserted not only on a special title track, marked with the letter T on the timeline, but also on any track convenient for you. Let's play with some effects. For example, we are stylizing a building shot against a blue sky.
At the same time, we will make the shade of the sky itself more juicy. The easiest (and most importantly, fastest) way to achieve this is by applying the Chrominance filter. Drag the icon of this filter to the desired clip and open the effect properties.
Move the crosshair mouse cursor over the bluest part of the sky and click once. Thus, you have just ordered the filter to remember the color that will serve as the starting point for further work. This color can be changed, or any effect that Edius has at its disposal can be applied to the area with this color. You can also do the same with areas that lie outside this color. The drop-down list called Inside Filter is responsible for working with the specified blue color. Select the Color Balance filter in it and click the Setup button (1) to the right of the list. The Color Balance effect settings window will open. Set the Chroma value to the maximum and close the window.
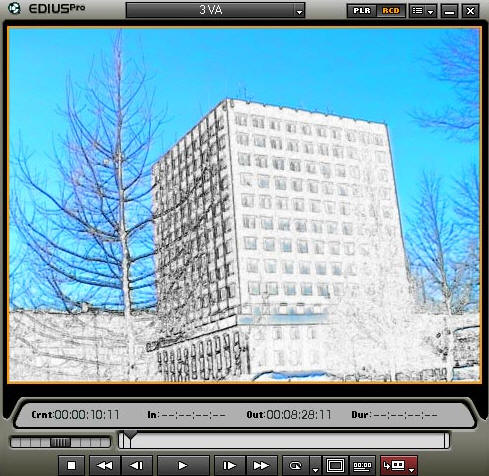
You can already see how bright the sky has become. Now you need to "process" the rest of the area. For working with areas lying outside the selected color (in our case, as we remember, this color is blue), the Outside Filter drop-down list is responsible. Select the Pencil Sketch filter in it, and click Setup (3). Set the value that suits you, because any changes you make are instantly displayed in the video viewing window.
What is the result? Of course, this is just an example of working with one of the filters, the highlight here is that your possibilities are in no way limited by the program's capabilities. All that can interfere with you is the lack of a habit of doing everything the way you want, and not the way the program can.
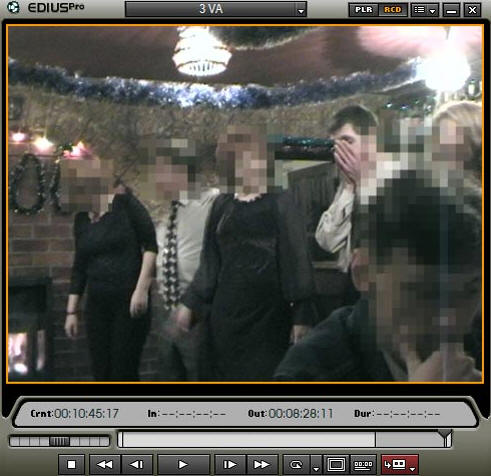
We performed the operation on only one of the clips located on the timeline. Let this operation was spent a little time, but still. Do you really need to manipulate the effects settings for each clip every time? Of course not! It is enough to select those clips on the timeline to which you want to assign an already configured effect, and drag its icon to the selected range. Finally, let's look at one of the main tools of Edius Pro, which beats rivals on the spot: the Region filter. With this module, it becomes theoretically possible to build a chain of filters of incredible length, and apply them to one clip. But more to the point. Our task: using only the Region filter, correct the color of the picture (it was filmed with a lack of lighting) and cover the faces of all those present in the frame with a mosaic.
Drag the Region filter icon to the clip you want to process and open the filter properties. You will see a rather large module with a video window at the top. In this window, you can adjust the position and size of the dotted frame that defines the scope of the filter. Stretch this frame to full screen, or manually set the desired size. A little lower there are three tabs: Inside, Outside and Moving Path. It is easy to guess that in the first tab filters are configured that process the area inside the dotted frame, the Outside tab controls the processing of the outer area, and in the Moving Path tab there are tools that allow you to animate the movement and size of this very frame.
Unfortunately, the result of the current filter settings is not displayed in the upper window of the video, it can only be seen in the program monitor window (which again emphasizes the need for two monitors for full-fledged work). So, stretching the dotted frame to the entire window, select the Combine Filters filter in the drop-down list of the Inside tab. We used a military trick: instead of one filter, we fed several filters to our Region at once. Now enter the settings of the selected Combine Filters (Setup button on the right) and in the five drop-down lists, select whatever your heart desires. In this case, as you can see in the figure, Color Balance and four Region filters in a row were selected sequentially. We need the first one in order to change the color of the picture (remember, because we stretched the dotted frame to fill the screen, and, therefore, the entire five filters will act over the entire area of the frame). It makes no sense to describe the Color Balance settings in detail - with the help of a few sliders, you can easily adjust the color or contrast of the video. As for each of the four Region filters, there's nothing complicated here either: move the dotted frame of the first filter to one of the faces that need to be incognito, and in the Inside tab, select the Mosaic filter. Going to the settings of the second Region, do the same with the second person and so on. Question: what to do if there are more than five faces in the frame? You know the answer. Nothing prevents you from choosing the same Combine Filters in all five lines of Combine Filters, and now in them - Region. The main thing is not to get confused. The result of a minute's work is shown in the figure.
By the way, if you do not want to see such sharp borders of the transition from mosaic to normal image, then you can smooth this border by checking the box on the Soft Edge option and selecting the appropriate smoothing threshold (from 1 to 100). In addition, a rectangular frame can be turned into an ellipse by checking the corresponding box here.
Here, bad luck. One undisciplined participant in the shooting made an awkward movement of his head and ... Lost his incognito, being outside the range of the Mosaic filter. In this case, the third tab of the Region - Moving Path filter will help us.
By moving the frame after the face or changing its size, press the Add button - and the frame parameters will be written into keyframes, from now on they will change linearly from one key to another, and the frame (and, consequently, the mosaic effect contained in it) will move along the path you set. Let's summarize. We got acquainted with the operation of the Picture in Picture filter, learned how to control color zones and the Region filter. There is no doubt that even a little practice in Edius Pro will teach you techniques unknown to anyone, because the originality of the approach to working in this program allows you to carry out the same operation in completely different ways. And, if you find something that seems useful, necessary and original to you, be sure to share your find with your colleagues. Publication: ixbt.com
▪ Lighting ▪ How to take a good photo of a child ▪ Mounting within the framework of traditions, or Mounting as a craft
Artificial leather for touch emulation
15.04.2024 Petgugu Global cat litter
15.04.2024 The attractiveness of caring men
14.04.2024
▪ Created antimalarial mosquitoes ▪ Nanobots to be launched into human veins ▪ Computer vision for electric scooter ▪ Food sensors based on paper and graphene
▪ site section Batteries, chargers. Article selection ▪ article Fishing in troubled waters. Popular expression ▪ article What is the largest passenger plane? Detailed answer ▪ article A skier is not afraid of climbs. Tourist tips ▪ article Self-resetting electronic fuse. Encyclopedia of radio electronics and electrical engineering
Home page | Library | Articles | Website map | Site Reviews
www.diagram.com.ua |


 See other articles Section