|
|


 Arabic
 Bengali
 Chinese
 English
 French
 German
 Hebrew
 Hindi
Hindi Italian
 Japanese
 Korean
 Malay
Malay Polish
 Portuguese
 Spanish
 Turkish
 Ukrainian
 Vietnamese
|
BOOKS AND ARTICLES movie maker. Amateur video editing
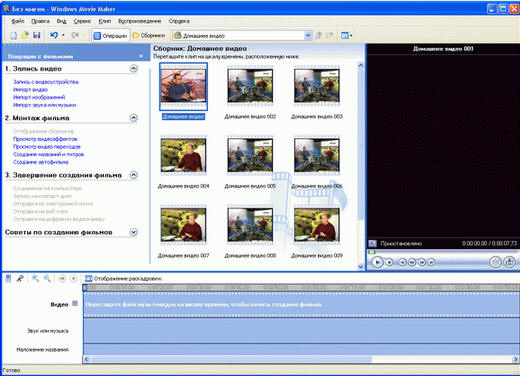
movie maker. Amateur video editing It is quite easy to learn, but nevertheless powerful enough editor for processing digital video received, for example, from a digital video camera, TV tuner or any other signal source. For novice users, in my opinion, you won’t find a better program, because only with its help you can quickly download your home video to your computer, break it into scenes, create a menu, set the necessary special effects for transitioning between episodes, and then record the finished DVD movie or convert it to a format suitable for sharing over the Internet. Let's take a closer look at how this is done... So, let's say you filmed some home video on a video camera: a trip to Turkey, a birthday or New Year celebration, a newly acquired pet, or a solemn departure of your mother-in-law. Recording a video on a computer In order to copy the recorded video to a computer, the camcorder must be connected to it via the FireWire or USB port (this depends on the type of camera - see the instructions attached to it). As a rule, modern digital cameras are connected to a computer through a FireWire port - this is a special high-speed port that is usually used to transfer video streams. On personal computers, a FireWire port is quite rare (it is built into only the latest motherboards), but you can purchase a separate PCI card with this port, or even better - with a whole set of ports: additional USB and a pair of FireWire. Such boards are inexpensive - twenty to thirty dollars. Also, the FireWire port sometimes comes across in external USB hubs, however, in this case, its speed will not exceed the speed of the USB 2.0 port, which is somewhat lower. Connect your camcorder, put it into playback mode (without starting playback), and then launch Windows Movie Maker. Externally, the window of the running program looks like this:
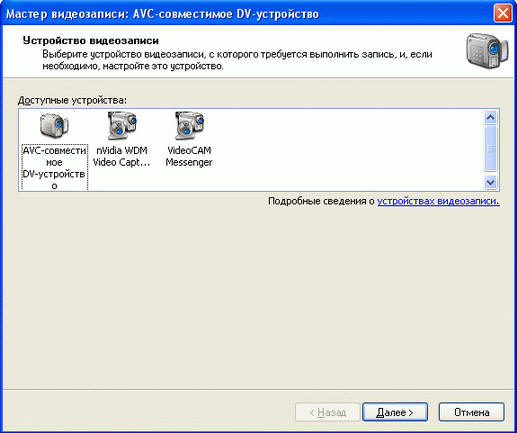
As you can see, everything is quite simple and clear here. On the left is a listing of the stages of film creation: video recording, film editing, completion of creation. In the center is a collection of imported video clips. On the right is the preview window, below is the artboard. To start processing, we need to either directly record a video clip from an external device (in this case, a camera), or import an already recorded video file. Let's say we want to directly capture a video clip from a digital camera. To do this, click on the "Record from video device" link. We have the following window:
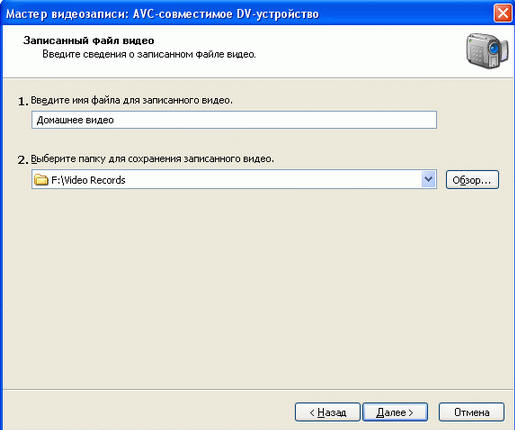
As you can see from the illustration, Windows Movie Maker offers to import an image from any appropriate devices found in the system: camcorders, webcams, video signal input devices. Select a camera and click the "Next" button. After that, we will be asked to specify the folder for recording the video file and give it a name:
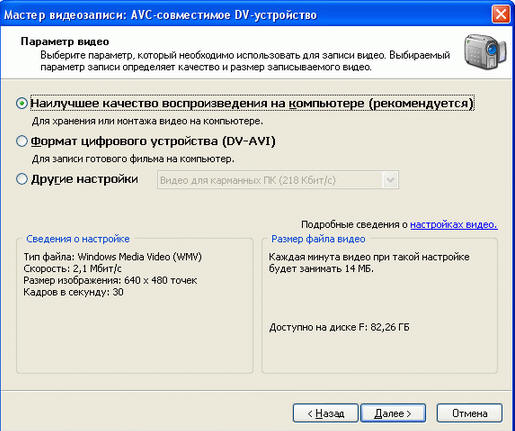
Keep in mind that if you need to transfer a rather large video to your computer (for example, half an hour or an hour of recording), then this may require a large disk space (depending on the selected format). For example, half an hour of video in a standard format (we will talk about them in detail below) takes about 0,5 GB, and in an extended digital format - almost 5,5 GB! Therefore, choose a folder on that drive (if you have more than one) that has enough free space. Next, a very important question is asked in what format to record a video on a computer:
And here the main thing is not to miss, so let's look at the proposed formats. Best playback quality on PC (recommended) This recording format is most suitable for further processing, so in most cases it is recommended to select it. Moreover, the specific parameters with which the recording will be made depend on the selected recording device and the audio and video output by the device to the computer, as well as on the speed of the computer processor. At the same time, each minute of video recording will take up approximately 14-15 MB on the computer. In this case, the image size is 640x480 pixels, the bit rate is 2,1 Mbps, frames per second is 30. These parameters are usually quite enough to play the movie on a computer and on a TV screen. Digital device format (DV-AVI) This recording format is only available when recording from a digital video device such as a digital video camera or digital video device. Its main advantage is that the quality of the original video is completely preserved during recording, so after processing it can then be recorded back to a DV cassette. If you shoot with a digital camera and plan to seriously edit, then this format is the best choice. However, video files saved using this setting may be quite large. For example, each minute of video saved in this format consumes approximately 178 MB of disk space. So make sure you have enough free hard disk space to record the required amount of video. Half an hour of video in this format, as we have already found out, is almost five and a half gigabytes (!). In this case, the image size is 720x576 pixels (this is the DVD-Video format), the bit rate is 25 Mbps (the best quality and the smoothest movement of objects in the frame), frames per second - 25. Other settings This section offers all the formats included in the program, including the ones listed above:
Various resolutions are presented there: both highly compressed, for pocket computers (while a minute of recording takes no more than 1 MB), and the smallest formats (for example, video for remote access), in which a minute can take only 278 KB. However, unless clearly necessary, and also if you are going to do at least some kind of editing, it is better not to choose these compressed formats. When you need to compress a movie, for example, to transfer it to a PDA or transfer it over the Internet, you can always do this using this program (or any similar one) after you finish editing. We won’t mess around with the digital format, but we are interested in the usual quality and simple installation, so we choose the very first, recommended item. After that, Windows Movie Maker will ask us the following juicy question:
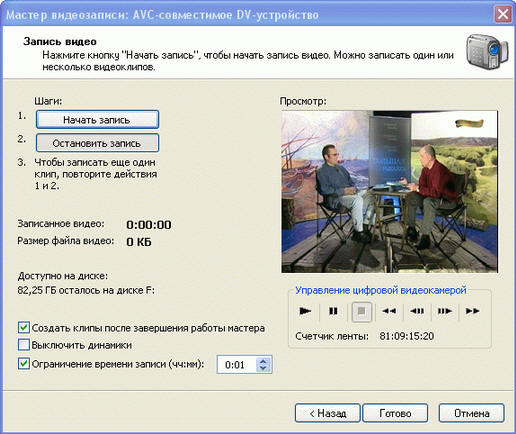
The fact is that Windows Movie Maker can independently manage digital video cameras. And if he is given the appropriate command, he can rewind the cassette to the beginning himself, start it with the simultaneous inclusion of recording and rewrite the entire cassette to disk. If you need exactly this, choose the very first item (turning on or off preview when recording is to your taste; if you are going to somehow use a computer while rewriting the cassette, then it is better not to turn on simultaneous playback, because it will consume system resources). However, it is rare that users need to rewrite an entire tape at once. As a rule, recordings on a cassette are divided into different events, and in the name of more convenient processing, it is better to choose the manual recording mode - and here, be sure to turn on the preview! After that, click the "Next" button, and the recording management window appears in front of us:
The window, by the way, is very informative. With the buttons "Start Recording" and "Stop Recording" everything is clear. Below them is information about the recorded time of the video and the resulting size of the video file. Below is some very useful information about how much space is left on the selected drive. (This setting must be monitored.) From the options below: Create clips after completing the wizard - quite a useful feature for home installation. Windows Movie Maker will analyze the recorded video and divide it into sections (clips) on its own, between which you can then insert transition effects. In principle, you can split the video manually, but, as a rule, Windows Movie Maker does this quite competently, which means why bother with unnecessary work, right? Turn off speakers - turn off the sound during video recording. This may make sense if the video contains all sorts of naughty scenes - for example, putting a button on the chair of a favorite teacher - that parents do not need to know about. Well, or other spicy scenes - think of which ones. Recording time limit - the ability to set the automatic stop recording after a certain period of time. For example, if you need to go somewhere and you know that this piece on the tape takes about twenty minutes, set a limit of twenty-five minutes (with a margin), start recording and go about your business. In the right part of the window there is a preview of the recorded (played) video, as well as a digital video camera control section, with which you can perform any manipulations with the tape: rewind it back and forth, start, stop, frame by frame rewind. Unfortunately, all these joys of controlling the device from a computer are only available for digital cameras. With analog (old cameras) this trick will not work, and the buttons on it will need to be pressed with handles. You should also keep in mind that you can record not just one clip at a time, but as many as you see fit. This can be handy if you want to include, for example, a piece from the beginning of the tape, a piece from the middle, and a piece from the end into the edited movie. Record three clips, and then it will be convenient to mount them into one video. For example, I recorded two separate clips for a minute, so that we can see how it's all mounted later. After everything is recorded, you need to click the "Finish" button. Film editing If automatic splitting of the clip into clips was set, then Windows Movie Maker will display all the prepared clips in the central window. If there was no automatic splitting, then as many clips as you have just recorded will appear in the window:
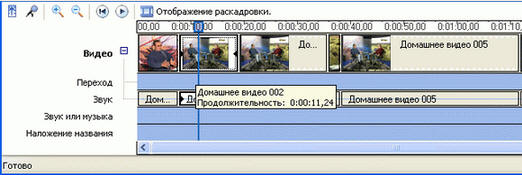
Now we need to make a video movie (video clip) from these clips. The action plan is simple. The recorded clips must be dragged in the appropriate order to the timeline at the bottom. This is done using the mouse with a simple "drag and drop" - that is, you select the desired clip, press the left mouse button on it and, without releasing it, drag the clip onto the timeline. When the clip is in the right place, release the button. The result is something like this:
As you can see, almost all clips visually have different lengths. Why? Yes, because the timeline of each clip is shown in the appropriate scale on the timeline. You can change the scale using the mm icon with a plus and minus, located on the table at the top left. In the same place, you can start and stop the broadcast of the clip with the reference point selected by the mouse:
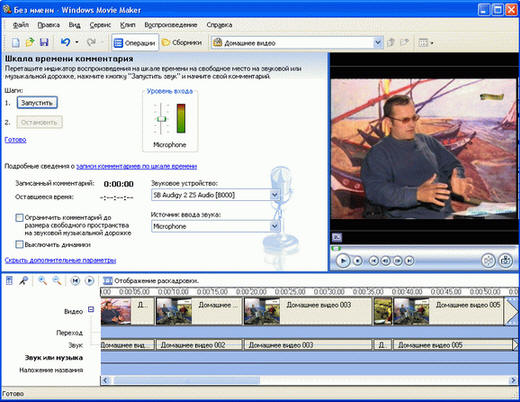
Sound overlay Now that we've prepped the storyboard, we can start layering our voice overs. To do this, turn on the microphone (in laptops they are usually built-in, in personal computers they need to be connected separately) and click on the microphone icon on the timeline - an audio recording window will appear on top:
You can adjust the microphone volume using the input level bar. Also, by clicking the sound level icon on the timeline (to the left of the microphone icon), you can set the balance between the sound level of the clip and the accompaniment level:
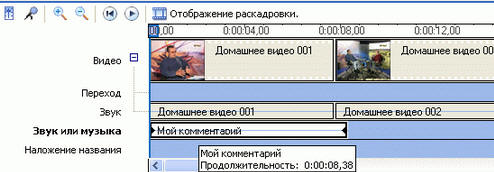
Don't be afraid to experiment! If there is something wrong with the sound level, you can always remove the comments and record them again. Now you can start writing a comment. To do this, drag the playback indicator from the timeline to the appropriate place on the audio track, then click the "Start" button and record a comment. When finished, click "Stop" - the system will ask for the file name and folder where it should be placed. It is better to give a name such that later it is clear what kind of audio track it is: for example, "My comments" or "Background music" (you can overlay any audio tracks, including musical compositions, and not just your voice comments on the audio track) . After the comment is recorded, it will appear on the audio track:
If you click on a comment (audio track) with the right mouse button, a context menu will appear, which lists some options for working with a comment:
The volume setting is especially important there, with which you can correct the sound balance, and also, if necessary, completely turn off the original clip track, leaving only the sound you have overdubbed. Video effects Now let's move on to the video effects. To switch to the video effects overlay mode, you need to click on the "Storyboard display" icon on the timeline. Video effects can be of two types: the playback effect of the clip itself and the transition effect from one clip to another. The clip playback effect is set using the star icon located on the clip, and the transition effect - on the special icon between clips:
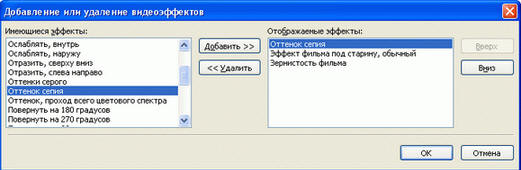
replay effect Windows Movie Maker offers a fairly wide range of a wide variety of playback effects: slow motion, grainy, old film effect, sepia, blur, and so on. The most convenient way to work with playback effects is as follows. First, in the top menu "Tools", select the item "Video effects" - a list of suggested video effects with a preview will appear in the top window:
Now all you have to do is take the desired video effect with the mouse cursor and drag it to the corresponding timeline video clip. Moreover, the effects can be combined with each other in any way - for example, you can set the sepia color and the effect of the old film at the same time. The second option for applying effects is to right-click on the desired video clip and select "Video Effects" from the context menu. You will see a special window in which you can set effects according to their description:
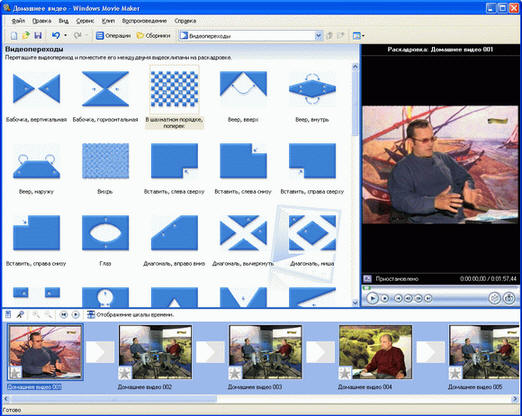
In the same window, you can remove unwanted video effects. transition effect Transition effects are not about playing clips, but about transitioning from one clip to another. Therefore, they are set at the junction of clips - a special icon is used for this. Transition effects are set in much the same way as playback effects. The most obvious option is to select "Video Transitions" in the "Tools" menu. You will see a list of transition effects with a preview:
Now it remains only to select the desired effect and drag it with the mouse to the icon of the corresponding transition from clip to clip - the image of the selected effect will immediately appear on the icon. For example, in the screenshot below, the first transition has the effect of a checkerboard frame change, while the second one has not yet been set.
Title and credits Any film, even homemade, should have at least a title, not to mention the credits, which list the creators and characters, well, or write all sorts of funny nonsense. It's very easy to create a title and credits in Windows Movie Maker. To do this, it is enough to select the item "Title and credits" in the "Tools" menu. You will see a list of options:
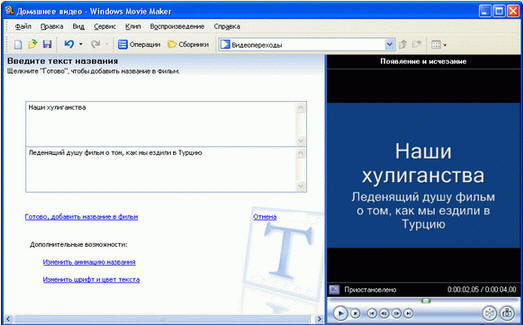
Click on the "Add title at the beginning of the movie" link. We will see a form for entering the title and its description. When everything is entered, in the right window you can see a preview of these frames with the specified effects:
Title and title animation can also be set there by clicking on the "Change Title Animation" link. There you will be given a list of a wide variety of options. Titles and their descriptions are set in the same way for any of the selected clips, and they can be placed before the clip, directly on it, and after the clip. Under the final credits, a special form is offered:
Well, like everything. After everything is done, it remains only to scroll the movie in the preview window from beginning to end, and if no further processing is required, you can proceed to the stage of recording the edited movie. However, before that, it is strongly recommended to save the film project ("File - Save Project"), so that you always have the opportunity to return to it and change or edit something. Completion of the film Now what can be done with the fruit of our labors? We are offered several options.
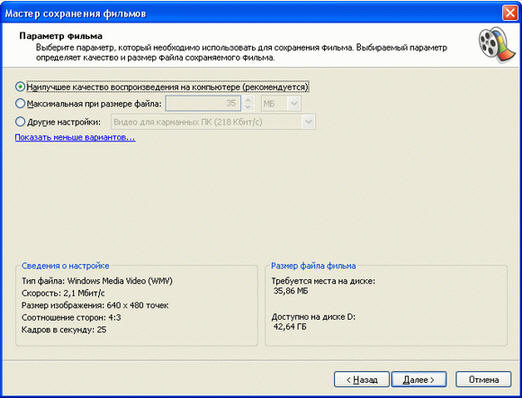
Hard disk recording The first option is the most preferable, because you can then process the saved movie in any way you like: burn it to a CD, send it by e-mail, publish it on the Internet. In addition, when choosing the first option, all the others will be offered in the additional menu - just like when copying a video from a cassette (device) to a computer. Let's choose the first option - burning a movie to a hard drive. After that, as usual, you will first be asked to name the file and select a folder. Next, a familiar window will appear with a choice of recording format options:
By default, of course, you need to select the very first item - the best quality for playback on a computer. The movie will be recorded in WMV (Windows Media Video) format and can be viewed using either Windows Media Player or any other player that supports this format (eg Nero Show Time). Let me also remind you that in this case, one minute of the film will take approximately 15-17 MB. Our two-minute film ended up taking up 30 MB. If you want to save the video in its original format without additional compression - for example, in order to later be able to convert it to DVD-Video or some other format using some program, select the DV-AVI mode, but keep in mind that in In this format, the saved clip will be very large. Recording to CD If you choose to burn to a CD, Windows Movie Maker will offer you three formats before burning: the best quality (as for burning to a hard drive), the most suitable format for burning to a CD (a slightly more compressed image), and the minimum file size (it needs to be will indicate). And here it all depends on the length of the video and whether it fits on a compact (640 MB) or not. If the video is small, then choose the best quality, and if it exceeds 640 MB, then specify the format for recording to a CD or select a specific size value. Please note that the video will not be written to the disc in DVD format (MPEG-2). Windows Movie Maker only handles two formats: Microsoft's native Windows Media Video and the almost uncompressed DV format (not suitable for burning to CD). Therefore, the film will be recorded using Microsoft HighMAT technology, and it will be possible to play it on a consumer player only if it supports this technology. However, almost all modern players support it. Sending a video by email By e-mail, of course, you will not send a large volume. Therefore, when you select this item, Windows Movie Maker will convert the movie to a small image size (270x200) and compress it to the size specified in "Tools - Options - Advanced Options - E-mail". The default is 1 MB. You can increase this value, but keep in mind that many mailboxes won't let messages larger than 2MB, for example. In addition, when a clip of one megabyte is attached to a letter, the entire letter will take one and a half times more - that is, at least 1,5 MB. Even a two-minute video compressed to 1 MB looks completely obscene, so it's better not to use this opportunity at all. If you need to send a video over the Internet, it's easier to upload it to some server and send a link to the recipient. Below we will consider this possibility. Uploading a movie to a website It should be noted right away that for Russian users the corresponding Microsoft service for uploading video content to a special web site is not yet available. But there is nothing wrong with that. After all, the main task here is to convert your film to a form suitable for uploading to the Web. Because even an ordinary ten-minute film in standard definition takes 150-170 MB, and this is not the amount that can be easily downloaded even on a good line. In addition, it makes no sense to load both yourself and the addressee with such volumes, because you have obviously mounted not "Cleopatra" and not "King Kong", which require viewing on a huge screen. In this case, we are talking about home video - the cat is sleeping on the pillow, dad is opening champagne, the whole family is sitting on the plane going to the resort - so there will be nothing to worry about if you reduce the image resolution and increase the image compression. This will have a very favorable effect on the size of the final file, and the cat, dad and the plane will not suffer from this in any way. Click on the "Submit to Web Site" link. Give the new video a name. After that, the following window appears:
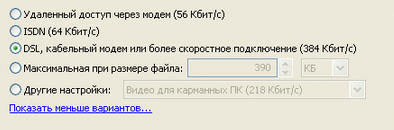
Here you are not tormented by a tedious enumeration of all the intimate parameters of the video stream, in which you may not understand anything. The approach, as you can see, is simple - depending on the type of channel: access to the Web through dial-up, through a weak dedicated line, through a high-speed connection. Format for dialup to choose, in general, it makes no sense - 160x120 pixels and 38 Kbps - this is not quality at all. But dialup for transferring video over the Internet is not suitable, so if your subscriber has the misfortune to go online through a telephone connection, take the time to meet him in person and transfer this gorgeous video in excellent quality on CD. The format that already makes sense for transmission over the Internet is what the program offers for DSL or faster connections - 320x240 pixels and 340 Kbps. At the same time, a ten-minute video takes about 25 MB (instead of 150-170) with quite decent quality for home video. Then you just have to somehow put it on a site on the Internet (for example, on your home page) and give a link to the subscriber. In addition, if you are well aware of what exactly you want to receive as the final file for uploading to the Web, you can click on the "Show advanced options" link, and you will have the following options:
Here, for example, you can build on the size of the file. The source file, as we agreed, is 150 MB, but you know that the subscriber will not pull out more than 50 MB. Then just set 50 MB, and the program itself will select the optimal parameters for converting, in order to end up with a video of this size. Its resolution in this case will be about one and a half times greater than when choosing a format for DSL. Sending to a digital camera This type of saving is only used if you have re-recorded the original material in DV (Digital Video) format and edited (mounted) it in order to re-record it on tape. Note that recording from a computer to tape is possible only when using a digital camera. If you click on this link with a digital camera connected and turned on in the appropriate mode, Windows Movie Maker will rewind the tape in the camera to the beginning and record this video on it - over the contents of the tape, if there is something there. In conclusion about Windows Movie Maker Windows Movie Maker is a very easy to learn even for novice users and quite an effective program for reading, processing and recording amateur videos. However, it has one very noticeable drawback: the program works with almost only one single video format - Windows Media Video (WMV). This means that the videos created in it can only be viewed on a computer. Household players practically do not support this format, the program cannot record videos in DVD-Video (MPEG-2), in MPEG-4 (DivX, XviD), supported by most modern players, it also cannot, or rather, does not want to. the program, however, can save the created movie in DV-AVI format, but in order to later turn it, for example, into a standard DVD-Video (MPEG-2), processing in some separate program - a converter or editor! Thus, the scope of this program is limited to clips created for viewing on a computer and for sending them over the Internet. A pity, very pity. If she could immediately record videos in DVD-video format, she would not have a price for novice users. But here everything is explained by purely marketing considerations: Microsoft has created the WMV format and it is diligently promoting it in any way, including the hard binding of Windows Movie Maker to this format. Well, in conclusion - some tips novice filmmakers on creating videos and using Windows Movie Maker. 1. Read video from tape to your computer in the best quality and save this video separately in its original form before editing. Many users believe that if they need to make a video to send via the Web, then they can also download video material from the tape to their computer in poor quality. This is an extremely incorrect approach, because you will then erase the original frames on the tape, and if you suddenly need to get a video in good quality, there will be nowhere to get it! Therefore, when reading a tape, be sure to select the best quality and separately save the original video as this before editing - it will come in handy. In the end, copy it to a DVD - the process will cost you a maximum of fifteen rubles, and this is not such an amount that will ruin you forever. 2. Spend a certain amount of time processing, and most importantly, reducing the source material. What do many novice camcorder users do? They go on a trip, they record every step of their companions, and then, after returning home, they transfer all these hours and tens of hours of recordings to a computer, save them in the form of a long video without any editing, and then treat them to their unfortunate friends who have the imprudence to come to visit . Where does it end? The complete absence of all sorts of friends, because the one who had to watch at least once two or three hours of home videos of his friends (unless, of course, we are talking about erotica), makes a terrible oath never to appear in this house again - at least , until the moment when the owners break their damn camera or at least their computer. Therefore, show your generosity: carefully review all these endless hours of video, select only the best from there, carefully edit and offer guests the final film, which by no means should take more than fifteen minutes! Better yet, ten minutes. Then the guests will be happy, and you will also want to review this final version from time to time, because I assure you that almost no one ever watches an unedited video - including its creators and participants themselves. 3. Don't get carried away with video effects and transition effects. A common problem for all novice video enthusiasts is stuffing the video with a wide variety of video effects. And if the scene change is also done automatically in Windows Movie Maker, as a result of which a ten-minute video contains several dozen scenes and each of the transitions is equipped with some kind of video effect, all viewers will quickly develop idiosyncrasy from such a movie. So you need to learn a very simple thing: not film for special effects, but special effects for film. The first is video. Effects only emphasize something - for example, a scene change, the appearance of inscriptions and subtitles. But they should not clog the image, should not distract attention from the image, and in any case - should not replace the image. If you think that the audience, seeing the endless flashing of the most stupid effects on the screen, will consider you a great director, I assure you, you are deeply mistaken! 4. Accompany your home video with unobtrusive background music. Unlike video effects, which are rarely needed, good background music for home videos is almost always needed! In live sound from an amateur video camera, apart from the noise of the street or the room, as well as the idiotic remarks of the participants in the filming, there is nothing else. Do you think the audience will applaud enthusiastically every time the brother once again says: "Suher, they're filming us," and dad accidentally hiccups or sneezes? Well, once, maybe, they will applaud politely, but after the second or third time, the same brother or dad will set fire to a chair under you, a great director - and they will do it right! Therefore, to hell with live sound, it is absolutely not needed! Take some unobtrusive instrumental, mount it with Windows Movie Maker to your movie, properly muffling the original sound, and then there will be not a movie, but just some kind of masterpiece, honestly! Moreover, if the film is long or it has different episodes, for each of them select your own instrumental composition suitable for this video sequence. 5. If what is happening in the film requires some comments - write them down directly on the video. It often happens that a home video requires quite significant commentary - for example, who are these people, where is it happening, what happened before, after that, and so on. Of course, you can count on commenting on what is happening on the screen during the show, but, firstly, this may not always be convenient (for example, you have already had such a rest at the festive table that the language is already hard to listen to), secondly, over time, you may forget some details, and thirdly, what should the viewers to whom you recorded the video do so that they can watch it at home? So it's better to immediately put comments on the video. As you like - in the form of text, if there are few of them, in the form of a voice commentary superimposed on the episode, in the form of a separate video that needs to be additionally filmed. Then the film will be solid and self-sufficient. Author: Alex Exler; Publication: exler.ru
▪ How to get perfect video in nightmarish lighting
Artificial leather for touch emulation
15.04.2024 Petgugu Global cat litter
15.04.2024 The attractiveness of caring men
14.04.2024
▪ AI was taught to distinguish between the eyes of the living and the dead ▪ Dogs and primates see magnetic fields ▪ AD8370 Digital Gain Control Amplifier ▪ Forecast about refusal about TVs was not confirmed
▪ section of the Antenna website. Article selection ▪ article The suffering of young Werther. Popular expression ▪ article When did the bath appear? Detailed answer ▪ article Cyclanter bladed. Legends, cultivation, methods of application ▪ article Teletext system. Encyclopedia of radio electronics and electrical engineering
Comments on the article: Novel When I open Windows Movie Maker, the <record from video device> window does not activate, what should I do? Please tell me what's wrong?
Home page | Library | Articles | Website map | Site Reviews
www.diagram.com.ua |


 See other articles Section