|
|
EFFECTIVE FOCUSES AND THEIR CLUES Session with cylinders (several tricks). Focus Secret
Directory / Spectacular tricks and their clues Session description: Pulling his sleeves behind his wrists, the magician shows his hands to the audience so that they can make sure that they are empty, and begins his story: “Once a young man was in a hurry to go on a date with a girl, but forgot his handkerchief at home. What to do? But our hero didn’t he was confused. He bought a newspaper on the way."... The artist takes a newspaper sheet from the work table, holds it by two adjacent corners directly in front of him, turns it and shows both sides of it, hits the newspaper with his hand, proving in every possible way that it has no secrets, and rolls it into a cylinder. Roll up the newspaper into a tube, as shown in Fig. 103, the presenter holds it in his left hand and continues: “And then everything was quite simple: from a newspaper cylinder he easily got the handkerchief he needed.”
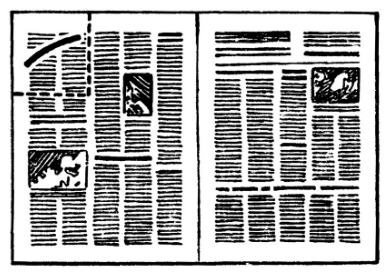
At these words, the artist lowers his right hand inside the newspaper tube and slowly, piece by piece, takes out a bright handkerchief. “This is what it means to not get confused and realize in time.” He throws the handkerchief up and, having caught it, puts it in the breast pocket of his jacket, and then unfolds the newspaper and, holding it by two corners, shows both sides and takes it to the work table. After this, the performer returns to his original place, takes a scarf from his breast pocket, tosses it several times in the air, catches it and throws it over his left shoulder. With his right hand, from the left inner pocket of his jacket, he takes out a small piece of thick drawing paper. Holding this sheet by one corner in his left hand, he hits it with the edge of his right hand with quick and sharp movements, proving to those present that this is ordinary paper in front of them, without a catch. Then the artist rolls the piece of paper into a tube, looks through it into the audience, and then slowly, piece by piece, pushes the handkerchief into it completely and unfolds the tube, the handkerchief is not in it - it has disappeared. Having shown both sides of the paper and striking it several times with force with the edge of his right hand, the magician takes it and places it on the work table. Taking a few steps away from the table towards the ramp, he stops. “You just had the opportunity to see that you can not only get scarves from paper cylinders, but in such cylinders scarves disappear without a trace.” The artist takes out from the right inner pocket of his jacket a small glass tube-cylinder 15-18 cm long and 2-2,5 cm in diameter. Holding it by the two ends with his hands at chest level, he turns and shows it to the audience. “Now you have a glass cylinder in front of you,” says the artist. Having made a sharp movement to the left, he raises his outstretched right hand with the cylinder in it upward. The audience sees a colored scarf appearing in a glass tube, its end hanging out. “It turns out that a glass cylinder is also suitable for our purposes.” The presenter removes the handkerchief from the tube, puts the tube in his pocket, ties a single knot on one of the corners of the handkerchief and, taking the handkerchief in his right hand by the opposite corner, holds it with the knot down. The handkerchief hanging in this way begins to flutter, and suddenly, in front of the public, the knot slowly unties and disappears completely. This little trick makes a big impression on the audience. The illusionist, smiling welcomingly, threw the handkerchief up and, catching it, slowly pushed it into his left fist. Pause... A sharp swing of the left hand from bottom to top and back, the palm is unclenched, but there is no scarf in it - it has evaporated! Bowing, the artist leaves the stage. The assistant appears and brings out an ordinary small table, then brings and places on it a tray with three large (height 35-40 cm and diameter 15-18 cm) cylinders, and he goes backstage. After a short period of time the magician returns. Approaching the table, he rearranges the cylinders on it, removing them from the tray, and places the tray on the work table. Then he again approaches the demonstration table and, taking one of the cylinders, shows it to those present, looks through it at the audience, sticks his hand in, points to the light - this is an ordinary thin-walled cylinder with nothing inside. The magician threads this cylinder through the second one and shows that it is also empty. Having again passed the first cylinder through the second, he shows the first empty cylinder and again passes it through the second. Having shown the audience that the second cylinder is still empty, the artist passes it through the third and shows that there is nothing in that either. Having again passed the second cylinder through the third, he demonstrates the empty inside of the second cylinder and, once again passing this cylinder through the third, he shows the third cylinder in the light and places it on the table. Then the illusionist moves to the first cylinder, pulling his sleeves higher and exposing his wrists, puts his hands inside it and takes out several bright scarves one at a time. He does this slowly, pulling out the scarves gradually, while looking slyly into the audience. "As you can see, almost any cylinder can produce scarves. The larger the cylinder, the more scarves can be extracted from it." The artist again puts his hands into the cylinder and takes out a large dice. Taking it in his hand and turning all its sides in front of the audience, he places it on the table, shows the first cylinder empty, threads it through the second and shows the second cylinder empty. Having again threaded the cylinders one through the other, the presenter places them on the table. Pulling his sleeves even higher, he puts his hands into the second cylinder and takes out several scarves, then several bright silk ribbons, and finally places a small flower vase on the table. Having shown that the third cylinder is empty inside and, for greater convincing, having threaded the second cylinder through it, the presenter places the cylinders, having first once again shown the second cylinder empty. From the third cylinder, he takes out several bright scarves, a piece of thin red material about a meter long, and a bouquet of flowers, which he places in a vase taken from the second cylinder. Addressing those present, the artist says: “It turns out that not only scarves can be obtained from cylinders.” Throwing scarves and ribbons, he once again demonstrates them to the audience, and then, showing a piece of red material, turns it into a banner and, holding it with one hand, leaves the stage with a solemn step. An assistant comes on stage. Taking the first and second cylinders in his hands, he shows those present that they are empty inside, inserts them one into the other, demonstrates the third empty cylinder by inserting the first two into it, and, once again showing the cylinders folded together, takes them backstage. Focus Secrets: It is not at all difficult to obtain a scarf or other similar things from a sheet of newspaper if you skillfully dissect it in advance. To do this, take two identical newspapers of the same issue. Having unfolded one of them, a small curved cut is made in the upper left corner of the sheet with a sharp knife or razor, as shown (thick line) in Fig. 104.
From another newspaper, the same corner is cut in the form of a rectangle; in our figure this is shown with a dotted line. Having placed this rectangle on the corresponding place of a whole newspaper sheet opposite the cut, mark with a pencil the place where it will be glued. Then apply rubber glue to the rectangle along the entire perimeter (the width of the glue strip is 1-1,5 cm), as well as the gluing area along the entire contour, allow the glue to dry and, having placed the rectangle on the marked area, cover it with a clean sheet of paper and smooth the gluing by hand. Excess glue that protrudes beyond the boundaries of the rectangle is removed with fingertips; when stroking them, the glue rolls up and moves away from the newspaper. So in the corner of a newspaper sheet we have a “secret” pocket in which a small thin handkerchief folded into a quarter is neatly hidden. The handkerchief hides in your pocket completely unnoticed. When a newspaper sheet is shown to the public, it is held so that the pocket opening is hidden by the magician's hand. When the sheet is folded, the pocket slot appears inside the cylinder. When pulling the handkerchief out of your pocket, be careful not to tear the slot in the newspaper, otherwise the noise caused by the tearing paper will reveal our secret. The “disappearance” of the scarf into a small cylinder rolled up from drawing paper occurs with the help of a thimble, which we previously described in second session with scarves. The difference is that in this trick the thimble is put on in the left inner pocket when a piece of paper is taken out of it, and it is not a pound that is rolled up from this piece of paper, but a tube. The artist leaves the thimble on his work table when he takes a piece of paper there that has become unnecessary. To make it easier to understand how the handkerchief ended up in the glass cylinder, let's carefully look at Fig. 105, A.
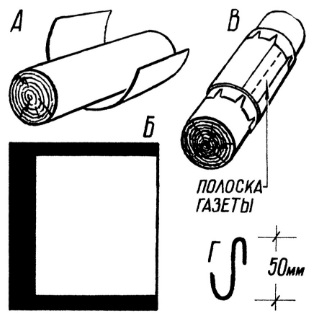
The figure shows that the (black) thread a, one end of which is fastened under the collar of the jacket, passes through the glass tube b, and the blue handkerchief, attached to the other end of the thread, is hidden in a small pocket in the (pochette) located under the right lapel. A blue scarf is used because the black thread will not be visible on it. In this form, the tube is placed in the right inner pocket of the jacket, while the thread against the black background of the magician’s costume is not visible to the audience. When the artist takes out a glass tube and shows it to the audience, he tries to hold it against the background of the right half of the jacket in order to hide the thread. He holds the tube with both hands by the ends. Then suddenly, with a quick and sharp movement that needs to be well rehearsed, the artist raises both hands holding the pipe up above his right shoulder, while simultaneously turning his body to the left. At this moment, the thread under the cover of the left hand, stretching, grabs the handkerchief and pulls it inside the glass cylinder. When the magician lowers his left hand, he, grabbing the thread, pulls out its end attached under the collar or simply breaks it off (Fig. 105, B). To make it easier for the magician to perform this trick, the length of the thread must be chosen exactly according to his height; the approximate length of the thread is 70-80 cm. When the glass tube is hidden in the pocket, the performer holds the scarf by the corner to which the thread is attached, and together with it ties a single knot at this corner (Fig. 105, B). Then he takes the handkerchief by the opposite corner and holds it with the knot down, the end of the thread falling to the floor; Having stepped on this end with his foot, the artist pulls the thread, tugging it slightly, causing the scarf to flutter, and then pulls the thread until it unties the knot. That is why the thread must be strong enough. Next, the thread must be either unnoticed, or skillfully hidden in the scarf and pushed into the fist in which the thimble is located (see Fig. 76 - the “disappearance” of the scarf from the fist is also described in detail there). In this case, the artist took out a thimble from the sideboard, hidden under the hem of his jacket on the left side, while standing with his right side towards the audience. In the same way, he freed himself from the thimble when he finished the trick. The three cylinders with which the illusionist worked are made of metal and painted or glued together from thick cardboard and finished with colored paper. The inside of the cylinders must be black. They are all made the same length, but their diameters are different (15 cm, 16,5 cm and 18 cm), thanks to which they can freely fit into one another. In Fig. 106 shows the procedure for making our cardboard cylinders. First of all, you need to select a blank of the appropriate size, it can be a piece of pipe, a wooden roller, etc. A cylinder with the smallest diameter is made on this blank, and then, increasing the volume of the blank by gluing cardboard onto it in several layers, the remaining cylinders are made.
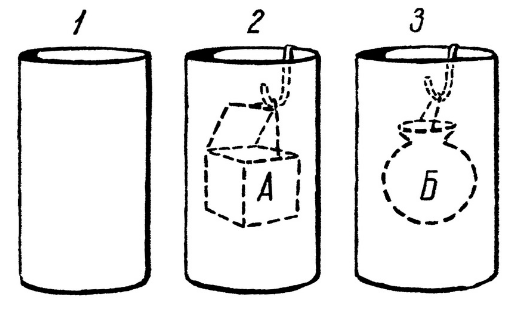
A rectangle is cut out of thick glued cardboard, the dimensions of which exactly correspond to the height of the future cylinder and the circumference of the blank. This pattern is first bent along the blank (Fig. 106, A), and then a sheet of black paper (photo wrap) is glued to its inner (concave) side - Fig. 106, B. The black paper should be larger than the pattern, so that on one side (along the gluing seam) it extends 5-6 cm, and along the edges of the cylinder - by 3-4 cm. Next, the pattern is folded and, having been put on a blank, glued along seam (end-to-end), for this, a 5-6 cm strip of black paper that extends beyond the pattern is smeared with glue. A strip of newspaper is glued over the seam for strength (Fig. 106, B). The black paper extending beyond the edges of the cylinder is coated with glue, cut, and the scallops are folded and glued to the outside of the cylinder. Now all that remains is to cover the outside of the cylinder with colored paper, dry it well, and then remove it from the blank. To prevent the cylinder from accidentally sticking to the blank during operation, it must first be wrapped in a clean sheet of paper. The glue should be applied not to cardboard, but to paper, then the gluing will be stronger. At your request, all three cylinders on the outside can be the same color or each can have its own color. We still have to make two hooks, their profile is shown in Fig. 106, G. They are made from a metal strip 5-6 mm wide and 0,8-1 mm thick. The edges of this strip must be processed so that they do not cut the “charging” pendants. Now we’ll talk about the technology for performing the trick itself, and we’ll talk about the design of devices for charging cylinders later. Having removed the cylinders from the tray, the performer placed them on the table in the following order - first on the right he placed the cylinder with a smaller diameter (1), it was not “charged”; the next cylinder (2) had a larger diameter and a “charge” was suspended inside it on a hook; the last, largest cylinder (3) was also “charged” - fig. 107.
Starting the trick, the artist showed the audience that cylinder 1 was empty - this was true, since it had no “charging”. Then the magician passed cylinder 1 from bottom to top through cylinder 2, while the “charge”, along with the hook, passed into cylinder 1, and cylinder 2 turned out to be empty. Next, he passed cylinder 1 through cylinder 2 from top to bottom and showed that cylinder 1 was empty, since the “charge” again transferred to cylinder 2. Having passed cylinder 1 for the third time from bottom to top through cylinder 2, the magician again transferred the “charge” to cylinder 1 So, passing one cylinder through another, then from bottom to top, then from top to bottom, the artist each time transfers the “charge” together with the hook from one cylinder to another. Thus, he managed to show the audience all three cylinders “empty”, after which the “charges” were: A - in cylinder 1 and B - in cylinder 2. Having taken the handkerchiefs and dice from cylinder 1, the artist completely removed “charge” A from it and showed the cylinder empty. Then he transferred the “charge” from cylinder 2 into it and showed it empty, after which he again transferred the “charge” B into it. When the artist removed scarves, ribbons and a flower vase from cylinder 2, this was only part of the “charge” B. That is why he previously showed cylinder 3 empty, and then transferred the “charging” to it and showed cylinder 2 empty. “Charging” B is completely removed from cylinder 3. After this, the assistant could show all three cylinders to the public without fear of exposure. The success of this trick largely depends on the leader’s ability to easily and freely, without looking, pass one cylinder through another in both directions. Therefore, before demonstrating magic tricks in public, you need to master this art well. In conclusion, as promised, we will talk about “charging” the cylinders with the objects that “appear” from them. In Fig. 108, And you see a cubic box made in the form of a dice, which is what the magician used to “charge” A. Using a loop of thick black thread attached to the box, as shown in our drawing, the “charge” is suspended inside the cylinder on hook. The artist pre-loaded (loaded) multi-colored thin handkerchiefs into the box, one at a time, so that they could be easily pulled out during the performance. When the illusionist took all the scarves out of the charger, he removed the box, hid a hook and a thread pendant inside it, closed the lid and showed the “dice” (box) to the public. To ensure that the metal hook does not dangle inside the box and does not make unnecessary noise, a special compartment is arranged for it, into which it is inserted tightly. The lid of the box, thanks to its sides, closes tightly, and to prevent it from falling through, cardboard strips - stops - are glued inside the box to the walls. The outside of the box is covered with black matte paper, circles (glasses) are cut out of white paper and glued with rubber glue. In Fig. 108, B shows our second “charge” - B. It is a small teardrop-shaped bag, sewn from green material. An elastic band is threaded into the fold of the upper edge of the bag (it is shown as a dotted line in the figure), which tightens the mouth of the bag. But before the elastic is inserted, green laces or the ends of a painted rope (6-8 cm long) are attached to the upper edge of the bag at a distance from each other and a pendant is made of strong black thread. If we now turn the bag upside down, our “charging” will take on a mushroom shape, which is clearly visible in Fig. 108, V. In this form, flowers from multi-colored nylon and leaves from green starched material are sewn onto the bag - this is how our “charging” turns into a bouquet of flowers, which you see in Fig. 108, G. Green laces hanging down look like flower stems.
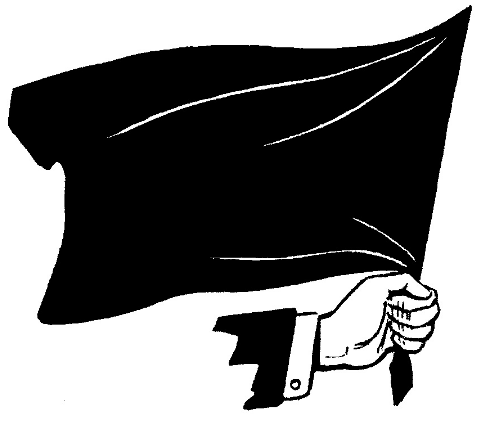
Flowers are cut from multi-colored nylon ribbons according to a template using scissors heated to 70°, while the edges of the nylon are sintered and the flowers do not fray along the contour. The cut out flower is folded (Fig. 108, E) and at point 1 sewn to the “charging” bag. Three or four such folded flowers, sewn to a bag with a bush, form a lush and bright carnation. Green leaves are sewn between the flowers. Objects are placed into the “charging” in the reverse order of their appearance from the cylinders. First, a piece of thin red material is placed on the bottom of the bag, several colored scarves are placed separately on top of it, then a flower vase is inserted into the bag, several colored ribbons are placed at the bottom, and multi-colored scarves are placed on top. It is better to take an unfinished vase, since it is heavy, and use it to make a copy of it from papier-mâché. After drying, the papier-mâché is sanded and puttied, and then sanded again with fine sandpaper and painted with enamel heated in boiling water. A vase painted in this way is difficult to distinguish from a real glazed ceramic one. When the artist is the last to remove the bouquet from the third cylinder, he manages to hide a metal hook inside the bag. You remember how in the first session with scarves we had a scarf balanced on our finger (see Fig. 67). To do this, we had to insert a thread into its edge with oblong-shaped beads strung on it. We will have to do the same with the red cloth of material in order to turn it into a waving banner at the right moment. Only in one of its edges you will have to insert not a string of beads, but a strong twine with elongated cylindrical beads strung on it. You know that if such beads are moved to one end and pressed tightly against each other, and secured in this position, holding, say, the opposite end of the twine in a fist, then they acquire the rigidity of a single rod. In this case, the red banner can be raised like a banner on a pole, as shown in Fig. 109. Our magician did the same, leaving the stage at the end of the session.
In the described trick, more than three cylinders can be used; some illusionists work with six cylinders. Thus, you can diversify your performances both by changing the number of cylinders and by changing the nature of the objects “infected” in them. But the principle of display always remains the same, that is, the cylinders are arranged in increasing order of the size of their diameters, the first cylinder has no “charging”, and the last one has an increased “charging”. Author: Bedarev G.K.
Machine for thinning flowers in gardens
02.05.2024 Advanced Infrared Microscope
02.05.2024 Air trap for insects
01.05.2024
▪ The light reflected from the planet will show its habitability ▪ Zyxel 802.11ax Outdoor Access Point (Wi-Fi 6) ▪ New Toshiba Low Voltage MOSFETs
▪ section of the site Visual illusions. Article selection ▪ article You can't drive up on a goat. Popular expression ▪ article When did you start collecting honey? Detailed answer ▪ article Head of Author's Programs Department. Job description
Home page | Library | Articles | Website map | Site Reviews www.diagram.com.ua |


 Arabic
 Bengali
 Chinese
 English
 French
 German
 Hebrew
 Hindi
Hindi Italian
 Japanese
 Korean
 Malay
Malay Polish
 Portuguese
 Spanish
 Turkish
 Ukrainian
 Vietnamese


 See other articles Section