|
|


 Arabic
 Bengali
 Chinese
 English
 French
 German
 Hebrew
 Hindi
Hindi Italian
 Japanese
 Korean
 Malay
Malay Polish
 Portuguese
 Spanish
 Turkish
 Ukrainian
 Vietnamese
|
ENCYCLOPEDIA OF RADIO ELECTRONICS AND ELECTRICAL ENGINEERING Racks for home theater equipment
Encyclopedia of radio electronics and electrical engineering / Speakers The home theater owner is often faced with the problem of how to arrange the equipment so that it is comfortable, functional and fits well into the interior of the room. This is a rather difficult task. The presence of sound equipment in a home theater complex, which, moreover, is often used to play audio CDs, imposes severe restrictions on the structures and materials used. A reasonable desire to save some space in our far from spacious apartments leads to the placement of home theater components in the space under the TV. It is possible to purchase a "wide" TV stand or two "narrow" ones (which is especially important when using a full-range floorstanding center channel speaker). The prices of branded stores bite very much. Are you ready to buy a rack for the price of a decent receiver? A search on the market for cheap domestic or home-made designs also did not bring the desired result. The products of our "handicraftsmen" are often flimsy. For a simple installation of a couple of equipment cases in such a rack, their strength should be enough, but installing a "large" TV weighing 40 - 90 kg on top can easily bring down the entire structure. So, we will make the racks ourselves... Steel and marble are used as the material, which gives the structure considerable strength and "musicality". Chipboard sheet is used only in the construction of the upper shelf, on which the TV is installed, to strengthen it. In my opinion, the bottleneck in manufacturing is the need for turning, which will not be available to everyone. In this case, you can purchase similar structural veneered chipboard racks and use metal parts from them. At one time I saw such racks of homemade work at a price of 1600-1800 rubles in one of the Moscow commission shops. They had good strength, but very poor workmanship of wooden shelves, which gave them an unsightly appearance. So, let's move on to the calculations ...
Calculation The first stage in the design and manufacture of any racks is to determine the composition and height of the equipment cases that will be installed in them. Let's take a typical composition: TV, receiver, DVD player, CD player, VCR, MD player and translation amplifier. For placement, we need two four-shelf racks. The height of the compartment for the amplifier and receiver, as a rule, is 18 - 24 cm, for the rest of the equipment - 12 - 18 cm. Add to the selected dimensions the thickness of each shelf (3,6 cm for the top shelf and 2 cm for the rest) and 8 -10 see mounting spikes and stand. The optimal height lies within 50 - 70 cm. Sometimes you can use a pair installation of two cases of equipment that is not associated with high-quality sound reproduction in one compartment. For example, two VCRs or MD decks (if they are only used for translations and not for music). In the future, I will use the following compartment sizes: 20, 12 and 18 cm. The height of the rack is 66 cm.
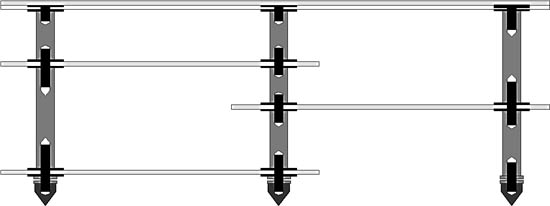
Metal The metal parts of the rack are made of structural steel with subsequent bluing, chrome plating or special paint coating. Their appearance and dimensions are shown in the sketches below. The length of the bushings corresponds to the selected dimensions of the niches in the rack. The diameter corresponds to a load of up to 40 kg on the top shelf and up to 20 kg on the rest. The total weight of the stand with the stand is about 85kg, of which up to 10kg is metal. You can proportionally increase the diameter of the bushings of the studs and cones, depending on the diameter of the material available to you. It is possible to combine the sleeve and the stud in pairs into one part.
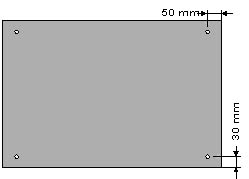
Marble Marble is used in the form of facing slabs with a size of 40x60cm and a thickness of 2cm. In total, 10 slabs will be required, which will be almost 2,5 sq.m. and about 150kg. The cost in Moscow is about $50. Transportation is possible by any passenger car, but preferably not in the trunk, but in the back seat with a vertical installation. When selecting plates, attention should be paid to their appearance. The upper plane has a polished surface, the lower plane and ends are polished. There is a plate with technological cuts on the lower plane, for laying on a cement mortar. The use of such plates greatly reduces the strength of the rack and is highly undesirable. You should also not use plates with cracks (they are especially visible on the lower unpolished plane) and with chips on the side edges. It is a good idea to process all the corners and edges of the plates with a diamond bar to give a minimum radius of curvature, while wetting the surface to be treated with plenty of water. In six out of ten plates, it is necessary to drill 4 holes with a diameter of 15mm. To do this, use a low-speed drill without perforation and drill bits. The holes are made in two passes, first with a 5-6mm drill, then with a 15mm drill using a water bath. To do this, around the intended hole, you can make a small rim of plasticine or press the rubber ring tightly and pour water. After processing, the marble slabs should be rinsed well with water and dried.
Assembly To strengthen the entire structure and the top shelf, a piece of furniture chipboard 600x400x16mm in size with rounded corners is used. It is also necessary to drill 4 holes with a diameter of 15 mm in it and make recesses for recessing the bolt heads. You can start assembling. The structure is assembled upside down. We insert the bolts into the chipboard plate, put on the washers and screw on the bushings. We screw the studs into the bushings until they stop and put the washers back on. We put a marble slab on the studs, again washers and screw on the bushings. Do not fully tighten them all at once, leave a little slack for proper centering. We assemble the remaining shelves in the same way, clamping the last shelf with nuts. Now we tighten the bushings, starting from the bottom, for rigid fixation of the shelves. We wind locknuts and cones on the protruding ends of the studs. Flip the stand. We glue the top plate to the chipboard with epoxy (or other suitable) glue. We lay the marble slab-stand on the floor at the place of installation of the rack, and install the rack on it, placing metal circles under the cones. By rotating the cones, we achieve an even, stable installation and fix the position of the cones with locknuts. It remains only to assemble and install the second rack.
Conclusion Using this technology it is also possible to make a single 6-post "wide" stand, although using two independent "narrow" stands has more flexibility if your home theater configuration changes. Separate racks can be positioned either side by side or slightly moved apart to install a center channel speaker or subwoofer. It is also always possible to reassemble them into one "high" 7 - 8 shelf rack when replacing a TV with a video projector.
Artificial leather for touch emulation
15.04.2024 Petgugu Global cat litter
15.04.2024 The attractiveness of caring men
14.04.2024
▪ Bats' immunity to transmissible viruses explained ▪ Volvo Concept Truck Hybrid Truck
▪ section of the site Data transfer. Article selection ▪ article Storm the sky. Popular expression ▪ article What is the difference between mumpsimus and sumpsimus? Detailed answer ▪ article Winding tubular coils on the machine. Standard instruction on labor protection ▪ article Putty by Professor Mendeleev. Simple recipes and tips ▪ article Frame and scarf. Focus Secret
Home page | Library | Articles | Website map | Site Reviews
www.diagram.com.ua |


 Leave your comment on this article: