|
|


 Arabic
 Bengali
 Chinese
 English
 French
 German
 Hebrew
 Hindi
Hindi Italian
 Japanese
 Korean
 Malay
Malay Polish
 Portuguese
 Spanish
 Turkish
 Ukrainian
 Vietnamese
|
ENCYCLOPEDIA OF RADIO ELECTRONICS AND ELECTRICAL ENGINEERING Car subwoofer. Part 2
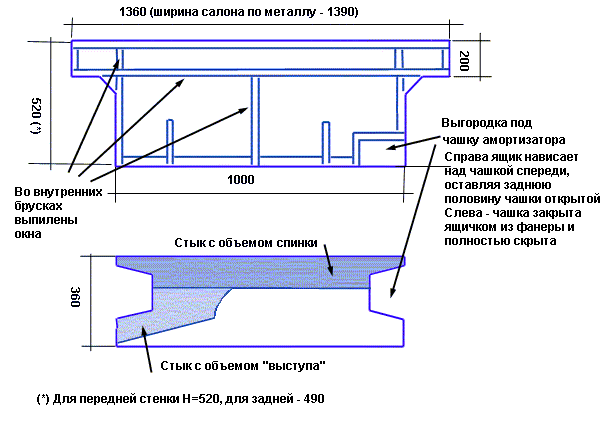
Encyclopedia of radio electronics and electrical engineering / Speakers The first option had two drawbacks. Firstly, a certain object standing instead of the back seat attracted the attention of young people and middle-aged gays. Secondly, the SPL was clearly lower than possible, and the frequency response ignored the region above 60 Hz. As a solution, the public advised turning the bubukalo backwards and using the horn effect. On the advice of the public... no, I didn't buy a "Moskvich" car, but decided to make a new Anti-Stealth-style bubuku, keeping the VISIBILITY of the rear seat and the invisibility of the subwoofer itself. The decision hovered in my head: The sub should be made as a dummy rear sofa - covered with the same cover as the front (real) seats, no pioneer would guess. The back of the sofa is just a rectangular volume 120 * 1370 * 520 mm, albeit with curly cutouts, which even with thick walls will give at least 35 liters. Since the depth of the Focal speaker (press it to the heart! I won’t change it, you won’t wait) is 160 mm, the head does not fit into the size of the back, and requires additional volume of the “muzzle”. This is how it should look in profile.
And here are the dimensions of the back and bottom of the box. The approximate volume is 30-35 liters in the back itself and 10-15 in the "growth". Total 40-50, as it turns out.
How much Materials and budget (spring-2000, Moscow markets)
Total - 1300 rubles - less than 50B. Without finishing Weekend project. Here is the sequence of work - using a fast polyester resin, it’s really possible to do everything for a fine finish in less than two days off (for one, helpers, black children and drinking companions are welcome but not required) .. self-tapping screw. Day 1 First, the front (without cutouts) wall is cut out and adjusted in place. Boards of 80 * 30 mm are sewn onto it around the perimeter and inside, using liquid nails (plentily) and self-tapping screws. In the internal partitions (in my case, one vertical, one horizontal), windows are pre-cut. Then, having installed with the help of a Negro, and preferably two, the “back” in place, we mark out the exact shapes of the bottom and back wall. Cut out. There, right in the plane of the rear wall, at the bottom (Niva and on bubuki) - between the arches - there are two growths - suspension cups. The box simply bypasses the right cup, and the left one is actually included in the volume of the protrusion for the speaker. For her, a house of bars and plywood is being built on the bottom. Also, oblique bars are attached to the bottom along the leading edge, to which we then sew the front wall. Then we paste over all the internal planes that do not touch each other and spacers with carpet. Ideal moment, slightly diluted with any solvent. Smear with a spatula. Or PVA, but it dries longer. And you can nail with small carnations. And you can not upholster at all, a matter of taste. Temporarily we shake up what we have. We cut out the mounting ring for the speaker and find the optimal position - so that it is both beautiful and does not take up much space, and so that the magnet does not strike on the wall. We determine on the spot the contour and shape of the fiberglass transitions from the ring to the box and the bottom. We cut a hole in the back wall along the contour of a slightly narrower fiberglass mold. If possible, we make walls, bars, etc., forming the transition from the "muzzle" to the box. In my case, the left wall of the "transition" by 2/3 is just a triangular scarf made of the same plywood. As we decided - we finally assemble the box with glue and screws, fix the muzzle (that is, the flange). There is no need to explain to those who are intelligible that in the last lines the first stage of the dish "Podium in Yelyutinsky" was presented. Stage 2 - having removed the glue streaks, and having protected the insides with what is necessary (old jeans in a plastic bag are convenient) - the transition area is covered with foam. Preferably "wet kneading", so that the dried foam is dense and does not crumble. Stop, let it dry... Day 2 Did you guess though? right, the second day begins with the removal of excess foam and gluing the shell. I warn you right away, polyester dissolves the foam, and in order to avoid its failure (literally and figuratively) - I rubbed the surface of the foam ... with hot plasticine. For everything about everything, it took a liter of resin in 4 batches. Before starting the next batch, be sure to clean up resin drips and burrs! I just ripped off, on Genn's advice, everything was grinder. 1. Primary 2 layers of fiberglass on plasticine. It won't work anymore, it starts to slip. 2. The main array of glass-glass-coal-coal-glass-coal-coal-glass is performed three times with one Stakhanov jerk. Since May turned out to be cold and the resin hardened no earlier than an hour, I made it on time, but in the sun it will most likely be necessary to break the operation into two steps. The output should be at least 7 mm of the wall without bubbles. 3. We paste over the outside in 3-4 layers of the bottom-back wall joint. After all, there is no bar there, everything will be held on this "corner" of fiberglass. Paste over the other seams around the perimeter (top). We glue the "fairing" for the right suspension cup on the foam blank. 4. Turn the object over and glue the remaining joints. Publication: cxem.net
Artificial leather for touch emulation
15.04.2024 Petgugu Global cat litter
15.04.2024 The attractiveness of caring men
14.04.2024
▪ MAX9701 - Class D Audio Power Amplifier ▪ Nicotine from e-cigarettes mutates DNA ▪ Miniature efficient acoustic amplifier ▪ Scientists have learned to compress water
▪ section of the website Audiotechnics. Article selection ▪ Infection prevention article. Basics of safe life ▪ article How big is the largest galaxy? Detailed answer
Home page | Library | Articles | Website map | Site Reviews
www.diagram.com.ua |


 Leave your comment on this article: