|
|


 Arabic
 Bengali
 Chinese
 English
 French
 German
 Hebrew
 Hindi
Hindi Italian
 Japanese
 Korean
 Malay
Malay Polish
 Portuguese
 Spanish
 Turkish
 Ukrainian
 Vietnamese
|
ENCYCLOPEDIA OF RADIO ELECTRONICS AND ELECTRICAL ENGINEERING Heterodyne receiver for a range of 20 m. Encyclopedia of radio electronics and electrical engineering
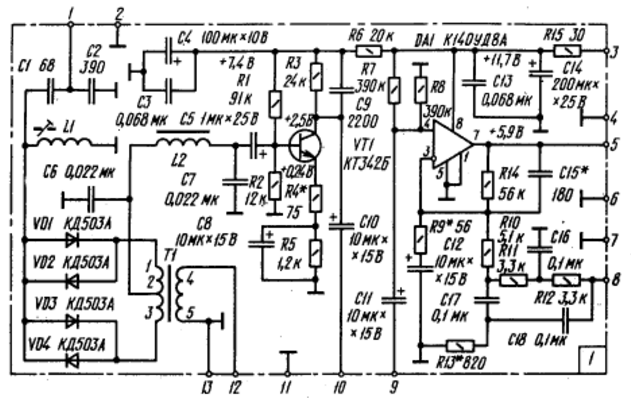
Encyclopedia of radio electronics and electrical engineering / radio reception The technique of heterodyne reception or, as it is often called, direct frequency conversion allows you to create very simple, but with good characteristics, equipment for amateur short-wave communications - transceivers and radio receivers. Interest in heterodyne reception (in its modern version) arose in the late 60s. Since then, many descriptions of various designs of KB equipment using direct frequency conversion have been published on the pages of amateur radio magazines. In our country, the USSR DOSAAF Publishing House published two books by the famous radio amateur designer V. Polyakov (RA3AAE), who did a lot to popularize the technology of heterodyne reception. One of these books is Direct Conversion Receivers for Amateur Communications (1981), the other is Direct Conversion Transceivers (1984). They consider in detail the physical foundations and features of heterodyne reception of signals from amateur radio stations, give practical designs of both individual units and complete devices. One of the reasons for the increased interest shown by shortwavers in this technique is the increasing use of low power operation (QRP) in recent years. The technique of heterodyne reception is the best suited for creating QRP equipment. It is interesting to note that in the USA, for example, despite the wide range of communication equipment with traditional circuit solutions, one of the companies produces (and it is very popular) a relatively inexpensive QRP transceiver with direct frequency conversion. The heterodyne receiver described in this article is designed to receive signals from amateur radio stations in one of the most popular KB bands - 20 meters. The receiver covers (naturally, with some margin at the edges) this entire range: from 14000 to 14350 kHz. As you know, direct frequency conversion allows you to receive only the signals of radio stations operating by telegraph (CW) or single-sideband modulation (SSB). Stations with amplitude modulation can only be listened to with difficulty (and, as a rule, with noticeable distortion), tuning into "zero beats" with the carrier frequency. However, this is not essential, because the vast majority of shortwaves no longer use AM. This type of radiation has survived almost exclusively in the 160 m band, where it is used by some of the beginner radio amateurs. The receiver has a local oscillator with a fairly powerful output, which makes it possible to turn it into a single-band telegraph transceiver through a simple refinement. We note right away that by simply replacing the frequency-determining elements (coils and capacitors in oscillatory circuits), this receiver (or transceiver) can be transferred to any amateur band. To simplify the design of the receiver, its manufacture and adjustment, there is no radio frequency amplifier in it, therefore the sensitivity of the receiver is approximately 1 μV at a signal-to-noise ratio of 10 dB. Such sensitivity is quite sufficient (at least in the vast majority of cases) for daily work on the air, provided that an external antenna is used at the station. It can easily be increased three to four times by introducing an emitter follower at the receiver input (between the input circuit and the mixer). The receiver bandwidth at the level of -6 dB lies within 250...3000 Hz. When receiving telegraph stations in conditions of strong interference, it can be narrowed to 200 ... 300 Hz (at an average frequency of about 600 Hz). These figures characterize the audio frequency path of the receiver, where the signal selection is mainly carried out. In reality, as is known, heterodyne receivers receive both the main and the image channel directly adjacent to it (if you do not use phase methods for suppressing the image channel, which significantly complicates the device). That is why the real bandwidth of the received signals is twice the values given above. The receiver is powered by a battery of elements that provide voltage in the range of 10 ... 15 V. Current consumption is about 30 mA. Heterodyne receivers, which have a very high gain at audio frequencies, are very sensitive to 50 Hz AC pickups, in particular, to pickups from the mains transformer (due to a significant stray field), as well as to supply voltage ripples (usually with a frequency of 100 Hz - with full-wave rectification). For these reasons, it is not advisable to power the receiver from the network. If necessary, this, of course, can be done, but then you should use a separate (remote) power supply with a good voltage regulator that provides low output voltage ripple. The receiver is made on two printed circuit boards - the main one and the local oscillator, on which the vast majority of parts are located. In the figures, the item designations of the parts are given without indicating the board number (1 - main, 2 - local oscillator), and in the text, in order to avoid confusion, they will be designated as 1-C1, 2-L1, etc. Parts outside these boards will be denoted without an additional index C1 R1, etc. Schematic diagram of the main board of the receiver is shown in fig. one.
The signal from the antenna is sent to pin 1 of the board. The radio frequency selectivity of the receiver is provided by a single input circuit 1-L1, 1-C1, 1-C2. The input impedance of the I-VD1-1-VD4 diode mixer connected to this circuit is low (a few kiloohms), so the loaded quality factor of this circuit will also be small - 25...30. For this reason, the bandwidth of the input circuit at the -3 dB level lies within 450...550 kHz, and there is no need to adjust it when tuning the receiver in range. Coordination of this circuit with a signal source (50 ... 75 Ohm, for example, a dipole powered by a coaxial cable) is provided by the choice of capacitor capacities 1-C1 and 1-C2. The mixer is made according to a balanced circuit on anti-parallel diodes, which makes it possible to obtain a very small "creep" of the local oscillator voltage into the antenna and thereby eliminate interference from radio amateurs living in the neighborhood. The mixer is connected to the circuit completely. This made it possible to obtain a sufficiently high sensitivity of the receiver without a radio frequency amplifier (although at the cost of some loss of input selectivity). The local oscillator voltage is fed to pin 12 of the board and fed to the mixer through a balancing transformer 1-T1. From the midpoint of the secondary winding (terminals 1-3) of this transformer, the mixing products enter the low-pass filter 1-L2, 1-C6, 1-C7 with a cutoff frequency of about 2,5 kHz. This filter selects a useful audio frequency signal, which is pre-amplified by a cascade on a 1-VT1 transistor. To achieve a minimum level of intrinsic noise, the collector-emitter voltage of this transistor was chosen to be approximately 2,5 V, and the collector current was approximately 0,2 mA. The gain of the cascade is approximately 70. It is determined by the ratio of the "load resistance in the collector circuit of the transistor to the sum of the resistances of the resistor 1-R4 and the emitter junction of the transistor. The load resistance is resistors 1-R3, 1-R7, 1-R8 connected in parallel, as well as audio frequency signal level control R1, located outside the board (see Fig. 5). The input resistance of the operational amplifier 1-DA1 and the output resistance of the transistor 1-VT1 (they are also connected in parallel with the load) in this case can be neglected. The gain of the preamplifier is set by selecting a resistor 1-R4 (it has little effect on the DC operation mode of the transistor). To improve the selectivity of the receiver, a capacitor 1-C1 is connected in parallel with the load of the transistor 1-VT9. It provides additional attenuation for signals above 5 kHz. The main amplification of the receiver provides a stage on the operational amplifier 1-DA1. In general, a gain of about 100000 is required from the audio frequency path of the receiver. In this case, the noise voltage at the output of the op-amp (i.e., on headphones) will be approximately 20 mV, since the noise voltage reduced to the input of the amplifier on transistor 1-VT1, usually lies in the range of 0,1 ... 0,3 μV. Moreover, it is already quite difficult to obtain 0,1 μV - it requires the use of transistors with a normalized noise figure and careful selection of their operating mode for direct and alternating current. Taking into account the noise of the mixer, the total noise voltage at the output of the op-amp will be approximately 30...40 mV. They are already well audible in headphones. Increasing their level above the given values will limit the receiver output dynamics, defined as the ratio of the maximum output signal level to the noise level at the receiver output. For direct conversion receivers, which, as a rule, do not have an automatic level control system, this parameter is quite important. Modern operational amplifiers have a gain of over a hundred thousand, and it would seem that it would be quite possible to limit ourselves to just one stage. However, it is not. Firstly, most op amps have worse (compared to devices based on discrete elements) noise characteristics. The noise level given to the input is usually no better than 1 µV. For OU K140UD8, for example, it is even 3 μV. Secondly, the op amp gains indicated above are only for direct current and at very low frequencies - tens and hundreds of hertz. With increasing frequency, the maximum allowable gain of the cascade at the op amp drops quite quickly.
On fig. 2, a shows the amplitude-frequency characteristic of the K140UD8 operational amplifier (it is typical for a number of op-amps with internal correction). It can be seen that in an amplifier with a bandwidth of about 3 kHz, the maximum allowable gain is only 1000 (60 dB). So he was chosen for the op-amp cascade in this receiver. Taking into account the gain of the pre-stage, the total gain of the audio frequency path of the receiver is about 70. A constant offset at the output of the op-amp (equal to about half the voltage of the power supply) sets the divider on resistors 1-R7 and 1-R8. The gain of this stage determines the ratio of the resistances of the resistors 1-R14 and 1-R9. The 1-C15 capacitor included in the negative feedback circuit further attenuates the high frequencies at the receiver output. Load - headphones are connected through a separating capacitor (it is installed outside the board, see Fig. 5) to terminal 5. For the receiver, headphones with an emitter resistance of 50 ... 100 Ohms are best suited (they have a DC coil resistance of 100 ...200 Ohm, since the emitters are connected in series). Here you can also use headphones with emitters with a resistance of 1600 ... 2200 Ohm, but in this case they should be connected in parallel, observing the polarity of the connection - it is indicated on the emitter housings. To receive signals from telegraph radio stations in conditions of increased interference, the bandwidth of the cascade at the op-amp 1-DA1 can be narrowed by connecting a double T-bridge to the negative feedback circuit (resistors 1-R11 - 1-R13, capacitors 1-C16-1-C18). For this purpose, the SA1 switch (see Fig. 5) is connected to the amplifier output (pin 5) with the T-bridge input (pin 8). In a simplified form, the connection of the T-bridge in the negative feedback circuit on the operational amplifier is shown in fig. 2b. A characteristic feature of the double T-bridge is that. that at a certain frequency (it is usually called the quasi-resonance frequency), the transmission coefficient has a minimum, and for certain ratios between the values of the capacitors and resistors included in it, it can be very close to zero. So for a double T-bridge, in which the capacitances of all three capacitors are the same, and the resistance of the resistor in the capacitive branch is four times less than the other two resistors. For such a bridge, the transmission coefficient at the quasi-resonance frequency will be about 10-2. The dependence of the transmission coefficient of the double T-bridge used in this receiver on frequency is shown in fig. 3, a. If a four-terminal device with such a frequency response is included in the negative feedback circuit of the cascade on the op-amp, as shown in Fig. 2, b, then in the first approximation, the transfer coefficient of the device will be determined by the ratio of the resistance of some equivalent resistor to the resistance of the resistor 1-R9.
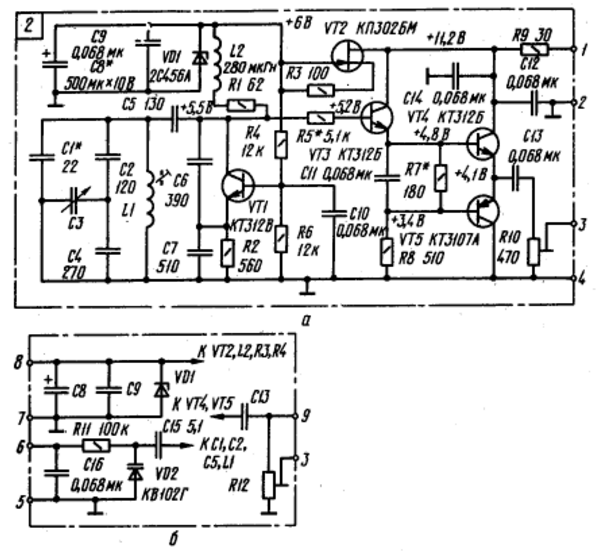
It is easy to see that at the quasi-resonance frequency, when K is close to zero, the stage gain will be approximately the same as in the absence of a T-bridge (i.e., equal to the ratio of the resistances of resistors 1-R14 and 1-R9). At frequencies far from the quasi-resonance frequency, K is close to unity, and the stage gain drops noticeably (approximately to the ratio of the resistances of resistors 1-R10 and 1-R9). It would seem that in order to improve selectivity, it makes sense to reduce the resistance of the resistor 1-R10. However, it is not. Firstly, at low values of load resistance (and for the T-bridge 1-R10 - load), the characteristics of the bridge deteriorate noticeably. This could be avoided by introducing, for example, an emitter follower between the 1-R10 and the T-bridge. But then the equivalent quality factor of the bridge will noticeably increase, and the bandwidth of the receiver with the filter turned on will narrow to values that are unacceptable in practice (less than 100 Hz). In other words, the option used in this receiver is close to the optimum (in any case, if we keep in mind simple circuit solutions). The amplitude-frequency characteristic of the audio frequency path (without a low-pass filter) is shown in fig. 3b. The frequency response of the tract with a double T-bridge connected is also shown here. For 0 dB, the transmission coefficient of the path is taken, corresponding to the maximum frequency response with the filter turned off. Between the pre-amplifier and the output amplifier there is an audio frequency signal level control. It is connected to pins 9, 10, 11 of the board. Schematic diagram of the local oscillator board is shown in fig. 4, a. The generator is assembled on a 2-VT1 transistor according to a well-known scheme. Let's pay attention to only a few of its features. To reduce the high-frequency voltage on the generator circuit (this reduces the heating of its elements by high-frequency currents and, consequently, increases the temperature stability of the local oscillator), the supply voltage of the cascade is chosen relatively low - less than 6 V. A standard block of variable capacitors from a broadcasting receiver is used in the local oscillator (only one section). The block is not subjected to any alterations, and the necessary frequency overlap is provided by "stretching" capacitors 2-C1, 2-C2, 2-C4. Note that since the receiver mixer is made on anti-parallel diodes, the generator operates at half (compared to the operating) frequency, i.e., it covers the 7000 ... 7175 kHz section with some margin at the edges of the range. The 2-RJ resistor eliminates parasitic self-excitation of the generator at low frequencies, determined by the inductance of the 2-L2 inductor. Instead of a conventional ballast resistor, a stable current generator based on a 2-VT2 field-effect transistor is used in the zener diode power circuit. For the receiver, this is not very important - it can be replaced with a 330 Ohm resistor. However, if the local oscillator is also used in the transmission path (in a transceiver based on this receiver), then the use of a stable current generator in the local oscillator will improve the dynamic characteristics of the voltage stabilizer, thereby reducing the spurious frequency manipulation of the generator. The high-frequency voltage from the generator is fed to a two-stage emitter follower. The first stage operates in class A mode (transistor 2-VT3), the second - in class B (transistors 2-VT4 and 2-VT5). This allows you to significantly reduce the power released on the output transistors (i.e., use ordinary low-power transistors here). To obtain the same load characteristics in the output stage operating in class A, one would have to use a medium-power high-frequency transistor, solve the problem of heat removal, and the temperature regime of the local oscillator. The connection between the generator and repeaters is galvanic. The bias based on the transistor 2-VT3 is set by the zener diode 2-VD1 (with minor corrections due to the voltage drop across the resistors 2-R1 and 2-R5). The bias voltage that opens the output transistors sets the resistor 2-R7. The main purpose of the resistor 2-R5 is to set the (preliminary) local oscillator output voltage level so that the emitter-follower transistors are not overloaded. Weakening the signal in this place, we additionally decouple the generator from the output of the device, improve its load characteristics.
The tuned resistor 2-R10 in the process of establishing the receiver accurately selects the optimal local oscillator voltage on the diode mixer. If it is planned to turn the receiver into a transceiver over time, then it is advisable to immediately lay in the local oscillator the possibility of detuning its frequency using a varicap, and also provide an additional output for the transmitting path. The measurements that need to be made in the local oscillator circuit are shown in Fig. 4b. They are mostly obvious. Let's just note. that from pin 6 the stabilized voltage is supplied to a variable resistor, which regulates the voltage on the varicap. The scheme of connecting the boards to each other, as well as to the other elements of the receiver located outside these boards, is shown in fig. 5. On fig. 6 shows the printed circuit board of the mixer and audio frequency amplifier of the receiver, and in fig. 7 - printed circuit board of the local oscillator unit (for the transceiver version). These boards are designed for the following parts: resistors - MLT-0,25, capacitors - KM and K50-6 (oxide), trimmer resistor - SPZ-4, variable capacitor - KPE from the Alpinist radio receiver, choke 2-L2 - standard corrective from a tube TV. You can also use chokes of the D and DM series or homemade. The coil 1-L2 of the low-pass filter is wound on an annular ferrite magnetic core of size K20 x 12 x 6 made of a material with an initial magnetic permeability of 3000, a wire-PEV-2 with a diameter of 0,1 mm, the number of turns is 430, the inductance is approximately 350 mH. The high-frequency transformer is wound on a ring magnetic circuit of size K7 x 4 x 2 made of ferrite with an initial magnetic permeability of 400...1000 (non-critical). Winding is carried out immediately with three PEV-2 wires with a diameter of 0,1 ... 0,25 mm. The beginning of one of the windings is connected to the end of the other - this will be the middle point of the secondary winding. The remaining winding is used as the primary. Coils 1-L1 and 2-L1 are wound on polystyrene frames, the drawings of which are shown in fig. 8, a. They have 17 turns of PEV-2 wire with a diameter of 0,4 mm. Trimmers - from carbonyl iron (M6 x 10). These coils, placed in aluminum screens (Fig. 8, b), should have an inductance of 2,3 μH with the trimmer in the middle position (screwed, halfway into the coil).
Transistors of the npn structure (1-VT1, 2-VT1, 2-VT3, 2-VT4) can be any of the KT312, KT342, KT3102 and similar series. The most optimal for a pre-amplifier of audio frequencies are transistors KT3102E and KT3102G (with a noise figure of not more than 4 dB). In the local oscillator, transistors of the KT315 series can also be used, but in any case, the current transfer coefficient (static) must be at least 100. The pnp structure transistor in the local oscillator (2-VT5) is KT361. KT3107 with any letter index. The operational amplifier K140UD8A (or K140UD8B - this is not essential) is replaced by any op-amp with internal correction. Of course, it is quite possible to replace it with an op-amp with external correction with appropriate changes in the circuit. In any case, replacing the op amp will require changes to the PCB of the main assembly. If an op amp is used that does not have field effect transistors at the input (for example, K140UD7), then it is advisable to take resistors 1-R7 and 1-R8 with a resistance of not more than 150 kOhm and compensate for the decrease in the gain of the preliminary stage by selecting resistor 1-R4. The field effect transistor in the stable current generator (2-VT2) must have an initial drain current of at least 15 mA. Here, individual instances of KP303E transistors may be suitable (they have this parameter in the range of 5 ... 30 mA) and KP302 transistors with any letter index, except for A (only individual specimens from this series are suitable, since their initial drain current may vary within the range from 3 to 24 mA). Diodes in the mixer - any high-frequency silicon (KD503, KD521, etc.). The zener diode 2-VD1 must have a stabilization voltage in the range of 5,5 ... 6 V. Schematically, the design of the receiver is shown in Fig. 9.
Setting up the receiver can be done for a fee. By applying a voltage of + 3V to terminal 12 of the main board, they check the modes of active elements for direct current. Deviations from those shown in fig. 1 values of more than 20% will indicate errors in installation or defects in the parts used. After that, it is advisable to check the end-to-end frequency response of the audio frequency path by applying a signal from a generator with an output impedance of 600 ... 1000 Ohms to the input of the low-pass filter (to the connection point 1-L2 and 1-C6). Since the gain of the audio frequency path of the receiver is very high, this can only be done if the radio amateur has an audio frequency generator with a low background level at his disposal. The amplifier's own noise level (with the local oscillator disconnected from the mixer), as already noted, should be about 20 mV. Its large values indicate that the transistor 1-VT1 should be replaced. The next step is to set up the local oscillator board. By controlling the local oscillator frequency by a frequency meter, a control receiver, or in another way, the limits of its tuning are set. To do this, with a minimum capacitance of the KPI, the coil trimmer 2-L1 achieves the generation frequency by 10 ... 20 kHz higher than the value of 7175 kHz. By moving the capacitor rotor to the position corresponding to the maximum capacitance, the generation frequency is checked. If it turns out to be slightly lower than 7000 kHz, then the setting of the range limits can be completed at this point. If it is higher than 7000 kHz, then install a capacitor 2-C1 of a smaller capacity and repeat the described procedure again. The setting of the boundaries can be noticeably accelerated if, instead of 2-C1, a tuning capacitor with an air dielectric is installed. Trimmer capacitors such as KPK or KPK-M should not be used. They have low temperature stability and can significantly degrade the performance of the local oscillator. After replacing the 2-CJ capacitor, it is necessary to pause each time to stabilize the temperature regime of the capacitor overheated during soldering. If a stable current generator is used in the local oscillator, then before setting up the generator, it is necessary to select a 2-R3 resistor so that the total current through the field-effect transistor (generator plus zener diode) is about 15 mA. Having disrupted the generation of the local oscillator in one way or another, by selecting the resistor 2-R7 they achieve that the current through the transistors 2-VT4 and 2-VT5 is approximately 2 mA. Then, the operation of the generator is restored and, by selecting a resistor 2-R5, a high-frequency voltage is set at the output of the local oscillator (the engine 2-R10 is in the upper position according to the diagram) of approximately 1 V (effective value). After that, you can check the load characteristics of the local oscillator: changing the load from idle to 50 ohms should not change the generation frequency by more than 50 ... 70 Hz. Now the receiver boards should be installed in the case (one of the possible options is shown in Fig. 9) and a complex adjustment of the receiver should be carried out. The first test of the receiver's performance is an increase in the noise level at the output, when a high-frequency local oscillator voltage is applied to the mixer. Noise should be about doubled. Having tuned in to some amateur radio station, they select the optimal local oscillator voltage (according to its maximum volume). It should be noted that this adjustment is quite critical: at low and high levels, the mixer transmission coefficient drops significantly. The final stage is the adjustment of the input circuit 1-L1. A double T-bridge usually does not require adjustment. If it turns out that the transfer coefficients corresponding to the maximum frequency response with the bridge on and off are noticeably different, then a resistor 1-R13 should be selected. Changing the value of this resistor somewhat changes the resonant frequency and, to a much greater extent, the transfer coefficient. This is due not only to a change in the frequency response of the double T-bridge, but also to its phase-frequency response.
Artificial leather for touch emulation
15.04.2024 Petgugu Global cat litter
15.04.2024 The attractiveness of caring men
14.04.2024
▪ Ultra-precise tangled atomic clock ▪ Analogue of human skin for a smartphone
▪ site section Power Amplifiers. Article selection ▪ article Under the sly. Popular expression ▪ article Insect bites. Health care ▪ article Electronic ignition. Encyclopedia of radio electronics and electrical engineering
Home page | Library | Articles | Website map | Site Reviews
www.diagram.com.ua |


 Leave your comment on this article: