|
|


 Arabic
 Bengali
 Chinese
 English
 French
 German
 Hebrew
 Hindi
Hindi Italian
 Japanese
 Korean
 Malay
Malay Polish
 Portuguese
 Spanish
 Turkish
 Ukrainian
 Vietnamese
|
ENCYCLOPEDIA OF RADIO ELECTRONICS AND ELECTRICAL ENGINEERING Signal generator with a frequency of 60 kHz ... 108 MHz. Encyclopedia of radio electronics and electrical engineering
Encyclopedia of radio electronics and electrical engineering / Civil radio communications A high-frequency signal generator is necessary for the repair and tuning of radio receivers and therefore is quite in demand. The Soviet-made laboratory generators available on the market have good characteristics, as a rule, they are redundant for amateur purposes, but they are quite expensive and often require repair before use. Simple generators of foreign manufacturers are even more expensive and at the same time do not differ in high parameters. This forces radio amateurs to manufacture such devices on their own. The generator is designed as an alternative to simple industrial devices similar to GRG-450B [1]. It works in all broadcasting ranges, its manufacture does not require winding of inductors and laborious adjustment. The device has extended HF bands, which made it possible to abandon a complex mechanical vernier, a built-in millivoltmeter of the output signal, and frequency modulation. The device is made from cheap common parts that any radio amateur who repairs radios can find. An analysis of many amateur designs of such generators revealed a number of common disadvantages characteristic of them: a limited frequency range (most cover only the DV, MW and HF ranges); significant frequency overlap in the high-frequency ranges makes it difficult to accurately set and leads to the need to manufacture a vernier. Often winding of inductors with taps is required. In addition, descriptions of these structures are too brief, and often absent altogether. It was decided to independently design a high-frequency signal generator that meets the following requirements: an extremely simple circuit and design, inductors without taps, the absence of self-made mechanical components, operation in all broadcast bands, including VHF, extended bands and electric vernier. A 50 ohm coaxial output is desirable. Table
1) At the coaxial output with a load resistance of 50 ohms, effective value.
As a result of checking many technical solutions and repeated improvements, the device described below appeared. The frequency ranges generated by it are indicated in the table. The generator frequency setting accuracy is no worse than ±2 kHz at a frequency of 10 MHz and ±10 kHz at a frequency of 100 MHz. Her departure per hour of operation (after an hour of warm-up) does not exceed 0,2 kHz at a frequency of 10 MHz and 10 kHz at a frequency of 100 MHz. The same table shows the maximum effective values of the output voltage in each range. The non-linearity of the millivoltmeter scale is no more than 20%. The supply voltage is 7,5 ... 15 V. The signal generator circuit is shown in fig. 1.
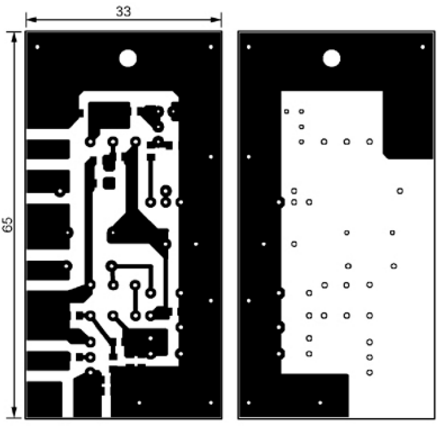
As a rule, oscillators with a point-to-point connection of an oscillating circuit, capable of operating at a frequency of more than 100 MHz, generate a distorted square wave rather than a sinusoid in the medium wave range. To reduce distortion, a significant change in the operating modes of the active elements of the generator is required depending on the frequency. The signal of the master oscillator used in the described device with field-effect and bipolar transistors connected in series in direct current [2] has much less distortion. They can be reduced by adjusting the operating mode of the bipolar transistor only. At low-frequency ranges, the operation mode of the transistor VT2 is set by resistors R1 and R9 connected in series. With the transition to high-frequency ranges, switch SA1.2 closes resistor R1. To increase the steepness of the characteristics of the field-effect transistor VT1, a constant bias equal to half the supply voltage is applied to its gate. The supply voltage of the master oscillator is stabilized by the integral stabilizer DA1. Resistor R10 serves as the minimum load of the regulator, without which its output voltage is clogged with noise. Industrial-made chokes are used as inductors L1-L10 of the master oscillator. They are switched by switch SA1.1. In the VHF2 range, the inductance L11 is a piece of wire about 75 mm long, connecting the switch to the printed circuit board. The deviation of the actual inductance of the inductor from the nominal one can be quite significant, so the range boundaries are chosen with some overlap in order to exclude their laborious installation. The limits of the ranges indicated in the table were obtained without any selection of chokes. It is preferable to use large chokes, the stability of the inductance of which (and therefore the generated frequency) is higher than that of small ones. For frequency tuning, the device uses a three-section variable capacitor with a gearbox, which was used in the Okean radio receivers, the Melodiya radiograms and many others. So that its body does not have electrical contact with the body of the device, it is fixed inside it through an insulating gasket. This made it possible to include one section of the capacitor in series with two others connected in parallel. This is how extended HF bands are implemented. In the DV, SV1 and SV2 ranges, where a large frequency overlap is required, the SA1.2 switch connects the variable capacitor case to a common wire. In the ranges of KV6, UKV1 and UKV2, the variable capacitor is switched off by the SA2 switch. When the switch is closed, the stable generation frequency does not exceed 37 MHz. In parallel with the variable capacitor, a circuit of the varicap matrix VD1, capacitors C6, C9 and resistor R6 is connected, which serves as a frequency modulator, an electric vernier, and when the variable capacitor is turned off, it is the main tuning element. Since the amplitude of the high-frequency voltage on the oscillatory circuit reaches several volts, the matrix varicaps connected in anti-series introduce much less distortion than a single varicap would introduce. The tuning voltage for the varicaps of the VD1 matrix comes from the variable resistor R5. Resistor R2 somewhat linearizes the tuning scale. The generator's frequency modulation signal is fed to the XS1 connector from any external source. When setting up and testing an AM radio receiver, the conversion of frequency modulation into amplitude modulation occurs in it itself due to the uneven frequency response of the pre-detector part of the receiving path. You can observe the AM signal on the last IF circuit of the receiver using an oscilloscope. Such a solution is not always acceptable, but simple amplitude modulators used in amateur designs of measuring generators create strong spurious frequency modulation even in low-frequency HF bands, which makes it almost impossible to use them for their intended purpose. A sawtooth voltage is applied to the XS2 connector when using the device as a sweep frequency generator. The master oscillator is connected to the output follower on the transistor VT4 through the capacitor C12, the extremely small capacitance of which reduces the effect of the load on the generated frequency and the decrease in the amplitude of the output voltage at a frequency above 30 MHz. To partially eliminate the decrease in amplitude at a low frequency, the capacitor C12 is shunted by the R11C14 circuit. A simple emitter follower with a high output impedance on a bipolar transistor turned out to be the most suitable solution for such a wideband device. The effect of load on frequency is comparable to that of a FET source follower, and the amplitude versus frequency dependence is much smaller. The use of additional buffer stages only worsened the decoupling. To ensure good decoupling in the DV-KV ranges, the VT4 transistor must have a high current transfer coefficient, and in the VHF ranges, extremely small interelectrode capacitances. The repeater output is connected to the XT1.4 terminal, which is mainly intended for connecting a frequency meter, which leads to a slight decrease in the output voltage. The internal resistance of this output on the HF bands is about 120 ohms, the output voltage is more than 1 V. The diodes VD2, VD3, the transistor VT3 and the LED HL1 have an indicator of the presence of RF voltage at the output of the repeater. From the engine of the variable resistor R18, which serves as an output voltage regulator, the signal goes to the R19R20 divider, which, in addition to additional decoupling of the generator and the load, provides the output impedance of the coaxial output (XW1 connector) on the HF bands close to 50 ohms. On VHF, it drops to 20 ohms. The frequency deviation when the position of the R18 slider changes from the upper position to the lower one according to the scheme reaches 70 ... 100 kHz at a frequency of 100 MHz without load, and with a 50 Ohm load connected - no more than 2 kHz (at the same frequency). To measure the output voltage at connector XW1, a detector is provided, made on resistors R15, R17, diode VD4 and capacitor C17. Together with an external digital voltmeter or multimeter in voltmeter mode, connected to contacts XT 1.3 (plus) and XT1.1 (minus), it forms a millivoltmeter of the effective value of the generator output voltage. To obtain a more linear scale, a constant bias voltage of 4 V is applied to the diode VD1, which is set by a multi-turn trimmer resistor R17. The external voltmeter must have a measurement limit of 2 V. In this case, a unit will be constantly displayed in the highest digit of its indicator, and the measured output voltage in millivolts in the lower digits. The minimum measured voltage is about 20 mV. Above 100 mV readings will be slightly higher. At a voltage of 200 mV, the error reaches 20%. The generator is fed from a stabilized DC voltage source of 7 ... 15 V or from a battery. With an unstabilized power supply, the generated high-frequency signal will inevitably be modulated at a frequency of 100 Hz. The installation of the generator should be approached very carefully, the stability of its parameters depends on this. Most of the parts are mounted on a printed circuit board made of insulating material foiled on both sides, shown in fig. 2.
The location of the parts on the board is shown in fig. 3. The common wire foil pads on both sides of the board are interconnected by wire jumpers soldered into the holes, which are shown filled. After mounting, the elements of the output repeater are closed on both sides of the board with metal screens, the contours of which are shown by dashed lines. These screens must be securely, soldered around the perimeter, connected to the common wire foil. In the screen, located on the side of the printed conductors, above the contact pad to which the emitter of the VT4 transistor is connected, a hole is made through which a copper pin soldered to this pad passes. Later, the central core of the coaxial cable is soldered to it, going to the variable resistor R18 and the capacitor C18. The cable braid is connected to the repeater screen. The generator mainly uses fixed resistors and capacitors for surface mounting of size 0805. Resistors R19 and R20 are MLT-0,125. Capacitor C3 - oxide with low ESR, C7 - oxide tantalum K53-19 or similar. Inductors L1-L10 - standard chokes, preferably domestic series DPM, DP2. Compared to imported ones, they have a much smaller inductance deviation from the nominal one and a higher quality factor. In the absence of a choke of the required rating, the L10 coil can be made independently by winding eight turns of wire with a diameter of 0,08 mm onto an MLT-0,125 resistor with a resistance of at least 1 MΩ. As an inductance L11, a piece of a rigid central wire from a coaxial cable about 75 mm long is used. Three-section variable capacitors with a gearbox are extremely common, but if one is not available, a two-section one can also be used. In this case, the capacitor housing is connected to the device housing, and each section is connected through a separate switch, and one of the sections is connected through a stretching capacitor. It is much more difficult to control a device with such a variable capacitor. Switch SA1 - PM 11P2N, similar switches of the PG3 or P2G3 series are also applicable. Switch SA2 - MT1. The variable resistor R18 is SP3-9b, and it is not recommended to replace it with a variable resistor of another type. If the variable resistor indicated in the circuit was not found, then you can replace it with a lower value, but you need to increase the resistance of the resistor R16 so that the total resistance of the parallel-connected resistors R16 and R18 remains unchanged. Variable resistor R5 - any type, R17 - imported multi-turn trimmer 3296. Diodes GD407A can be replaced with D311, D18, and diode 1 N4007 - with any rectifier. Instead of the varicap matrix KVS111A, it is allowed to use KVS111B, instead of 3AR4UC10 - any red LED. The master oscillator is insensitive to the types of transistors used. The field effect transistor KP303I can be replaced by KP303G-KP303Zh, KP307A-KP307Zh, and with the correction of the printed circuit board - by BF410B-BF410D, KP305Zh. For transistors with an initial current of more than 7 mA, resistor R7 is not required. The bipolar transistor KT3126A can be replaced by any pnp microwave transistor with minimal interelectrode capacitances. As a replacement for the KT368AM transistor, SS9018I can be recommended. Connector XW1 - type F. Any cable can be easily embedded into it, and if necessary, you can simply insert a wire. Clamping block XT1 - WP4-7 for connecting acoustic systems. Connectors XS1 and XS2 are standard 3,5 mm mono jacks. The generator is assembled in a case from a computer power supply. Its installation is shown in the photograph of Fig. 4. Remove the fan grille, and cover the side of the case where it was located with a sheet steel plate with holes for connectors and controls. To fix the plate, use all the screw holes in the case.
Mount the board on a brass stand 30 mm high, next to the SA1 switch, with printed conductors facing up. Tin the contact point of the rack with the case and place a contact tab under it, which is connected to the screen of the output repeater. If possible, avoid the formation of large closed circuits of the flow of high-frequency current through the common wire, leading to a decrease in the output voltage on the VHF bands. Place the variable resistor R18 in an additional metal screen, clamping it under the resistor flange. Installation of resistors R19 and R20 - hinged. Connect their common point to connector XW1 with a coaxial cable. Install the detector elements of the millivoltmeter on a small circuit board, which you fix directly on the connector XW1. Install the variable capacitor C4 in the housing through the insulating gaskets. It is advisable to make a dielectric extension of the capacitor axis, on which the tuning knob will be put on. But this is not necessary, it is permissible to put it on the axis of the capacitor itself. Connect the variable capacitor to the SA2 switch and to the board with a rigid central core from the coaxial cable. Capacitor C5 install and connect to the case next to the capacitor C4. Before installing the switch SA1 into the device, mount inductors L1-L10 and resistor R1 on it. The axes of neighboring coils must be mutually perpendicular, otherwise their mutual influence cannot be avoided. This is especially true for the low frequency ranges. It is convenient to alternate coils with axial and radial leads. Connect the common wire to SA1.1 with a bundle of ten or more MGTF wires. With a separate wire, connect the resistor R1 and the movable contact of the SA1.2 biscuit to the common wire. Using a syringe with a shortened needle, apply all the necessary inscriptions on the front panel with tinted zapon varnish. Mount the sawtooth voltage input connector XS2 on the rear panel to prevent accidental connection to it. Connect the power cord there as well. It is duplicated by contacts XT1.1 (minus) and XT1.2 (plus), from which you can power other measuring instruments or a custom device. Close all extra holes in the case with steel plates soldered to it. Assembled according to the recommendations, the device should work immediately. You should measure the DC voltage at the emitter of the transistor VT4. With the upper (according to the scheme) position of the variable resistor R18 slider, it should not be less than 2 V, otherwise it is necessary to reduce the resistance of the resistor R13. Next, you need to check the operation of the generator on all ranges. On VHF, with a large input capacitance of the variable capacitor (if it is turned on), the oscillations are stalled, as can be seen from the decrease in the brightness of the HL1 LED. If the variable resistor R5 is included, as shown in the diagram, then the tuning band on the VHF bands will not exceed 15 MHz, and it may be necessary to lay these bands within the broadcast limits. First of all, do it in the VHF1 range (65,9 ... 74 MHz) using the trimmer capacitor C9 with the SA2 switch open. Next, move the SA1 switch to the VHF2 position and, by changing the length of the piece of wire that serves as the inductance L11, achieve coverage of the broadcast range of 87,5 ... 108 MHz. If you need to greatly increase the frequency, a piece of wire can be replaced with a strip of copper foil or a flattened braid of a coaxial cable. The frequency tuning limits of the varicap can be significantly increased if the variable resistor R5 is supplied with voltage from the input, and not from the output of the integral stabilizer DA1. But this will lead to a noticeable deterioration in frequency stability. Adjustment of the millivoltmeter detector consists in setting a voltage of 17 mV with a trimming resistor R1010 on a multimeter connected to the output of the detector at zero output voltage of the generator (the variable resistor R18 engine is in the lower position according to the diagram). Further, by increasing the output voltage range to 280 mV with a variable resistor (controlled by an oscilloscope), adjust R17 so that the multimeter shows 1100 mV. This corresponds to an effective value of the output voltage of 100 mV. It should be borne in mind that RF voltage less than 20 mV cannot be measured with this millivoltmeter (dead zone), and at a voltage of more than 100 mV, its readings will be very high. It is recommended to turn on the generator one hour before the start of measurements. After it warms up, the long-term frequency stability will increase significantly. The PCB file in Sprint Layout 6.0 format can be downloaded from ftp://ftp.radio.ru/pub/2016/01/gener.zip. Literature
Author: G. Bondarenko
A New Way to Control and Manipulate Optical Signals
05.05.2024 Primium Seneca keyboard
05.05.2024 The world's tallest astronomical observatory opened
04.05.2024
▪ MAX22192 - 8-channel digital input driver with galvanic isolation ▪ What do poisonous mushrooms smell like? ▪ Artificial wood from the laboratory ▪ Samsung Gear VR Innovator Edition - virtual reality glasses for smartphones
▪ site section Parameters of radio components. Article selection ▪ article Barcode. History of invention and production ▪ Article What is the difference between registered and preferred shares? Detailed answer ▪ article Carbine brake. Tourist tips
Home page | Library | Articles | Website map | Site Reviews
www.diagram.com.ua |


 Leave your comment on this article: