|
|


 Arabic
 Bengali
 Chinese
 English
 French
 German
 Hebrew
 Hindi
Hindi Italian
 Japanese
 Korean
 Malay
Malay Polish
 Portuguese
 Spanish
 Turkish
 Ukrainian
 Vietnamese
|
ENCYCLOPEDIA OF RADIO ELECTRONICS AND ELECTRICAL ENGINEERING VHF beacon. Encyclopedia of radio electronics and electrical engineering
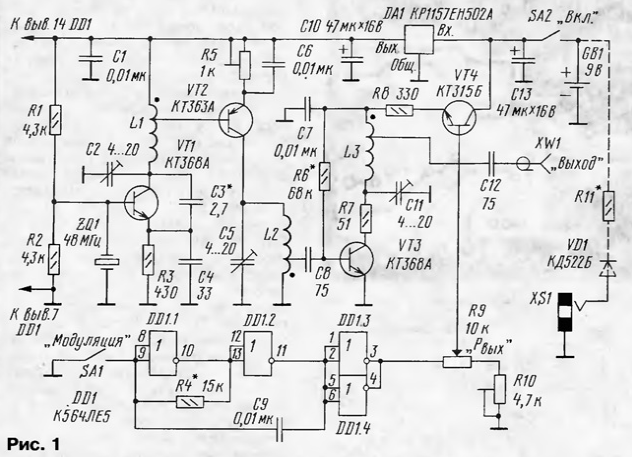
Encyclopedia of radio electronics and electrical engineering / Civil radio communications To test and tune various VHF equipment and antennas, radio amateurs often use a low-power transmitter, the so-called "beacon". "Beacon" is usually located at a distance of several tens or hundreds of meters from the place of adjustment work. Since such work usually takes a long time, the transmitter must be equipped with an autonomous power source and provide a stable signal in terms of frequency and level during this time. The scheme of such a transmitter is shown in fig. one.
It consists of a master oscillator, a frequency multiplier, an output stage, a modulator, and a modulating signal generator. The device is powered by a battery of galvanic cells or batteries with a total voltage of 8 ... 9,5 V. The supply voltage to the generators is supplied through a voltage regulator on the DA1 chip. The master oscillator is assembled on a transistor VT1 according to the "capacitive three-point" scheme with quartz frequency stabilization. The ZQ1 resonator operates on the third harmonic, and its frequency can be in the range of 48...48,66 MHz. A frequency tripler is assembled on the transistor VT2. The transistor operates with a cutoff of the collector current, its optimal mode is set by a tuned resistor R5. The third harmonic of the master oscillator signal (in the frequency band 144 ... 146 MHz) is selected by the L2C5 circuit and, from part of the turns of the L2 coil, enters the output stage, the transistor VT3. The L3C3 circuit, also tuned to this frequency, is included in the collector circuit of the transistor VT11. From the tap of the coil L3, the transmitter signal through the capacitor C12 is fed to the antenna socket XW1. A rectangular pulse generator with an operating frequency of about 1 kHz is assembled on the DD1 chip, and a modulator on the VT4 transistor. The output stage of the transmitter is powered through the resistor R8 and the transistor VT4. By changing the supply voltage of this stage, you can change the output power level. This adjustment is implemented using a variable resistor R9. If the switch SA1 ("Modulation") is closed, then the output of the microcircuit elements DD1.3, DD1.4 and, accordingly, the resistor R9 will have a stable constant voltage. By changing the voltage at the base of the transistor VT9 with a variable resistor R4, the output power level of the signal is changed, while the signal will be emitted continuously. In position SA1, shown in the diagram, the rectangular pulse generator is turned on. The output stage of the transmitter is powered by a pulsed voltage and the pulse modulation mode will be implemented. A continuous transmitter signal can be received by a CW receiver, and a pulse modulated signal can also be received by an AM receiver. Almost all parts of the device are placed on a printed circuit board made of double-sided foil fiberglass, a sketch of which is shown in Fig. 2. The second side of the board is left metallized and connected in several places along the edge of the board with a common wire of the first side.
The following types of parts are used in the transmitter: trimmer capacitors - KT4-25, KT4-35; permanent - KM, KLS, K10-17; oxide - K50-16, K50-35. Fixed resistors - MLT, S2-33; tuning resistors - SPZ-19; variable - SPO, SP4-1. Transistor VT1 can be replaced with KT316A; VT2 - on KT363B; VT3 - on KT368B. The DD1 chip can be replaced with K564LA7, DA1 - with any similar low-power integrated stabilizer of the 78xx series. Switches SA1, SA2 - any small-sized. It is possible to use resistor R9 with a switch, for example, type SPZ-4vM. Accordingly, the need for SA2 is eliminated. Jack XW1 - any high-frequency small-sized. Quartz resonator ZQ1 - harmonic for the above frequencies or 16000 ... 16220 kHz (first harmonic) in a small-sized version. It is advisable to pay attention so that the frequency of the device does not fall on the calling channels of the 144 MHz range. The inductor L1 is wound with PEV-2 0,4 wire on a mandrel with a diameter of 4 mm and contains 13 turns with a tap from the 4th turn. Coils L2, L3 are wound with the same wire on a mandrel with a diameter of 3,5 mm and contain 6 turns each with a tap from the 1st and 2,5th turns, respectively. The conclusions of the parts before soldering are shortened to a minimum length. The board, together with the power supply, is placed in a rectangular metal case measuring 104x64x25 mm. On the short side wall of the housing, next to the inductor L3, a socket XW1 is installed, switches SA1 and SA2 are installed on the same side. The variable resistor R9 is fixed directly on the front side of the case through a hole in the board. Setting up the transmitter begins with a master oscillator. Capacitor C2 achieves stable generation at the frequency of the quartz resonator. If the generator will operate at other frequencies, then the capacitance of the capacitor C3 must be reduced, if the generator is not excited, then the capacitance C3 should be increased. Then, with capacitors C5 and C11, the corresponding circuits are tuned to the frequency of the output signal, and the tuning resistor R5 sets the operating mode of the frequency tripler, at which the maximum of the third harmonic signal is obtained. The signal is controlled by a high-frequency oscilloscope with an input impedance of 50 ohms connected to the output of the device. Trimmer resistor R10 sets the minimum output level that can be obtained at the output of the device. If desired, the variable resistor R9 can be provided with a graduated scale. In the author's version of the transmitter, the output power level can be adjusted from 0,01 to 2 mW. If the pulse modulation mode is not needed, the circuit can be simplified by excluding the elements DD1, R4, C9, SA1, and the left output of the variable resistor R9 according to the circuit can be connected to the output of the DA1 microcircuit. The "beacon" consumes a current of 9 mA in the continuous signal mode and 7 mA in the pulse modulation mode. If a battery is used to power the device, then to charge it, it is advisable to install any small-sized socket on the case and additionally introduce a diode and a resistor into the circuit (the XS1VD1R11 chain in Fig. 1 is shown by a dotted line). The resistance of the resistor R11 is selected in such a way as to ensure the rated current of the battery charge from a constant voltage source of 12V. Author: I.Nechaev (UA3WIA)
A New Way to Control and Manipulate Optical Signals
05.05.2024 Primium Seneca keyboard
05.05.2024 The world's tallest astronomical observatory opened
04.05.2024
▪ Device for wireless charging of gadgets at a distance of up to a meter ▪ Non-contact emotion recognition system ▪ The Digital Key standard will turn your smartphone into a car key ▪ New 8-bit flash microcontrollers
▪ section of the site for the radio amateur-designer. Article selection ▪ article Cuckold someone. Popular expression ▪ article Why were Chistye Prudy used to be Pogany? Detailed answer ▪ article Printer of an offset machine. Job description ▪ article Diverging lens. physical experiment
Home page | Library | Articles | Website map | Site Reviews
www.diagram.com.ua |


 Leave your comment on this article: