|
|


 Arabic
 Bengali
 Chinese
 English
 French
 German
 Hebrew
 Hindi
Hindi Italian
 Japanese
 Korean
 Malay
Malay Polish
 Portuguese
 Spanish
 Turkish
 Ukrainian
 Vietnamese
|
ENCYCLOPEDIA OF RADIO ELECTRONICS AND ELECTRICAL ENGINEERING Tourist flashlight. Encyclopedia of radio electronics and electrical engineering
Encyclopedia of radio electronics and electrical engineering / Lighting. Control schemes The described flashlight has a high brightness of the glow, which is provided by 16 LEDs assembled in a matrix. The directional characteristic of the emission of LEDs creates a powerful luminous flux at a distance of at least 3 m without the use of reflectors and illuminates a large area.
The flashlight is turned on with a microswitch. The modes of operation, set by an additional switch, allow you to use this flashlight for various needs. For example, use it directly as a flashlight, a lamp or a powerful beacon. In beacon mode, the flashlight emits ultra-bright flashes of light visible from a considerable distance. The flashlight can be switched to standby mode, when it will automatically turn on at dusk or in the dark. The scheme of the flashlight is shown in Fig.1.
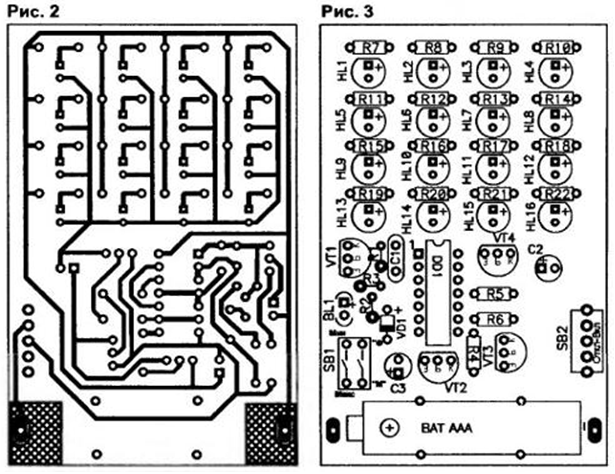
Using the switch section SB 1.1 set the sensitivity of the flashlight to the ambient light level. So, in the position when the SB1.1 contacts are closed, the sensitivity to the level of illumination is maximum, and the flashlight will turn on only in complete darkness. This mode of operation can be combined with both continuous glow and pulse, set by the position of the contacts in the SB1.2 section. In the position when the SB1.1 contacts are open and the illumination level is minimal, the flashlight can turn on even in the shade or in cloudy weather. Both installation options allow you to use the flashlight as a lamp with automatic switching, for example, in a tent. The second section of the SB1.2 switch sets the mode of light pulses emitted by the flashlight (position "beacon" or "flashlight"). In beacon mode, the LEDs emit short, bright flashes of light. This mode of operation can be used for searching, marking a place, or drawing attention. In the "lantern" position, the LEDs emit a bright, even white light, just like in a conventional flashlight. The flashlight is powered by a single 1,5 V AAA cell, which is very convenient during hiking trips, when every gram of weight counts. The circuit (Fig. 1) consists of a short pulse generator on microcircuit elements DD1.1, DD1.2, buffer elements DD1.3 ... DD1.6, an electronic switch on transistors VT2 ... VT4 and a spark gap on capacitor C2. LEDs HL1...HL16, located on the printed circuit board in the form of a matrix, periodically flash at a high frequency. The flashlight is switched on by switch SB2. Immediately after turning on the power, the generator starts working on the elements DD1.1 and DD1.2. By introducing the R2-VD1 chain into the generator structure, short positive pulses with a longer pause were obtained at its output. This is necessary for the normal charging and discharging of the capacitor C2. Suppose, after turning on the power, a wide negative pulse appeared at the output of the generator. After passing through the elements DD1.3, DD1.4 and twice inverted, this pulse opens the transistor VT2 and connects the positive plate of the capacitor C2 to the "+" power supply. The same pulse, after a single inversion by the DD1.4 element, opens the transistor VT4, connecting the negative plate of the capacitor C2 to the common wire. Capacitor C2 charges quickly. After changing the negative pulse at the output of the generator with a short positive one, the transistors VT2, VT4 are closed and held closed for the duration of the positive pulse. This positive pulse with a duration of about 10 ms from output 4 DD1.2 comes through the elements DD1.5, DD1.6 to the base of the transistor VT3 and opens it. As a result, the charged capacitor C2 is connected in series with the power source to the load of LEDs HL1...HL16. For a short time, twice the supply voltage is connected to the outputs of the LEDs, i.e. about 3 V. Current flows through the LEDs and current-limiting resistors R7 ... R22, and the LEDs flash, illuminating the space in front of them. A negative pulse appears again at the output of the generator, which closes the transistor VT3, and the process of charging capacitor C2 is repeated. This ensures the periodic ignition of the LEDs. The capacitance of the capacitor C2 determines the energy of the flash of the LEDs. In this circuit, the capacitor accumulates a charge sufficient for a very bright glow of the LEDs. Photocell BL1 and transistor VT1 control the on/off of the generator on the chip DD1, and consequently, the inclusion of LEDs HL1...HL16. The switch section SB 1.1 allows you to set the sensitivity to the level of illumination. When SB1.1 is in the closed position (maximum sensitivity), the emitter of the transistor VT1 is connected to the common wire, and the transistor becomes an amplifier. If at this moment it is dark, the photodiode is closed, and the transistor VT1 is also closed. The generator automatically turns on, i.e. light is lit. When BL1 is illuminated, a positive potential appears on the anode of the photodiode, which opens the transistor VT1. Through VT1, a low logic level arrives at pin 1 of the DD1.1 element and blocks the operation of the generator. The generator is in the blocked state until at least a small flux of light enters the photodiode, and the generator on DD1.1, DD1.2 turns on only in complete darkness. If SB1.1 is in the off position, the BL1 photodiode is connected through the base-collector junction of the transistor VT1 to the generator input at DD1.1, DD1.2. There is no additional signal amplification by the transistor. This leads to blocking the generator with a weak current of the BL1 photodiode only at a high level of illumination. In other words, even a slight dimming of the photodiode turns on the generator on the DD1 chip and lights up the flashlight LEDs. The second section of the switch - SB1.2 - sets the operating mode of the generator. Closing this section leads to the connection of the resistor R3 in parallel with R1, which causes a decrease in the frequency of the generator and flashes of the LEDs. The device is assembled on a printed circuit board made of one-sided fiberglass with dimensions of 55x85 mm. The drawing of the board is shown in Fig. 2, and the location of the radio components is shown in Fig. 3. The contacts for connecting the battery are taken from an old TV remote control.
It is not difficult to dismantle them, it is enough to carefully disassemble the remote control and remove the contacts that are in the grooves of the battery compartment. The contacts are installed on the printed circuit board so that they reliably touch the ends of the battery, and are sealed with a neutral no-clean flux. After installing the battery, it is fixed with a thin single-core copper wire, which is soldered to the pads shown in Fig. 3 (next to the battery). The list of radio components used in the device is given in the table. The 74HC14 chip can be replaced by the 74LV14, which is operable at very low supply voltages. In this case, the duration of the flashlight from one battery will increase. The flashlight uses ARL-3014UWZ LEDs (white, high brightness). But it is possible to install other LEDs. The main thing is that they be with increased brightness of the glow. In case of replacement, it is recommended to select the current mode of the LEDs by increasing or decreasing the resistances R7 ... R22. If you do not plan to use a flashlight in the photorelay mode, the transistor VT1 and the photodiode BL1 do not need to be soldered. I want to note that using the photorelay mode increases the overall current consumption from the battery, which must also be taken into account. To power the flashlight, I used a "fresh" GRUNDIG cell (most likely Chinese) of AAA size with a voltage (no load) of 1,66 V (1,5 V on the label). When the element was connected, the current consumption in the "Lantern" mode was 15 mA, in the "Lighthouse" mode - 9 ... 10 mA. To expand the supply voltage range "down", it is necessary to reduce the resistance of the current-limiting resistors to 15.20 Ohm and at the same time reduce the capacitance of the discharge capacitor (otherwise the LEDs will burn out) to 1500 ... 2200 μF. Author: A. Lechkin, Ryazan
Machine for thinning flowers in gardens
02.05.2024 Advanced Infrared Microscope
02.05.2024 Air trap for insects
01.05.2024
▪ IR1161L and IR11688S synchronous rectifier controllers ▪ Apple is the most valuable company in history
▪ section of the Electrician website. PUE. Article selection ▪ article What is smell? Detailed answer ▪ article Working with hand forging tools. Standard instruction on labor protection ▪ article Theory: frequency synthesizers. Encyclopedia of radio electronics and electrical engineering ▪ article Ring of the fakir. Focus Secret
Home page | Library | Articles | Website map | Site Reviews
www.diagram.com.ua |


 Leave your comment on this article: