|
|


 Arabic
 Bengali
 Chinese
 English
 French
 German
 Hebrew
 Hindi
Hindi Italian
 Japanese
 Korean
 Malay
Malay Polish
 Portuguese
 Spanish
 Turkish
 Ukrainian
 Vietnamese
|
ENCYCLOPEDIA OF RADIO ELECTRONICS AND ELECTRICAL ENGINEERING Electrical bell. Encyclopedia of radio electronics and electrical engineering
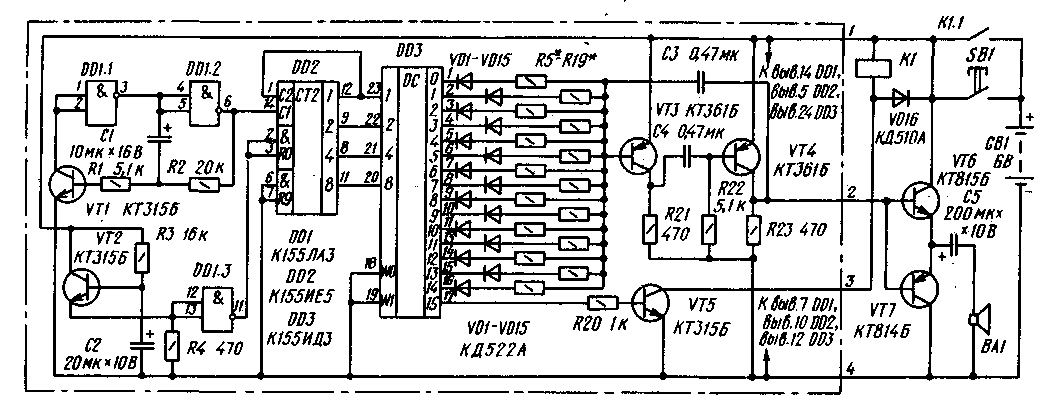
Encyclopedia of radio electronics and electrical engineering / Calls and audio simulators Such a bell can be installed in the apartment instead of the usual electric one. And then, when you press the button at the front door, the apartment will be filled with the sounds of a popular melody that you choose yourself and program in advance. The bell (Fig. 1) uses three microcircuits and seven transistors. On the elements DD1.1, DD1.2 and the transistor VT1, a clock generator is made that generates pulses with a duration of approximately 0,5 s. They go to the counter DD2, the outputs of which are connected to the decoder DD3.
In turn, fifteen outputs of the decoder are connected through decoupling diodes VD1-VD15 and resistors R5-R19 to an audio frequency generator assembled according to the multivibrator circuit on transistors VT3, VT4. From the generator, the signal is fed to a power amplifier assembled on transistors VT6, VT7. The load of the amplifier is the dynamic head BA1. As soon as the SB1 button is pressed, the bell is powered from the GB1 source. At pin 17 of the decoder. as on the other output pins, the logic level 1 appears. The electronic key on the VT5 transistor opens, the relay K1 is activated. With contacts K1.1, the relay blocks the button - it can be released. After pressing the button, the counter does not turn on immediately, but after a while, necessary for the relay to operate. For this purpose, a delay node is introduced into the call, made on a transistor VT2 and an element DD1.3. The duration of the delay depends on the resistance of the resistor R3 and the capacitance of the capacitor C2. Only after turning on the counter, the inputs of the decoder will receive signals in binary code. In this case, the logic 0 level will “move” at the outputs from the top to the bottom according to the output circuit, connecting one or another frequency-setting resistor of the audio frequency generator to the common wire (minus the power source). The dynamic head will emit the sound of the corresponding key. When the logic 0 level appears at the last output (pin 17), the electronic key will close, the relay will release, the bell will turn off. In this design, you can use MLT-0,125 or MLT-0,25 resistors, K50-6 oxide capacitors. the remaining capacitors are KM-6. Diodes - any silicon. Dynamic head - with a power of 0,25-1 W with a voice coil with a resistance of 5 ... 8 Ohm. The relay is a reed relay or any other that operates at a voltage of up to 4 V and consumes a current of not more than 100 mA (the lower the current consumed, the longer the power supply will last). The power source is four elements 343 connected in series. The details of the nodes circled in the diagram with a dash-dotted line are mounted on printed circuit board (Fig. 2) from one-sided foil fiberglass with a thickness of 1,5 mm. Resistors R5-R19 are soldered in the process of establishing a call. The board is fixed inside the housing of the subscriber loudspeaker or another housing suitable in size. A power source, a relay, a VD16 diode and a capacitor C5 are also installed there. The output transistors are attached to the case near the board with M3 screws, and the dynamic head is mounted on the front wall. Establishing a call begins with checking the operation of the clock generator. An oscilloscope is connected to the output of the DD1.2 element and the generator pulses are observed - they should be approximately 0,5 s long. If necessary, this value can be changed by selecting the resistor R2 or capacitor C1. Next, they check the operation of the counter and the decoder by the sequential appearance of a logical 0 level at the outputs of the decoder - an oscilloscope will also help here. By selecting the resistor R5 (the rest are not yet available), the first tone of the selected melody is set, and then the remaining tones are set by selecting the appropriate resistors. At this stage, it is convenient to "lengthen" the clock pulse by temporarily connecting another one in parallel with capacitor C1, with a capacity of 20 ... 50 microfarads. In addition, instead of resistors R5-R19, it is better to turn on a variable or trimmer, the resulting resistance of which is then measured and a constant resistor of the same or possibly close resistance is soldered. If a pause is needed at some point in the melody, the resistor and decoupling diode are not soldered to the corresponding output of the decoder. In order for the bell to work properly, monitor the condition of the power supply elements and in case of a significant (more than 1 V) voltage drop of the source under load, when the bell is on, replace the elements. Author: G. Shulgin, Moscow; Publication: N. Bolshakov, rf.atnn.ru
Artificial leather for touch emulation
15.04.2024 Petgugu Global cat litter
15.04.2024 The attractiveness of caring men
14.04.2024
▪ Mars changes the structure of near-Earth asteroids ▪ Unannounced smartphone All New HTC One has already been cloned ▪ Solar energy is developing exponentially ▪ Output from mobile phone to printer
▪ section of the site Interesting facts. Selection of articles ▪ article Close your eyes and think of England. Popular expression ▪ Is it possible to prove paternity by blood type? Detailed answer ▪ article Mortar pump operator. Job description
Home page | Library | Articles | Website map | Site Reviews
www.diagram.com.ua |

 Leave your comment on this article: