|
|


 Arabic
 Bengali
 Chinese
 English
 French
 German
 Hebrew
 Hindi
Hindi Italian
 Japanese
 Korean
 Malay
Malay Polish
 Portuguese
 Spanish
 Turkish
 Ukrainian
 Vietnamese
|
ENCYCLOPEDIA OF RADIO ELECTRONICS AND ELECTRICAL ENGINEERING Electronic corridor switch. Encyclopedia of radio electronics and electrical engineering
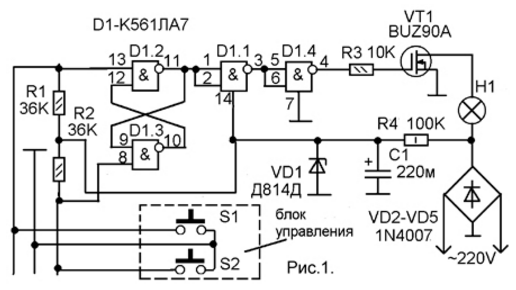
Encyclopedia of radio electronics and electrical engineering / Lighting The task of controlling light in a long corridor is usually solved by installing mechanical corridor switches. The scheme of their installation is known to any electrician - it allows you to turn on the light with one switch and turn it off with another. Thus, two control points for one lamp (or one lamp chain) are obtained. But, in some cases, not two control places (entrance and exit) are required, but much more. For example, in the conditions of the entrance of an apartment building, it is desirable that the entire chain of lighting lamps installed on landings can be controlled from each landing. Or in the conditions of an extended and branched corridor with a large number of inputs and outputs. In these cases, mechanical corridor switches are indispensable. Or the wiring diagram will turn out to be just fantastic, and each corridor switch will have to be with the number of positions equal to the number of control points (for example, 12 for the entrance of a 12-story building). In this case, it is better to make an electronic circuit, like the one shown in Figure 1, in which each control item consists of two buttons without fixing. All these control points are equal and their number is practically unlimited (all are connected in parallel to a three-wire bus).
The circuit is very simple and functional. The 1-wire control bus is routed to pass through all control points. If this is a multi-storey building, then the bus is laid, respectively, from the bottom up. On each staircase, one control element is connected to it, consisting of two buttons S2 and SXNUMX. The main unit is located at the very bottom - on the first floor, where the mechanical light switch was located in the entrance. The group button S1 is used to turn on the light, and the button S2 is to turn it off. They are connected to the inputs of the inverse RS flip-flop formed by the elements D1.2 and D1.3 of the D1 chip. When you press S1, the logic zero voltage is applied to pin 13 D1.2. The trigger is set to the state of a logical unit at the output of the element D1.2. Further, this level through the buffer stage on the elements D1.1 and D1.4 (this stage reduces the influence of the gate circuit of the field effect transistor on the operation of the RS flip-flop) enters the gate of the high-voltage field effect transistor VT1 of the BUZ90A type. Resistor R3 reduces the FET on/off current inrush caused by significant gate capacitance. With a logical unit at the output D1.4, the field-effect transistor VT1 opens and turns on the H1 lamp. The lamp power can be up to 200W when the transistor is operating without a heat sink. Load power up to 2000 W is possible, but this, firstly, will require replacing the diodes of the VD2-VD5 rectifier bridge with diodes of the appropriate power, and secondly, the field-effect transistor will need to be installed on a sufficiently efficient radiator. There is no lower load power threshold - a key field-effect transistor, unlike a thyristor, can be opened even at the very minimum load current. To turn off the lamp, press the S2 button. At the same time, a logic zero voltage is supplied to pin 8 D1.3. The trigger D1.2-D1.3 switches to a logic zero state at the output of the element D1.2. Accordingly, the output of D1.4 will also be zero. The field effect transistor closes and turns off the lamp. As already mentioned, there can be an almost unlimited number of control units consisting of two buttons. They all connect to the XNUMX-wire control bus in the same way as the one control unit shown in the diagram. Buttons in control units must be non-latching. You can use ordinary toggle or intercom buttons by installing two pieces in suitable cases. As a case, you can use a modified standard switch for external wiring with a wide key. It is disassembled and the contacts and the button mechanism are removed. The key is used as a false panel for installing two toggle switches. Two holes are drilled in it for installing toggle switches and two more holes in the corners for screwing the key to the base of the switch. Another version of the design is also possible, for example, as a housing, you can use a telephone euro socket for external wiring by removing the telephone jack from it. In order for the switch to be automatically set to the off position after a power failure, it is necessary to connect a capacitor with a capacity of 2 - 0,047 uF in parallel with any of the S0,47 buttons. The capacitor can be connected in any of the control units or directly on the main unit board - between pin 8 D1.3 and the common minus power supply. The microcircuit is powered by a parametric stabilizer on the zener diode VD1. Diodes VD2-VD5 must be selected according to the load power and for a reverse voltage of at least 300V. Zener diode D814D is needed in a metal case. It can be replaced with KD512 or some imported medium power. It is not advisable to use KD212 or D814D-1 in a glass case, as this greatly reduces the reliability of the circuit. A break in the zener diode will lead to the failure of the microcircuit and, perhaps, the field effect transistor, since in this case an unacceptably increased supply voltage is supplied to the microcircuit. In principle, to increase reliability, you can take two identical zener diodes and turn them on in parallel, observing the polarity. The BUZ90A field effect transistor can be replaced with an IRF840 or KP707V2. With load power up to 200W, it works without a radiator. Chip K561LA7 can be replaced by K176LA7 or CD4011. Capacitor C1 must be at least 16V. Everything but the control units and the lamp is located on a single printed circuit board with single-sided printed tracks. The scheme and layout of the board is shown in Fig.2.
As a basis, the author used his other development (L.1). The printed circuit board (Fig. 2.) is made on the basis of the device board from L.1, the necessary changes have been made to the wiring. With serviceable parts and error-free installation, no adjustment is required - the device works immediately after the first switch-on. Literature
Author: Lyzhin R.
Air trap for insects
01.05.2024 The threat of space debris to the Earth's magnetic field
01.05.2024 Solidification of bulk substances
30.04.2024
▪ Smart watch will monitor the quality of hand washing ▪ Liquid cooled CPU smartphone
▪ section of the site Security and safety. Article selection ▪ article Installation and equipment of tents. Fundamentals of safe life ▪ article Can animals distinguish colors? Detailed answer ▪ article Loch silvery. Legends, cultivation, methods of application ▪ article Electronic insect trap. Encyclopedia of radio electronics and electrical engineering
Home page | Library | Articles | Website map | Site Reviews
www.diagram.com.ua |


 Leave your comment on this article: