|
|


 Arabic
 Bengali
 Chinese
 English
 French
 German
 Hebrew
 Hindi
Hindi Italian
 Japanese
 Korean
 Malay
Malay Polish
 Portuguese
 Spanish
 Turkish
 Ukrainian
 Vietnamese
|
ENCYCLOPEDIA OF RADIO ELECTRONICS AND ELECTRICAL ENGINEERING Powerful flashlight converter. Encyclopedia of radio electronics and electrical engineering
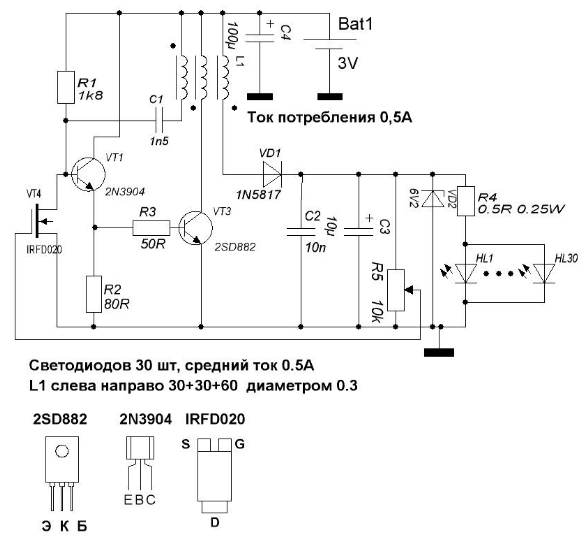
Encyclopedia of radio electronics and electrical engineering / Lighting The main drawback of LED power supply circuits directly from the battery is that when the voltage drops to 2.5 volts, the LED shines noticeably weaker, or even goes out altogether. This is solved by the previously proposed schemes (a module for powering the LED and a night light circuit) and many others on the Internet. But they also have a drawback - with a fresh battery, the LED shines with increased brightness and increased current consumption. At the same time, the increased current consumption leads to a slight increase in the brightness level, this is determined by the current-voltage characteristic of the LED, which resembles the characteristic of a zener diode. Once, when the LED flashlight died at the wrong moment (and I just recently changed the batteries), I decided to rearrange the LED block into an old Soviet flashlight with two 373 batteries (3 volts). Of course, simply rearranging will not work, the batteries will sit down a little and the flashlight will go out. It was decided to put a converter, but one thing is 1-2 LEDs with a current consumption of 30-40mA, and another thing is 30 LEDs with a current of up to 600 mA. Large current is not a problem, can be done. But, with a new battery, the LEDs consume a current of more than an ampere and heat up terribly, and most importantly, this current does not add brightness, i.e. is wasted. You can use specialized microcircuits (are there any at all for 600mA?), But I didn’t have it at hand, but I didn’t want to buy it until it came by mail and in general, a deep conviction that amateur radio should bring income, or not bring losses. Therefore, I decided to collect on loose materials, which you do not need to buy. The main requirement is simplicity and small dimensions - you need to insert it into a flashlight. I didn’t find anything like this on the Internet, it seems that there was once something in the Radio magazine, but I didn’t want to search for the last 10 years and it’s not a fact that there is what I need.
So the circuit, in fact, is the same blocking generator. VT3 is a medium power key transistor, on a small radiator (10x10x2mm). The saturation voltage of the key transformer is 0,3 volts, which is why I chose it. VT1 is just an amplifier, in theory, you can use a Darlington transistor and exclude VT1, but I had them either very healthy or small. VT2 - provides, together with VD2 and R5, stabilization of the current consumption. How it works. When the voltage on the upper plate C3 rises to 4 volts, the zener diode VD2 opens and the current flows through the base of the transistor VT2, it opens and shunts the base of the transistor VT1, as a result, VT1 and VT3 close and the voltage at C3 decreases. Why up to 4 volts? Because the zener diode is 3.3 volts and the emitter-base drop is 0.7 volts. But 3 volts fall on the LEDs, at high brightness 3.2-3.3 volts. For this, you need a resistor R4 with a power of about 0,5 watts (so as not to get warm, really 3 x 0.125). A current of 600 mA (30pcs x 20mA) multiplied by 1.2 ohms will give a voltage increase on C3 of 0.72 volts. Those. what was needed. Like a gut. But however, no, useless power of 0.5 watts is allocated on the resistor. If you find a 2.6 volt zener diode, you can exclude the resistor, but I have not seen such in nature. Yes, and stabilization left much to be desired, and there was also no brightness adjustment. Therefore, after a little thought, I drew a slightly more perfect scheme. The circuit repeats the old one, with the exception of a field-effect transistor, a trimmer resistor and a 6 volt zener diode. The field effect transistor is selected with an N-channel with a cut-off voltage of 2.5-3 volts. If the voltage at the gate exceeds this voltage, the field worker will open (in the open state, the resistance is one ohm) and shunt VT1.
The trigger level is regulated by R5, it can also set the desired brightness of the LEDs. R5 is preferably 10 k or less, with high resistance, glitches begin with charging the gate capacitance and reducing the brightness of the LEDs. R4 already has significantly less resistance, although everything works without it, and without R5. It's just that with this, the brightness is more smoothly adjusted and you can use a field switch with a higher cutoff voltage. The function of a 6 volt zener diode is that if you turn off the LEDs, the gate voltage can exceed the maximum allowable and the field effect transistor can be thrown into the trash, but I love them, especially the IRFD020 and IRF9020, I don’t know why. You can replace it with any N - channel field with an insulated gate and a cut-off voltage of 2-3 volts. The circuit maintains a fairly decent brightness down to 1.6 volts. At 1.4 volts, the LEDs go out, since the emitter base of transistors VT1 and VT3 drops 0.7 + 0.7 = 1.4 volts at the junctions. If less, then they can no longer open. You can try to use one transistor with a large gain, but not a Darlington !!! - he has two inside about the same scheme included. As a result, the LEDs shine from three volts with a very decent brightness at a current of 0.5-0.6 A, when the voltage drops to 2.1-2.5 V, the current consumption increases to 0.7-0.9 A (and this is correct, since the voltage has dropped and the brightness has remained the same, so you need to increase consumed current).
Machine for thinning flowers in gardens
02.05.2024 Advanced Infrared Microscope
02.05.2024 Air trap for insects
01.05.2024
▪ Smallest black hole discovered ▪ Deep Learning Technology for Time Series Analysis ▪ Scientific companies of Russia ▪ 84" NEC MultiSync X841UHD display with 3840x2160 resolution
▪ site section Infrared technology. Article selection ▪ article A slipway for the manufacture of a propeller. Tips for a modeler ▪ article Which matches between Inter and Milan discredit the away goal rule? Detailed answer ▪ article Soft and manual bicycle. Personal transport ▪ article Jet engine from a chicken egg. physical experiment
Comments on the article: OMG Well, why feed a current device, stabilizing its voltage, instead of current strength? Still including in parallel, guaranteeing uneven current of each? To change LEDs more often? In order to turn this device for killing LEDs into a working circuit, you need to turn them on in series, while moving R4 down the chain, that is, one lead to the diodes, and the other to ground. The VT1 base is connected to the top of them directly, without extra zener diodes with resistors. The resistance R4 in ohms should be 0.7 / I, where 0.7 is the voltage drop at the VT1 base junction, and I is the LED current in amps. The latter for ordinary LEDs is a maximum of 20mA, that is, 0.02. That is, we select R4 at 36 ohms, or somewhat larger, so that due to a slight decrease in current strength, and hence brightness, we can significantly extend the life of the LEDs. The circuit turns out to be even simpler, nothing heats up in it, and most importantly, it works correctly, without burning out the LED, and without converting almost half of the energy into unnecessary heat. When powered by a battery, it would be nice to add a cutoff for its minimum allowable voltage, or at least an indication of one. But this is a separate issue. Note Diagrams. The comment was translated due to incorrect encoding of the original text.
Home page | Library | Articles | Website map | Site Reviews
www.diagram.com.ua |


 Leave your comment on this article: