|
|


 Arabic
 Bengali
 Chinese
 English
 French
 German
 Hebrew
 Hindi
Hindi Italian
 Japanese
 Korean
 Malay
Malay Polish
 Portuguese
 Spanish
 Turkish
 Ukrainian
 Vietnamese
|
ENCYCLOPEDIA OF RADIO ELECTRONICS AND ELECTRICAL ENGINEERING Car subwoofer in the trunk. Encyclopedia of radio electronics and electrical engineering
Encyclopedia of radio electronics and electrical engineering / Speakers After making the podiums, it was the turn to think about the subwoofer. Of course, you could just buy a cabinet subwoofer, but for me it's too easy way :-) And in general, a ready-made box is a somewhat ambiguous thing ... Therefore, I decided to make a box myself. There are a lot of materials for the selection, calculation and manufacture of woofers. To begin with, I studied all the articles by A. Yelyutin on the theory and practice of "sabobuilding" on his website caraudio.ru. At the moment, there is a magazine "Avtozvuk", but I still managed to find the pages I was looking for. You can also watch "Bubuku" by Klaus. And on working with composite materials, a lot of valuable information can be found here. I will not justify my choice of a head for a subwoofer, I will only say that I bought an MTX Thunder 5124 speaker from Vadim - 12 inches, respectively. The parameters of the head indicated a closed box, the manufacturer recommended 1.25 cu.ft, and taking into account the characteristics of the chisel salon, Vadim calculated 1.22 cu.ft. What I based on. Having carefully read all the recommendations, I decided to build a box of the "stealth" type (hidden, irregularly shaped, repeating the shape of the trunk part) from fiberglass and carbon fiber with plywood walls. Materials and Tools From the main materials I needed: I don’t have an electric jigsaw, so I used ordinary saws - wide and narrow, also an electric drill, a Black & Decker building hair dryer, metal shears, a cutter knife and another hammer :-) gluing I decided to place the woofer on the left in the trunk - less distance to the battery and more space in the niche due to the lack of a gas tank neck. I also planned to use the place that is behind the plastic plug, and as it turned out for good reason, this is an additional 5 liters of volume. To begin with, I prepared the surfaces: I sealed everything with paper tape, including the plastic sidewall. Then, using cardboard, adhesive tape and plasticine, I made a shell (ends) around the cutout flush with the edges, after gluing a piece of 8 mm foam on the inner surface of the rear wing. This is so that the finished form does not rest against the wing from the inside. Here it is important to ensure that the side cardboard walls are at a slight angle, otherwise the cast cannot be pulled out of the hole. Then, with the same plasticine, I slightly corrected the resulting matrix to give smoother contours to the cast. Plasticine warmed up with a hair dryer. The surface prepared in this way was generously smeared with lithol and proceeded to pasting. I overlapped the fiberglass, in strips about 15 cm wide, slightly warming them up with a hair dryer and squeezing out the bubbles. I did not smear the surface with resin (it is in lithol), but pre-impregnated the strips. At this stage, I did not have a very clear idea of \uXNUMXb\uXNUMXbthe future shape of the box, so I glued a obviously large area. 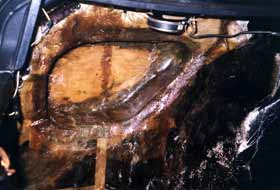 Failed to take a picture of the form before pasting. Fiberglass is laid in one layer with an overlap, paper tape and plasticine are visible through it. Epoxy cures slowly at low temperatures, so I had to find a warm garage to cure the mold. It turned out to be much easier than I expected, and after spending the night in a huge warm factory garage, I solemnly tore out the resulting cast, though with some effort ... wall I estimated the number, shape and size of the side walls already in place, cutting them out of cardboard and fastening them with hot melt glue (sold in the form of rods, melted with a soldering iron or inserted into a special "gun"). But at this stage there is a very important problem, the solution of which is not so trivial. How to estimate the volume of a box? I did not find a ready answer, I had to invent something. The box from the speaker contained 20 liters, so I cut it out of cardboard by eye and fastened the walls so that it turned out one and a half boxes. It is possible to measure the volume more accurately only with the help of bulk or liquid substances ... Cereals (30 liters of cereals :-O)), sand, expanded clay, and foam balls can also come up ... We are not talking about water yet - the design is leaky basically. But a fresh solution came by itself, though not right away: I poured 6 liters of water into ordinary garbage bags, tied them up and just threw them into a mock-up box! Although the structure almost crumbled due to the gravity of the water, I achieved my goal ... Then I cut out the walls already from 9 mm plywood, trying to take into account the reduction in volume in the future: wall thickness, the volume of bars and stiffeners, epoxy (9 bottles of 300g each), fiberglass, etc. He fastened the new walls with hot-melt adhesive and measured again. If there is any doubt about the correctness of the measurements, then you can make the width of the walls with a margin and cut off the excess later, when sufficient strength has been gained. The top wall had to be made with a cutout for the speaker in the regular place of the lining. So I plan to organize the rear sub-sound. 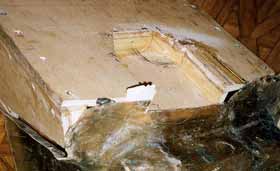 This cutout is for the stock "rear sub-sound" speaker. the same 9 mm plywood, epoxy and small nails were used. Then I fastened the walls together with screws (self-tapping screws), blocks and epoxy. Bars are best cut from hardwood: beech, oak, birch. Mark the places for the screws (I took 4X25mm) and pre-drill with a drill 0,5-0,75 of the screw diameter, otherwise the bar will crack. I also want to add that I fastened the side walls together without separating the back one - in order to constantly control the position of the wooden part relative to the fiberglass. That is, he tore the temporary adhesive joint, put a bar and again fixed the area with hot glue.  Self-tapping screws are located somewhat tricky - so that they do not "meet" inside the bar. For better recessing of the heads, the place was pre-drilled with a large drill.  Wooden binding in one layer, the bottom has not yet been glued thoroughly. The mold from the inside had to be polished a little. When the wooden trim was dry, I thoroughly glued the back wall to it with epoxy, nailing it with staple (small ones) carnations around the perimeter for a complete fit. After that, I cut off the excess cast and pulled out these carnations in some places ... 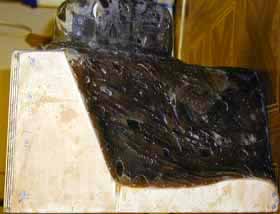 The cast adhered perfectly to the wooden wall in the most uneven area. If you look closely, then traces of carnations are noticeable around the perimeter. When docking, all the cracks were filled with a mixture of resin and sawdust. The original form was ready. Even at this stage, the box turned out to be completely airtight, so I measured the volume with water, and without the use of plastic bags ... Author: Dmitry Tsypchenko, Autosound; Publication: avtozvuk.com
Artificial leather for touch emulation
15.04.2024 Petgugu Global cat litter
15.04.2024 The attractiveness of caring men
14.04.2024
▪ The computer fetters the imagination of the designer ▪ Coca-Cola in the fields and on the hunt
▪ site section Electric meters. Article selection ▪ article End of story. Popular expression ▪ article Spoon herb medicinal. Legends, cultivation, methods of application ▪ article A pencil goes through a handkerchief. Focus secret
Home page | Library | Articles | Website map | Site Reviews
www.diagram.com.ua |

 Leave your comment on this article: