|
|


 Arabic
 Bengali
 Chinese
 English
 French
 German
 Hebrew
 Hindi
Hindi Italian
 Japanese
 Korean
 Malay
Malay Polish
 Portuguese
 Spanish
 Turkish
 Ukrainian
 Vietnamese
|
ENCYCLOPEDIA OF RADIO ELECTRONICS AND ELECTRICAL ENGINEERING Automatic switching of front and rear view cameras. Encyclopedia of radio electronics and electrical engineering
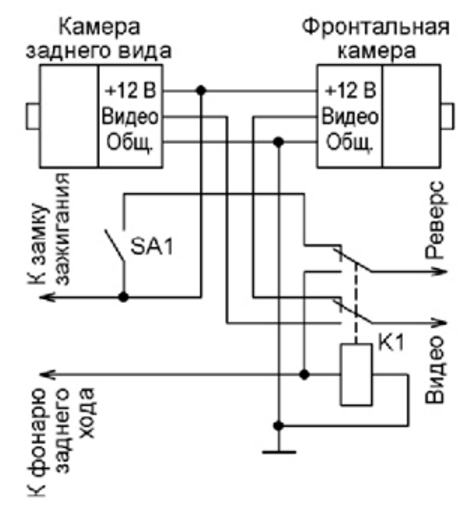
Encyclopedia of radio electronics and electrical engineering / Automobile. Electronic devices To improve traffic safety, most modern cars are equipped with rear-view cameras. But today on sale you can also find sets of front-facing cameras, the task of which is to help the driver safely park the car in conditions of limited free space in front. Since the rear view camera starts working when the reverse gear is engaged and must be given priority, certain rules must be followed in order for two cameras to work correctly on one monitor. Usually, camera switches are controlled manually, which is not always convenient. Commercially available video camera automatic switching modules work according to a very simple algorithm. The front camera turns on for 10 seconds after the ignition is turned on and after the reverse gear is turned off. Let's consider two options for manual video camera switches for connecting them to a standard head unit or an additionally installed monitor. In the first variant (Fig. 1), the coil of relay K1 receives voltage from the reversing lamp (reverse gear engagement signal). Having worked, the relay connects a rear-view camera to the head unit with one group of its contacts. The second group of relay contacts supplies +12 V voltage to the "Reverse" input of the head unit, which switches the monitor of this device to display the video signal applied to the "Video" input. When the reverse gear is off, the video input receives a signal from the front video camera, but it is displayed on the monitor only when the contacts of the SA1 switch are closed.
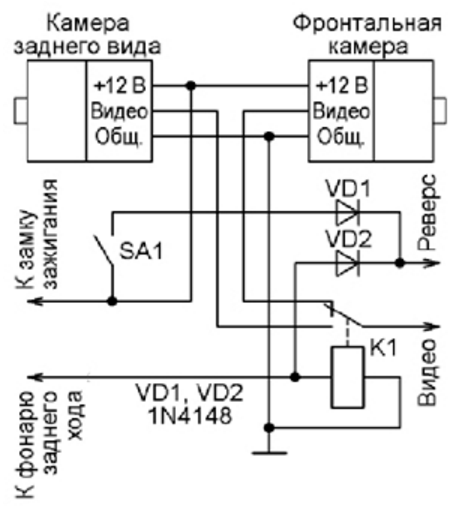
The difference between the device, the scheme of which is shown in Fig. 2, from the one considered only in that the relay K1 has one group of contacts, and the reverse signal forms a logical OR node on the diodes VD1 and VD2.
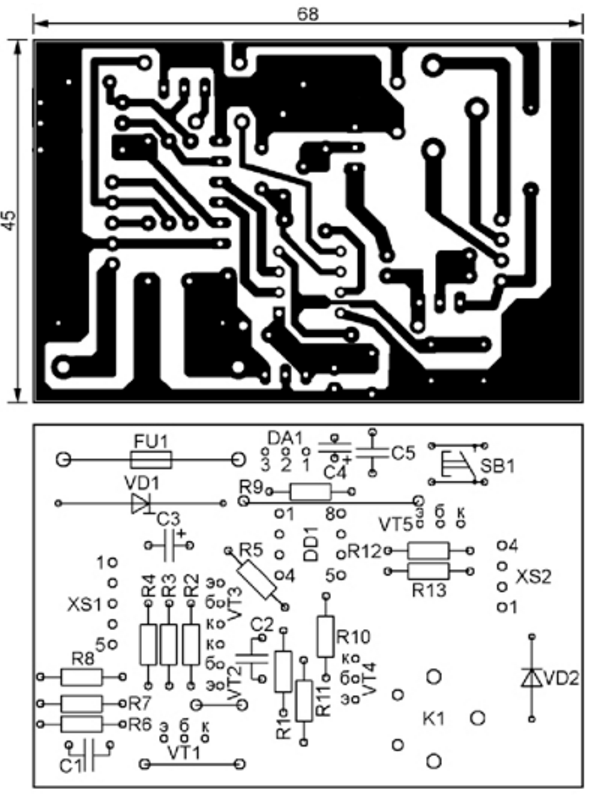
I have developed a front and rear view camera switcher with more features. It works according to the following algorithm: 1. Turns on the front camera for 5 seconds after power on (engine start) and movement starts. 2. Turns on the front camera when the brake pedal is pressed and the vehicle speed is below the set threshold. If after that the car stopped or its speed became higher than the threshold, or the brake pedal was released, then after about 2 seconds the front camera will be turned off. 3. Always turns on the rear view camera when reverse gear is engaged. The machine is built on the PIC12F675-I / P microcontroller according to the scheme shown in fig. 3. The microcontroller includes a comparator module and an internal 4 MHz RC clock. In addition to the DD1 microcontroller and the DA1 supply voltage regulator, protected from input voltage surges by the VD1 diode, the machine has control signal limiters on transistors VT1-VT3 and a Reverse signal control unit on transistors VT4, VT5 and diode VD2. The video signals from the cameras are switched by relay K1, controlled by the voltage coming from the reversing lamp.
When the ignition key is turned to the "On" position, the voltage of the on-board network through the switch for automatic control of the front camera, which is not shown in the diagram, is supplied to pin 1 of the XS1 connector. In turn, the +5 V voltage from the integral stabilizer DA1 is supplied to the microcontroller DD1. Signals with levels of +12 V from the brake pedal sensor, reversing lamps and pulses from the path sensor through the shapers-limiters on transistors VT1 - VT3 are fed to the inputs of the microcontroller. From the collector of the transistor VT5, the control signal is fed to the "Reverse" input of the head unit and switches its monitor to play the signal from the "Video" input. Through the VD2 diode, the +12 V voltage from the reversing lights is fed to the "Reverse" input when the reverse gear is engaged. It also does not pass the voltage of the "Reverse" signal to the lamps of the lanterns when the front camera is working. Setting up the machine consists in setting the threshold speed of the car and choosing the operating mode - manual or automatic. The threshold speed is set by pressing the SB1 button while driving at this speed. The button should be held pressed for 1...2 s until the front camera turns on briefly, after which it can be released. The threshold speed value will be written to the EEPROM of the microcontroller. At zero speed, writing to the EEPROM is blocked. Of course, you can record the threshold speed repeatedly in order to choose an acceptable option. Until the described operation is performed, the EEPROM stores a value equivalent to six pulses of the encoder in 0,72 s. This corresponds to a speed of 12 km/h for path sensors giving 2500 pulses/km (they are installed on Japanese and Korean cars), approximately 7 km/h for sensors with 4000 pulses/km, 5 km/h for sensors with 6000 imp./km and about 4 km/h - for sensors with 8000 imp./km. It is desirable to use voltage divider resistors R1 and R5 with a tolerance of ±1% from the nominal, otherwise selection of resistor R1 may be required. Based on the voltage at the output of this divider, the program determines that the car engine is running and prohibits changing the operating mode of the device. To select the operating mode, it is necessary to press the brake pedal in a stopped car with the engine turned off, turn on the ignition and turn on the power of the machine. The brake pedal should be kept depressed for about 10 seconds until the front camera is turned on briefly (for 2 seconds). With each repetition of this operation, the modes change in a ring. Initially, automatic mode is enabled. The manual operation algorithm is simple. After the power is turned on, the front camera is turned on and is turned off only by turning on the reverse gear or turning off the power of the machine. The rear view camera works when reverse gear is engaged. In order to avoid false alarms, both cameras and the machine must be powered through the car's ignition switch. All parts of the machine are mounted on a 68x45 mm printed circuit board made of foil fiberglass 1,5 mm thick. The printed circuit board drawing is shown in fig. 4. It is placed in a plastic case of suitable dimensions, where it is fixed with hot glue.
The FU1 fusible insert is used with flexible leads soldered into the board. Relay K1 - 102-1CH-S-U01-12VDC with a winding resistance of 225 ohms. For greater reliability, it is better to install the DD1 microcontroller on the machine board directly, without a panel. Of course, the camera_ 675.HEX file must first be loaded into its memory using the programmer. The camera_629.HEX file is for the PIC12F629-I/P microcontroller, which can be used instead of the PIC12F675-I/P. Protective diode 1 N6277 can be replaced with a zener diode 1N4746A, diode 1N4148 - KD522B. Instead of transistors 2N3904, you can install BC547, and instead of 2N3906 - BC557 or any KT209 series. Be aware of the differences in the pinout of these transistors. All slots in the body of the machine must be sealed with adhesive tape to protect against moisture and dust. In the author's version, it was additionally wrapped in foam rubber to avoid the appearance of extraneous sounds when the car was driving on uneven terrain. You can fix the machine in a suitable place under the dashboard of the car. Microcontroller programs and PCB file in Sprint Layout 6.0 format can be downloaded from ftp://ftp.radio.ru/pub/2016/03/camera.zip. Author: V. Surov
Artificial leather for touch emulation
15.04.2024 Petgugu Global cat litter
15.04.2024 The attractiveness of caring men
14.04.2024
▪ Robotic London Underground trains ▪ Portable Vaccine Patch Printer ▪ Graphene becomes a superconductor ▪ Video surveillance in Moscow schools
▪ website section LEDs. Article selection ▪ article Not the poet who knows how to weave rhymes. Popular expression ▪ article How did Zeus punish people for Prometheus stealing fire? Detailed answer ▪ article Working with a gas burner kit. Standard instruction on labor protection ▪ article Chairs. Focus Secret
Home page | Library | Articles | Website map | Site Reviews
www.diagram.com.ua |


 Leave your comment on this article: