|
|


 Arabic
 Bengali
 Chinese
 English
 French
 German
 Hebrew
 Hindi
Hindi Italian
 Japanese
 Korean
 Malay
Malay Polish
 Portuguese
 Spanish
 Turkish
 Ukrainian
 Vietnamese
|
ENCYCLOPEDIA OF RADIO ELECTRONICS AND ELECTRICAL ENGINEERING The device of the car enthusiast. Encyclopedia of radio electronics and electrical engineering
Encyclopedia of radio electronics and electrical engineering / Automobile. Electronic devices With this device, you can check and adjust the electrical equipment of a car with a power supply voltage of 12 V and a four-cylinder engine.
The main parameters:
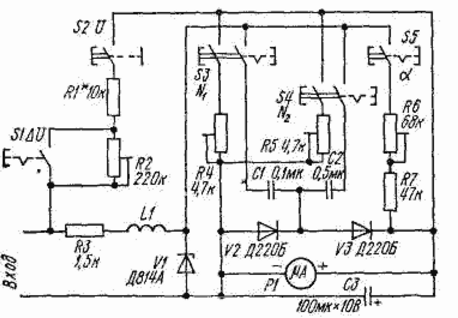
Voltages can be measured by pressing button S2. In this case, additional resistors R1 * and R1 are connected in series with the microammeter P2. The upper limit of the measured voltages is set by a tuning resistor R2. To assess the condition of the breaker contacts, the voltage drop across them is measured. The device (button S2 is pressed) is connected to the terminals of the breaker contacts and the ignition of the car is turned on. Slowly turn the crankshaft of the engine with the crank until the breaker contacts close (at this moment the voltmeter will show a voltage close to zero) and press the button 5 /. The smaller the deflection of the arrow, the better the condition of the contacts. If the pointer goes beyond the blackened area of the scale, this means that the contacts need to be cleaned or replaced. At the end of the measurement, press the button S1 again. To determine the speed of the crankshaft, press the button S3 (N1) or S4 (N2), and the clamps of the device are connected to the terminals of the breaker. In this case, the device measures the pulse repetition rate in the primary winding of the ignition coil. The frequency f, 1/min, of rotation of the engine crankshaft and the frequency N, Hz, of contact opening are interconnected by the ratio N = 120 f/z, where z is the number of engine cylinders. With each opening of the contacts of the breaker, the capacitor C1 (or C2, if the button S4 is pressed) is charged through the diode V3 and the microammeter P1, and each time the contacts are closed, it is discharged through the diode V2. Current I through the microammeter I = C1 / fUst, where C1 is the capacitance of the charging capacitor. Thus, the readings of the device are directly proportional to the frequency of opening the contacts of the breaker. Coil L1 protects the device from self-induction currents that occur in the primary circuit of the ignition coil during the operation of the car breaker, which increases the accuracy of measurements. When the S5 (a) button is pressed, the device measures the angle of the closed state of the breaker contacts, i.e. the angle of rotation of the breaker cam from the moment the contacts close to the moment they open (this parameter characterizes the size of the working gap of the breaker). The angles of the closed a and open φ states of the contacts are interconnected by the relation a + φ = 360¦/z. Coil L1 is wound on a cylindrical frame with a diameter of 6 mm and a distance between the cheeks of 26 mm (diameter of the cheeks is 16 mm), contains 9400 turns of wire PEV-2 - 0,08, winding in bulk. Trimmer resistors SPZ-16, capacitors C1 and C2 MBM, C3 - K50-6. M906 microammeter with a loop resistance of 750 ohms and a total deflection current of 100 μA. You can also use microammeters M24, M93 with similar parameters, while the scale of the device is calibrated again. Setting up the device begins with a voltmeter. To do this, the device is connected in parallel to a reference voltmeter and a constant voltage of 1 V is applied to them (buttons S1 and S2 are pressed). Choosing the resistor R1, they make sure that the arrow of the device is set at the last division of the scale. Then the button S1 is returned to its original state and a voltage of 16 V is applied. By changing the position of the slider of the resistor R2, the arrow of the device is again set to the final mark. To calibrate the tachometer, a rectangular pulse generator with an output voltage of 13..15 V and a duty cycle of 2 is required. For a subrange up to 1200 min-1 (N2), the generator signal frequency is set to 30 Hz. The resistor R5 of the tachometer sets the arrow on the division corresponding to 900 min-1. On the subrange up to 6000 min-1 (N1), the generator frequency is increased to 100 Hz and the arrow is set to 4 min-3000 with resistor R1. When calibrating the angle meter of the closed state of the contacts with a trimming resistor R6, set the arrow to zero on the Grad scale. In this case, the device is connected to a DC voltage source of 13 ... ... 15 V.
Artificial leather for touch emulation
15.04.2024 Petgugu Global cat litter
15.04.2024 The attractiveness of caring men
14.04.2024
▪ Intel Core i7-3970X Extreme Edition ▪ A polymer that responds to mechanical stress like a muscle ▪ New 103/4/5 RF Field Level Meter
▪ section of the site Assembling the Rubik's Cube. Article selection ▪ article by Louis-Ferdinand Celine. Famous aphorisms ▪ article Where are the spots on the sun? Detailed answer ▪ article Aralia high. Legends, cultivation, methods of application
Home page | Library | Articles | Website map | Site Reviews
www.diagram.com.ua |

 Leave your comment on this article: