|
|


 Arabic
 Bengali
 Chinese
 English
 French
 German
 Hebrew
 Hindi
Hindi Italian
 Japanese
 Korean
 Malay
Malay Polish
 Portuguese
 Spanish
 Turkish
 Ukrainian
 Vietnamese
|
ENCYCLOPEDIA OF RADIO ELECTRONICS AND ELECTRICAL ENGINEERING Electronic ammeter for car. Encyclopedia of radio electronics and electrical engineering
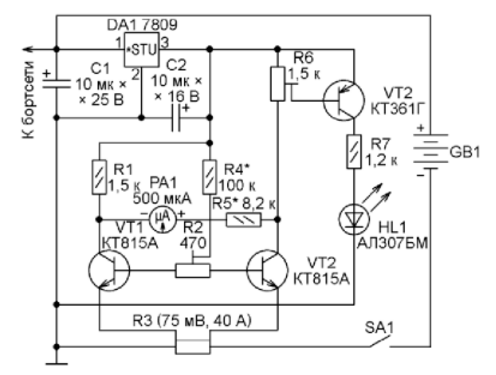
Encyclopedia of radio electronics and electrical engineering / Automobile. Electronic devices The proposed device is designed for visual monitoring of the charging and discharging current of a car battery during a trip. The ammeter indicator is a pointer, in addition, there is an LED current direction indicator that turns on when the battery is discharged. Having information about the direction and value of the current flowing through the battery allows the driver to avoid many emergency situations. For example, he can promptly notice that the battery is not charging for some reason and prevent it from completely discharging. An equally dangerous situation is when the charging current is excessively high, which can lead to a fire and failure of the generator. This happens, for example, when the voltage regulator fails. On modern passenger cars, they are usually limited to installing a battery charging indicator lamp on the dashboard. As a rule, there are no ammeters in the battery charging and discharging circuit, which is why they are not commercially available. To obtain more complete information about the operating conditions of the battery, it remains to install a homemade ammeter on the car. For example, a conventional milli- or microammeter, shunted by a resistor with a small resistance. But not every such device is suitable for this purpose, since the voltage drop across it at a current of full deflection of the needle can amount to a noticeable fraction of the voltage in the car’s electrical system. The industry produces standard measuring shunts for ammeters that have a voltage drop of 75 and even 50 mV at rated current, but for most small-sized electrical measuring instruments this is not enough. To connect them to the shunt, a DC amplifier with a low temperature zero drift is required. It is also required that the mechanism of the pointer device be resistant to vibration, and its dimensions are small enough to be installed on the dashboard of a car. It is not advisable to use an ammeter with a digital readout on a car, primarily for the reason that when the measured parameter (current) changes, the numbers on the indicator quickly change and it is difficult to navigate in its readings. Pointer instruments, when connected in parallel to a shunt, which is practically equivalent to a short circuit of the frame, have noticeable inertia caused by damping of the measuring mechanism. And in the dark, the driver has to strain his eyesight in order to see the position of the arrow. In addition, the needle can fluctuate not only as a result of changes in the measured current, but also due to vibrations of the car body. Therefore, it is advisable to supplement the pointer ammeter with a signal LED that turns on at a critical current value. In the proposed device, the glow of the LED indicates that the direction of the current through the battery corresponds to its discharge. The ammeter circuit is shown in fig. one.
Main Specifications
The device consists of a voltage stabilizer on zener diode VD1 and transistor VT2, a balanced DC amplifier on transistors VT1 and VT3, and a threshold device on transistor VT4, in the collector circuit of which the HL1 LED is included. Since the amplifier with transistors VT1 and VT3 is balanced, it has a relatively small zero temperature drift. Resistor R2 is a standard shunt with a voltage drop of 75 mV at a current of 40 A. When the generator is not working, current from the battery flows through shunt R2 into the car's on-board network, while transistor VT3 opens and its collector current increases, and the voltage drop across the tuning resistor R7 increases. When the generator starts working, current flows through the shunt from the on-board network to the battery. In this case, the collector current of transistor VT1 and the voltage drop across resistor R1 increase. The needle of milliammeter PA1 with zero in the middle of the scale deviates in proportion to the current flowing through the shunt in the direction of whichever of the resistors R1, R7, the voltage drop across which is greater. By moving the slider of the tuning resistor R7, the response threshold of the LED indicator of the battery current is adjusted. If this threshold corresponds to zero current through shunt R2, then the LED will be on when the battery is discharging and off when it is charging. If necessary, you can, of course, set a different threshold. The PA1 microammeter can be used with almost any frame resistance. Its influence can always be compensated by decreasing or increasing the resistance of the additional resistor R6. The author used a dial indicator from an imported avometer UH-1000A with a full needle deflection current of 500 μA. The body of the device was sawn in half and only its upper part was used with a dial indicator, which was redone so that in the absence of current the needle would be in the middle of the scale. The indicator is fixed to the dashboard using a metal plate and screws. The design of this device can withstand vibrations and not very strong shocks. As PA1, you can also use a recording level indicator (for example, M68 501 or M476/1) from an old cassette recorder. Such indicators have a small scale, but are highly resistant to vibration and can be used for a long time even on a motorcycle, where the vibration level is much higher than on a passenger car. In principle, the initial position of the PA1 instrument needle does not have to be exactly in the middle of the scale. Since the discharge current of a battery is much greater than the charging current, the part of the scale allocated for its display may be longer than that allocated for the charging current. This, however, will lead to some difficulties when it is necessary to quickly assess the direction of the current during movement. Resistor R4 is used to set the initial value of the collector current of transistors VT1 and VT3, and trimming resistor R3 sets the needle of microammeter PA1 to zero. To ensure that it does not deviate when the temperature changes, the heat-removing flanges of transistors VT1 and VT3 are tightly pressed to one another through an insulating gasket lubricated with heat-conducting paste, which equalizes the temperature of the transistors. The electronic ammeter unit is assembled in a plastic case with dimensions of 70x50x40 mm and is connected to a microammeter mounted on the dashboard, and with a twisted pair of wires to a R2 shunt of type 75SHIP-40, located under the hood near the battery. The device uses fixed resistors MLT, tuning resistors SP3-1b, and oxide capacitor K50-6. Instead of the KT315 transistor, you can use any low-power silicon transistor of the npn structure. LED HL1 - low-power of any type and color of light. When you turn on the electronic ammeter for the first time, you need to apply +12 V voltage to it from the vehicle's electrical system from any source, without connecting the battery. First of all, you should measure the voltage between the extreme terminals of the trimming resistor R7. If it differs greatly from 4,5 V, this value should be achieved by selecting resistor R4. Then you should set the arrow of the PA1 device to zero using the trimming resistor R3. Using trimming resistor R7, you need to turn on LED HL1, then slowly move the trimmer resistor slider in the opposite direction until the LED turns off. In this case, the readings of microammeter PA1 may change slightly, which must be corrected with trimming resistor R3, and then repeat the adjustment of trimming resistor R7. These operations may need to be repeated several times. To calibrate the ammeter, you need to create a standard current in shunt R2 by connecting to its power terminals a circuit consisting of a sufficiently powerful DC voltage source and a limiting resistor and a standard ammeter connected in series with it. In the absence of an ammeter with a sufficiently large measurement limit, you can measure the voltage drop across the limiting resistor and, knowing its resistance, calculate the current using Ohm's law. But you need to keep in mind that due to the dependence of resistance on the flowing current (it is very strong, for example, in incandescent lamps, often used to limit current), this method may not be accurate enough. The second option is to temporarily replace the R2 shunt with another one with several times higher resistance. Then you can calibrate the device at current values reduced by the same factor as the shunt resistance is increased, and upon completion of calibration, perform a reverse replacement. First, a current is set equal to the required measurement limit of the ammeter, and by selecting resistor R6, the pointer of the PA1 device is completely deflected. Then they change the direction of the current through the shunt to the opposite and make sure that the arrow has completely deviated in the opposite direction. The asymmetry of the deviation can be eliminated by selecting resistor R4 (in this case, setting the ammeter to zero will need to be repeated again) or simply take it into account when calibrating the scale. Divisions are applied to the scale by setting 5-10 current values in each direction. In some cases (for example, on a motorcycle), an electronic ammeter can be used, assembled according to the circuit shown in Fig. 2. Here GB1 is the battery, SA1 is the breaker for its negative wire. The device differs from the one described above by including a shunt in the negative rather than positive circuit of the battery, using transistors opposite to those used in the first version of the structure and an integrated voltage stabilizer DA1. The disadvantage of such an ammeter is that the starter current also flows through the measuring shunt.
You can make a measuring shunt for this device yourself, but making it from copper wire, as some radio amateurs recommend, is unacceptable. The fact is that the resistance of copper changes by 20% when the temperature changes by 8,5 °C, which leads to a change in the ammeter readings. The temperature coefficient of resistance (TCR) is approximately the same for other pure metals. Suitable materials for the shunt are nichrome or manganin alloys, the TCR of which is one or two orders of magnitude lower. It is preferable to make the shunt from a metal strip, which, with an equal cross-section, has a larger cooling surface than a round wire. For the described device, a shunt can be made, for example, from a piece of nichrome tape with a cross section of 10x1 mm and a length of about 17 mm. Both ends of the segment are soldered into slots made in massive copper plates. Two threaded holes are drilled into these plates to connect power and measuring circuits. Clamping the power and measuring wires under one screw is unacceptable. Usually, the shunt resistance is made deliberately less than the calculated one, and then it is adjusted by mechanically turning the tape in width and thickness. In the described device, you can do without adjustment, since the error arising from inaccurate shunt resistance can easily be compensated by selecting resistor R6. In the absence of tape, you can make a shunt from a large number of nichrome wires connected in parallel (for example, from an electric stove heater) of the same total cross-section. Author: A. Sergeev
Artificial leather for touch emulation
15.04.2024 Petgugu Global cat litter
15.04.2024 The attractiveness of caring men
14.04.2024
▪ Electronic navigation shoes for tourists ▪ 35 minutes of walking a day reduces the risk of stroke
▪ section of the website Electrotechnical materials. Article selection ▪ article Business time, fun hour. Popular expression ▪ article In which fairy tale by the Brothers Grimm do all the animal characters die? Detailed answer ▪ article Echinopanax high. Legends, cultivation, methods of application ▪ article Portable signaling device. Encyclopedia of radio electronics and electrical engineering
Comments on the article: Petrovich2015 An interesting decision. Specify the value of the resistor R1. Not shown on the diagram.
Home page | Library | Articles | Website map | Site Reviews
www.diagram.com.ua |


 Leave your comment on this article: