|
|


 Arabic
 Bengali
 Chinese
 English
 French
 German
 Hebrew
 Hindi
Hindi Italian
 Japanese
 Korean
 Malay
Malay Polish
 Portuguese
 Spanish
 Turkish
 Ukrainian
 Vietnamese
|
ENCYCLOPEDIA OF RADIO ELECTRONICS AND ELECTRICAL ENGINEERING Car radio station in the range of 144 ... 146 MHz. Encyclopedia of radio electronics and electrical engineering
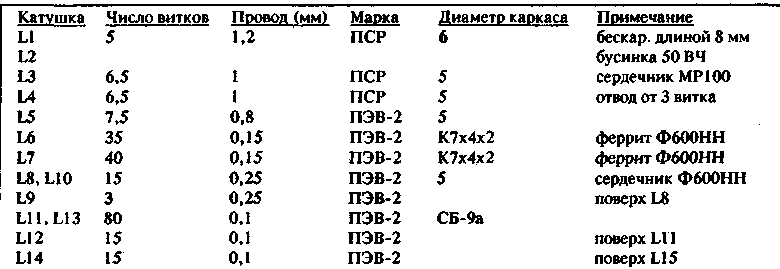
Encyclopedia of radio electronics and electrical engineering / Civil radio communications The radio station is made on four printed circuit boards: the board of the receiver, transmitter, synthesizer and the board of the common part. The boards are made of double-sided foiled fiberglass with a thickness of 1,5 mm, and the foil on the side of the installation of the elements is completely preserved and removed by countersinking only around the leads of the elements that are not connected to a common wire. The total fee is made in the usual way. The radio station uses all resistors of the MLT, S2-23, S2-33 types, a variable resistor R14 of the common board of the SGM-ZgM type, electrolytic capacitors of the K50-29 types on the common board and K50-35, K50-16 on the rest, for an operating voltage of 16 B, other capacitors of types K10-176, K10-7V, KM4, KM5, KM6, KT. Receiver microcircuits DA1 - K174PS1, K174PS4, DA2 - K174XA6, DA3 - K174UN7, filter Z1 type FP1P1 - 307-18, Z2 - FP1P1-60.03. Receiver transistors VT1 - VT3 type KP350A, VT4 - VT7 - KT315G, VT8 - KT361E, in the transmitter VT1 - KP350A, VT2 - KT399A, VT3 - KT920A. VT4 - KT920B, VT5 - KT925V, in the synthesizer VT1, VT2 - KP303E, VT3 - KP350A, VT4 - VT6 - KT315G, in the general part - VT1 - VT3 - KT315G, LEDs of the AL307BM type. Switches in the common part of the P2K type, in the PP8-3 (3A) synthesizer, a relay in the RPV 2/7 transmitter for a voltage of 12 V, in the common board K1, K2 of the RES-49 type, synthesizer microcircuits of the K561 series, headset speaker - 0.25GDSH2 , headset buttons SA1, SA2 - MP3-1, varicaps of the KV105 type synthesizer. The ZQ1 quartz resonator in the receiver can be at frequencies of 10,235 MHz or 11,165 MHz. Inductors are mostly frameless. For some coils, fluoroplastic frames with an MP100 core are used. The winding data of the receiver coils are given in table 1, and the transmitter in table 2.
The synthesizer coil L1 is wound on a ferrite ring made of F600NN ferrite of size K7x4x2 and has 15 turns of PEV-2 wire with a diameter of 0,25 mm, coil L2 - on a frame with a diameter of 5 mm made of PTFE has 4 turns of PSR wire with a diameter of 1 mm with a tap from 2 turns, wound with a pitch of 1 mm, coils L3 and L4 are frameless, have 7 and 2 turns, respectively, of PEV-2 wires with a diameter of 0,6 mm and are located close to each other so that their axes are on the same line. Coil L1 of the power filter of the common board is wound on two ferrite rings, folded together and wrapped with a fluoroplastic tape made of F2000NM ferrite, size K30x20x6. It has 25 turns of insulated wire in vinyl chloride insulation of the HB type with a cross section of 1,5 mmXNUMX. The radio station is mounted in a housing measuring 200x200x50 mm, made of duralumin. The body consists of a chassis, top and bottom covers. The rear wall of the housing is also a radiator for powerful transmitter transistors. She has ribs. An antenna connector is located on the rear wall of the case and a power cord is led out through the hole in it. The transmitter board is located at the rear wall, the common board is at the front panel, and the receiver and synthesizer boards are in the middle part of the case one above the other. The case is painted black and has a modern design. The corresponding controls of the radio station are displayed on the front panel. The headset was a converted headset from radio stations, similar to those used by railway workers. Setting up a radio station requires a radio amateur to have certain skills, tk. this device, let's say, is not for the first repetition of such designs, and the apparent simplicity of its circuitry can turn into disappointment during setup. The following instruments are required for tuning: an oscilloscope of type C1 - 79 or similar, a VHF generator with frequency modulation, an RF millivoltmeter, a tester, a sound generator, a frequency response meter of type XI-42 and preferably a calorimetric power meter, as well as an industrial equivalent of an antenna type "pear" at 50 ohms. It is advisable to configure each board separately before the general assembly of the radio station. You can start tuning from any part, for example, from the receiver. Having previously checked the installation and making sure that there are no short circuits between the tracks of the board, power is supplied to it, having previously connected a dynamic head with a resistance of 6 ohms to pin 4. From the sound generator, a signal with a frequency of 1 kHz and an amplitude of 5 mV is sent to pin 5 of the board, while the output power of the VLF must be at least 3 watts. Next, they check the frequency response of the filter at the ULF input, its band should be in the range of 300 Hz - 3,3 kHz. In this case, the voltage on the dynamic head should not exceed 3,5 V in the entire frequency range. Then the amplifiers of the first IF and the second mixer are adjusted, as well as the second IF and the frequency detector. A voltage with a frequency of 465 kHz and an amplitude of 1 mV, modulated in frequency, with a deviation of 3 kHz is applied to pin 18 of the DA2 microcircuit and, by rotating the cores of the coils L13 and L14, adjust them according to the maximum readings of a millivoltmeter connected in parallel with the dynamic head. It is also advisable to check the voltage shape at the ULF output, it should be sinusoidal. Then a voltage is applied with a frequency of 10,7 MHz and frequency modulation with a deviation of 3 kHz by a level of 100 μV to the capacitor C17 and repeat the same steps, tuning the circuit L8, C26 to resonance. The circuit in the local oscillator of the second mixer of the DA1 microcircuit is tuned for the best voltage shape and the highest amplitude, controlling them with an oscilloscope. Then adjust the high frequency part. A voltage of 3 mV and a frequency in the range of 400 - 133,3 MHz is applied to pin 135,3 of the receiver board, and a voltage is applied to the receiver input with a frequency in the range of 144 - 146 MHz and a level from 10 mV to 1 μV. The circuits are tuned with trimmer capacitors and stretching and compressing the turns of the coils. Capacitors C 18 and C19 achieve filter Z1 matching at the input and output. It is advisable to check the frequency response of the high-frequency part using the X1-42 instrument. For a tuned receiver, the sensitivity should be in the range of 0,1 - 0,2 μV. It must be remembered that in amateur conditions it is generally problematic to measure sensitivity above 0,5 μV and therefore you need to be sure when measuring it that there are no false measurements. Then proceed to setting up the synthesizer. The digital part usually starts working immediately and does not require any settings if installed correctly. Having broken the control circuit of the PLL varicap and applying a voltage of about 3 V, the generator on the transistor VT10 is tuned by the capacitor C1 to a frequency of 145 MHz with the contact K1.1 open, and when the contact is closed, to a frequency of 134,3 MHz by the capacitor C9. Next, tune the buffer amplifier on the transistor VT3 capacitor C20 to a frequency of 145 MHz for the transmission mode and to a frequency of 134,3 MHz - capacitor C18 for the reception mode. In this case, the voltage at pin 3 of the synthesizer board should be about 400 mV. When an audio frequency voltage of 1 kHz and an amplitude of 1 mV is applied to output 15 of the synthesizer board, the frequency deviation should be about 3 kHz. Since it is quite problematic to measure this parameter in amateur conditions, it is desirable to control it using a receiver or a selective voltmeter. Having restored the control circuit of the varicaps, they achieve a clear capture of the PLL when switching the channel number and when switching from reception to transmission by further tuning the corresponding control elements. If necessary, you can also select filter elements C30, R20, C1 in the varicap control circuit. This completes the tuning of the frequency synthesizer. Then proceed to setting up the transmitting part of the radio station. After carefully checking the installation, supply voltage to terminals 4 and 5 of the board. An antenna equivalent is connected to the output of the transmitter. As an equivalent, it is not recommended to use resistors connected in parallel, because. they have a fairly large inductance of the outputs. After applying the supply voltage, the quiescent currents of the transistors VT4 are set to 50 mA and VT5 to 0,1 A. Such currents will correspond to mode C. To increase linearity, these currents can be increased until mode B is obtained. By applying a voltage with a frequency of 145 MHz and an amplitude of 100 mV to pin 1 of the board and sequentially tuning the coils of the circuits by stretching and compressing the turns, establishing an appropriate connection between the cascades using trimmer capacitors, they achieve an output power on the antenna equivalent of about 15 W. It is undesirable to tune all circuits to the same frequency, since in this case the transmitter may be excited, it is desirable to detun them relative to each other a little in one direction and the other so that the top of the transmitter's frequency response is as flat as possible. This can best be done with a frequency response meter, such as the XI-42 or similar, if available to the radio amateur. Then, by changing the voltage at pin 3 of the board within 0,2 - 2 V, the change in the output power of the transmitter is controlled within 0,2 - 15 W. This completes the transmitter setup.
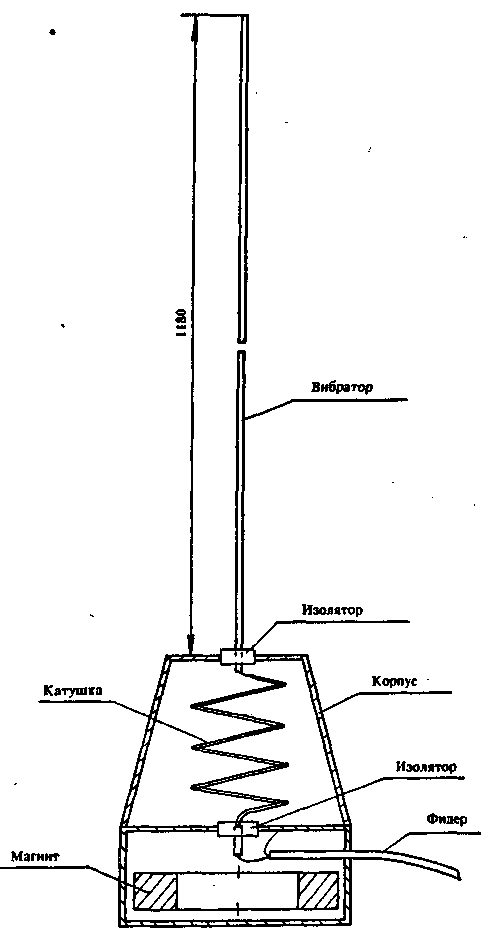
They make a complete assembly of the radio station in the case and mount the boards among themselves. By setting the headset tangent to the “transmission” mode and saying a long “a” in front of the microphone, measure the voltage at pin 5 of the common board, it should be about 0,8 V. In the transmission mode, the output power is set to 11 W with the resistor R0,5 for the SA2 switch mode "low power", and resistor R 12 - power 15 W or any other power for the "full power" mode. Then proceed to the manufacture of the antenna. The ranges at which it will be possible to establish communication between radio stations of the same type largely depend on the quality of its manufacture and tuning. The sketch of the antenna is shown in Fig.1. The antenna consists of a housing where there is a magnet for mounting it on the car roof and an extension coil. As a magnet, you can use a ring magnet from a fairly powerful dynamic head. The body is made of brass and covered with felt on the bottom to prevent scratches on the surface of the car and increase the coefficient of friction. The extension coil is wound with silver-plated wire with a diameter of 3 mm and has 4 turns with a diameter of 30 mm, stretched to a length of 40 mm. An insulator is installed in the upper part of the body, where a vibrator is installed, made of a brass tube or other material 1180 mm long. The coaxial cable is soldered with a core to the coil, and a braid to the body. It is necessary to ensure that the magnet has electrical contact with the body around the entire perimeter. This can be done with petals. The cable is led out of the housing into a hole in the side wall. The cable must have a characteristic impedance of 50 ohms. Set up the antenna as follows. Connect it to the radio station. The radio station is turned on for an output power of 0,5 W and put into transmission mode. The radiation of the antenna is controlled by the field strength indicator, setting it at a distance of 8 - 10 meters from the antenna and achieving its maximum readings. When setting up the antenna, you need to install it on the place of the car where it will be during operation and mark it. The tuning is carried out by stretching and compressing the turns of the coil, while the frequency of the radio station should be 145 MHz. If the radio amateur has a VSWR meter, then the antenna can be tuned and matched with the feeder more accurately. This completes the radio station setup. The radio station was tested in different climatic zones, showed good results and unpretentiousness in maintenance. The author has a request to everyone who repeats this design to report on the results achieved and its modifications. Author: V. Stasenko, Voronezh; Publication: N. Bolshakov, rf.atnn.ru
The world's tallest astronomical observatory opened
04.05.2024 Controlling objects using air currents
04.05.2024 Purebred dogs get sick no more often than purebred dogs
03.05.2024
▪ Electric car chargers in parking lots ▪ Quantum dots have reduced the size of terahertz devices ▪ Ultrasonic dry cleaning at home
▪ section of the Antenna website. Article selection ▪ article Exposure, dynamic range, white balance and zebra. video art ▪ article Valerian. Legends, cultivation, methods of application ▪ article Needle-lightning rod. physical experiment
Home page | Library | Articles | Website map | Site Reviews
www.diagram.com.ua |


 Leave your comment on this article: