|
|


 Arabic
 Bengali
 Chinese
 English
 French
 German
 Hebrew
 Hindi
Hindi Italian
 Japanese
 Korean
 Malay
Malay Polish
 Portuguese
 Spanish
 Turkish
 Ukrainian
 Vietnamese
|
PERSONAL TRANSPORT: GROUND, WATER, AIR
Sailing catamaran. Personal transport
Directory / Personal transport: land, water, air The rivers and lakes will not have time to be cleared of ice, as thousands and thousands of adherents of water tourism begin to prepare for the new season. They take out their "folders" and "airbags" from storage rooms and garages, take yachts and boats out of winter shelters. Those who live near the water or have a motor vehicle at their disposal are not aware of the problems that burden the life of a "horseless" lover of water travel. Do you carry a lot? Only "folded" or "inflatable". And even then not alone, since even a tightly packed watercraft requires a separate porter. And also a tent, provisions ... How to be a person who wants to be alone with nature? Yes, not on a kayak or an inflatable boat, but, say, on a sailing catamaran? Looking for an assistant to get to the water? But then how to return - again look for an assistant? Many of these questions are removed if we use the experience of Muscovite D.A. Vakhlamov. He proposed the original design of the sailing catamaran "Princess Frog", which has two very important advantages. Firstly, it is made mainly of pine wood - a very common material in Russia. And this means that "Princess" can be played in almost any corner of our vast country. There would be a desire. Secondly, the catamaran is designed in such a way that it is quite possible for one person to disassemble, transport and assemble it. The deck of the "Tsarevna" is quite spacious: it freely accommodates a crew of four "sailors" - the whole family of the designer. At the request of the editors, Dmitry Ananievich spoke about the structure of his catamaran. Main Specifications
The best memories of my childhood and youth are associated with quiet rivers near Nizhny Novgorod, with the majestic lakes of the Southern Urals and, of course, with a boat. In Moscow, looking at the hordes of "roaring" cars, I decided that in urban conditions there is a way out, because there are many rivers and reservoirs around the city. But what to prefer - a kayak? It is uncomfortable to sit in it, there is little space for tourist equipment, and you can swim only in calm water, you won’t go out into the water area of the reservoir in a steep wave. "Inflatable"? You can also swim across the ocean. It is possible, but very slowly. A mast with a sail, screws, a rudder will be added, but the capacity will decrease significantly. A boat made of duralumin sheets connected by a rubberized fabric? Not serious: because of its size, they won’t even let you into the subway. "Horseshoe" type "Vulture"? I do not argue - who likes what. Drive a car, drag a heavy engine and cans, enjoy the speed. The speed and the noise of the engine prevent me from communicating with nature... And then one of my friends advised: a catamaran! I took his advice - and after a while a wooden frame, floats, a mast, a sail appeared in my house.
The assembled catamaran, which was named the "Princess Frog", is shown in Figure 2. It is quite simple and extremely interesting to control it. The 4 m2 sail provides good speed in moderate winds and sufficient safety in heavy winds. So you don't have to worry about passengers. The "sailors" of the catamaran, for example, were my five-year-old child, a wife with hydrophobia, and a ninety-year-old father-in-law. If you decide to build yourself a similar boat, then you will not need special carpentry and locksmith skills for this. But time, accuracy and diligence will be needed. Choose quality material. Pine is preferred: for even layers of its wood without knots and low specific gravity. With sufficient strength and elasticity. Wood of long-term exposure in a dry place is desirable. Do not use raw - it will definitely "lead", and everything will be hopelessly spoiled. FRAME. It is advisable to start with it. The frame consists of four longitudinal bars - stringers and four transverse - beams. One-piece stringers are too long and inconvenient during transportation, so it is better to make them in two parts. The length of the parts is different, since plugs are attached to the corners connecting them, located at a convenient distance for the rower. Carefully plan, making sure that there is no skew, eight bars with a section of 40x40 mm: four of them (1340 mm long) will be the bow of the stringers, four (1110 mm long) will be the stern. Prepare four duralumin corners 40x40x4 mm 500 mm long. To connect the parts of the stringers with the corners, you will need 16 M8 bolts 50 mm long with wing nuts, metal washers with a diameter of 20 and a thickness of 2,5 mm and rubber damping washers 2,5 mm thick, the diameter of which is equal to the diameter of the bolt head. Lay the corners on the stringers: the middle of the length of each corner should coincide with the junction of their parts. The vertical shelves of the corners should be located as follows: on the first and third stringers - on the left, on the second and fourth - on the right. By the way, the joint of the parts of each stringer is loose - with a gap. Without it, strong compression will occur in the lower part of the joint on the waves, and the connecting corner may tear out the bolts. Therefore, while drilling holes, insert technological inserts made of plywood 4 mm thick to form a gap. But no matter how hard you try, you will definitely not be able to drill holes. Therefore, in order not to confuse parts of the stringers during subsequent multiple assembly-dismantling, mark them. If you stand in the stern, then the first stringer will be on the left. Clearly label its bow: "H1", and the stern - "K1". The second stringer is "H2" and "K2". And so on. Also mark the connecting corners with holes made with a drill: "o", "oo", "ooo" and "oooo". The bolts must not fit tightly into the holes. On the one hand, unwashed wood will definitely swell on water, and when disassembling the frame, the holes will inevitably be damaged. On the other hand, the bolts do not need extra freedom, which loosens the structure. So that the bolt heads do not break through the floats, they must be "drowned" in the body of the stringer. The depth of the socket under the head should be equal to the sum of the thicknesses of the metal and rubber washers and the head, the diameter - clearly according to the diameter of the metal washer - 20 mm. The last one is mandatory glue to the tree with "epoxy" with the force of a screwed bolt. If the nest is at least a little larger in diameter, the wood under the washer will be washed and crumbled, if it is smaller, then the stringer will noticeably weaken. Without a glued washer, the connection will loosen in one or two seasons, while with it the frame practically does not wear out.
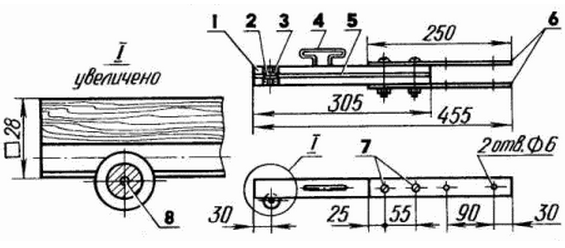
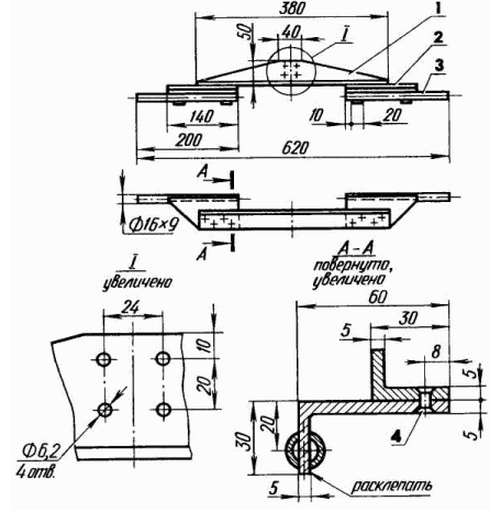
Plane the beams - four bars with a section of 75x30 mm and a length of 1380 mm. Optimize their mass by cutting off the ends (Fig. 3). Put the beams on the stringers and also mark: the first beam from the nose to the left is "L1", to the right - "P1". The second is "L2" and "P2". And so on. Drill holes - the same as in the stringers. Make chokers: bow - with a section of 58x24 mm and a length of 1010 mm, stern - with a section of 45x23 mm and a length of 770 mm. Label them with something.
The fastening of the henchmen to the beams is simple, but effective (Fig. 4). Moreover, ordinary nails are used in it. Treat the nail with respect - it has been perfected for centuries. Where the hardened steel or duralumin pins burst, the plastic nail will stand, in extreme cases, it will bend. Of course, the figures shown are oversimplifications. Give the parts you made some roundness, sand them and cover them with drying oil several times. That, in fact, is all that is needed for the frame. If you make it in good faith, strength and durability are guaranteed. For many years of operation of the Frog Princess, for example, not a single wooden part of its frame has broken or even cracked. Cut out the DECK from a tarpaulin (the one that covers the bodies of trucks is more suitable). The length of the deck should be equal to the length of the frame plus allowance for pockets for the bow and stern frames; width - the distance between the second and third stringer plus an allowance for the collar. Hem the edges with a harsh thread with a wide double seam by hand. Sew two wide pieces of canvas on the bottom to form pockets for the medium beams. Cut and overcast bolt holes. When you attach the beams to the stringers, the deck should be well taut. Place the henchmen on the deck. RUNDUKS are not much different from ordinary boxes. Only greater manufacturing precision is needed, since during transportation the bow locker is inserted into the stern locker. The design of the lockers is the same, the materials used are not scarce: plywood 3-4 mm thick, pine slats with a section of 20x15 mm, as well as small screws, epoxy glue, piano hinges (for seat covers). Dimensions of the aft (larger) locker - 800x285x225 mm. Sew a cover for him from a dense fabric, to which sew fasteners in the form of loops and buttons-sticks and a wide canvas belt with transverse leather straps. Attach the straps from the backpack to the latter. Do not remove the water cover. Place a sheet of foam rubber between the seat cover and the cover to make it soft and comfortable to wear. The bow locker should be easily removed from the stern locker. To do this, drill two holes in its sides and insert rope loops. Sew the cover only for the seat cover. Insert a sheet of foam rubber into it from the inside, and sew leather straps along the edges for attaching to the locker. Screw the lockers themselves to the lockers with M6 bolts 45 mm long (from household plumbing) with nuts - "lambs".
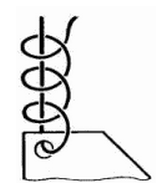
oarlocks. If you cannot find factory metal oarlocks (plastic ones are not suitable), then make them yourself from steel rods with a diameter of 14 and a length of 210 mm. Saw each rod along the axis to a depth of 70 mm, put on the washer-amplifier and straighten the sawn ends like a horn (Fig. 5). Use nails with a diameter of 4 and a length of 65 mm as the swing axes of the oars. Instead of cotter pins - pieces of graph paper. Wrap the seal with a fabric cord on epoxy resin.
PLUGS (Fig. 6) are made of aluminum pipes with a diameter of 22 mm. Flatten their lower ends by laying inserts - aluminum plates 7 mm thick. Hinge (but not freely, with an interference fit) attach them with thick rivets to the vertical shelves of the connecting corners of the first and fourth stringers (closer to the stern). To the same shelves (closer to the bow), in a similar way, attach struts made of aluminum pipes of round (diameter 20 mm) or oval section. Make clamps from a soft aluminum plate (for example, from the back of a children's sleigh). In the non-working position, the sub-keys and struts are folded along the connecting corners.
OAR. Their device is clear from Figure 7. It is desirable to use pipes with a diameter of 40 mm with a smooth surface inside and out. These qualities are possessed by athletics poles for high jumps. FLOATS. What are they made of? There is no single recipe, it all depends on who has what. You can use a lightweight two-layer material called "silver", rubberized fabric on a cotton or chemical basis, tent fabric and even very strong sleeves for pumping air! My floats, with a diameter of 400 and a length of 3600 mm, are made of strong shells (their fabric is somewhat denser than tent fabric), into which rubber or plastic balls are inserted through slots and then pumped up. These floats when inflated look pretty good. What are the positive qualities of the design I have chosen? Low weight and reliability, since there are many "sections". Flaws? Rough material does not glide well on the water, "drags" it along with it, which reduces the speed of the catamaran. And it is also difficult to adapt to evenly pump up the balls. By the way, the mattress "blower" is not good, you need a more powerful pump, with a built-in pressure gauge.
If you decide to make similar floats for yourself, then keep in mind that the actual length of the shell panel should be 40 mm more than the nominal length (allowance for collars), the width - by 60 mm (seam allowance). When cutting, do not forget that the sewn shells should taper smoothly towards the ends. Therefore, cut out in each panel four bow and stern ogival forms of a wedge 760 mm long (Fig. 8) and sew with a strong thread in several passes, leaving small holes in the bow and stern for rubber tubes from the extreme balls. But first, be sure to attach with basting seams to the inner surfaces of the shells (opposite the middle of each ball) girdle tight safety tapes, ending in ribbons, which are then tied on stringers. If this is not done, then in the event of a rupture of the shell, the balls will fly out like soap bubbles. And so they will remain in their places.
The MAST consists of three sections: upper, lower and middle (Fig. 9). Such division is convenient both during manufacture and during transportation. The main material of the mast is pine bars with an initial section of 40x40 mm. At the middle section, keep the value of this section along the entire length, at the bottom and top - gradually reduce to the ends of the mast to 35x35 mm. With a semicircular chisel, cut out the lippaz (in the lower section - approximately to the middle). Prepare slats 14 mm thick - lippaz lining along its entire length. Plane them with the same chisel to complete the lippase profile and attach to the mast sections with epoxy and screws. Thoroughly work the lippaz obtained in this way with sandpaper, achieving a smooth surface, then the sail will not get stuck in it and will not tear. Yes, and the entire mast would not hurt to sand, giving it a so-called presentation. Equip the ends of the mast with pulleys for the main halyard (wheels with a groove and axles taken from the children's designer), and its lower section also with a boom swivel and a loop for the boom bail hook. The mast sections are connected into a single whole with the help of brackets made of duralumin corner 25x25x3 mm and M8 bolts. Equip them with the top of the lower section and the bottom of the upper. Equip the ends of the middle one with reciprocal reinforcing plates made of duralumin sheet 1,5 mm thick, attaching them with small screws. By the way, do not forget to drill four holes with a diameter of 8 mm in the brackets (in the middle of their protruding shelves) for the cable carabiners. On a catamaran, the mast with its steps (bottom) is placed in a stand screwed to the lockers behind the bow locker. Plan out a stand from a pine bar with a section of 65x45 mm (reduce the height of 45 mm at the ends to 25 mm) and a length of 430 mm. In the middle, select a square notch for the step with a chisel. The depth of the excavation is determined empirically: if it is shallow, then with sharp gusts of wind the mast easily jumps out: if it is too deep, then the mast turns upside down.
Make the GIK (Fig. 10) using the same technology as the mast: cut a pine bar with a section of 30x30 mm along into two identical planks. Plan out the lippase and the gap of the lippaz. Connect the planks with glue and sand the boom so as to bring its section to 28x28 mm. Reinforce the glue line with screws. Provide the front end of the boom with loops - steel strips with holes for connection with the boom swivel located on the mast, and the rear end - with steel plates for docking with the leg of the boom (fastening the loops and plates with small screws not shown in the figures). It should be noted that the aluminum pin with a diameter of 5 mm, connecting the boom with the swivel, should fit quite tightly into the holes of the hinges and freely into the hole of the swivel.
NOC (Fig. 11) is a detachable continuation of the boom. This is a forced division, since in general the boom is too long and inconvenient for transportation. Structurally, the nok is similar to the boom, so your steps for making it are the same. The difference is that the bow is fitted with a small metal pulley and a wire clew for the clew end of the sail.
SAIL (Fig. 12) is best sewn, of course, from a special sail fabric. But since it is very difficult to get it, and the price "bites", a dense teak eraser or other durable fabric will do. If the width of the fabric roll is 700-900 mm, then the panels cut out of it must be stitched in the middle with fakes with 20 mm fabric underturns so that the future sail keeps its shape. Lay the panels perpendicular to the leech. One of the seams must pass through the tack of the sail. Trim tight edges, otherwise they will "gather".
Sew the sail with the widest stitches available on the machine, with the thread tension as low as possible. At the top of the sail, symmetrically attach a halyard plate of two 1,5 mm thick duralumin plates (Fig. 13): first, drill a series of small holes along the contour of both plates together with the sail, and then sew these holes with a thick thread with your hands. Expand the leech by making a "hump" that increases the area of the sail. And so that it has some rigidity, sew pockets for armor - long boards that can be made from plywood or school drawing rulers. Armor will not slip out of pockets if the latter are provided with laces and tied with reef knots. Reinforce the edge of the leech with an additional fabric strip. Cut the front and lower luffs in an arc-shaped manner so that the sail has a “belly” and a profile is formed, without which the catamaran will not go against the wind. Finish the edges of the luffs with seams 15 mm wide, sew to them along the edge of the sail a lyktros - a thick twisted cotton rope that will go into the lip groove of the mast and boom when the sail is raised. Lyktros runs from the upper end of the leech along its entire length, then along the leech and ends at the clew. When sewing on the lyktros, try to keep the tension of it and the fabric the same, and the needle pierces each flagellum of the rope.
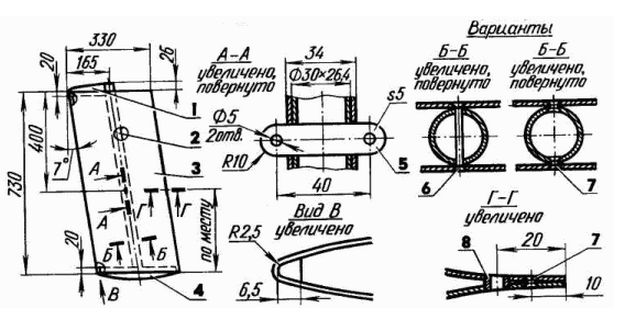
STEERING DEVICE (Fig. 15) consists of a tiller, a stock and a rotary rudder blade, which are held on a rack located in the middle of the fourth (stern) frame. The rack to the frame is pulled by an M6 bolt with a nut - "lamb" through the corner, the horizontal shelf of which is attached to the frame with screws. In addition, the rack has cable extensions with loops, put on screw holders, equipped with thick leather washers that prevent the extensions from jumping off. The upper attachment of the cables is clearly shown in the figure. The shaft of the baller is connected to the rudder post by corner loops, through the holes of which a long rotary axis of wire is threaded. Each hinge is attached with two M6 through bolts, under the heads of which duralumin plates are placed. The movable part of the stock is riveted from three steel plates 1,7 mm thick each. If their thickness is less, then between them it is necessary to lay sheets of foil so that the rudder blade can be freely inserted into the groove intended for it. The rudder blade is adjustable for shallow and deep water. The second position gives him much greater efficiency. Pen material - duralumin sheet 1,5 mm thick.
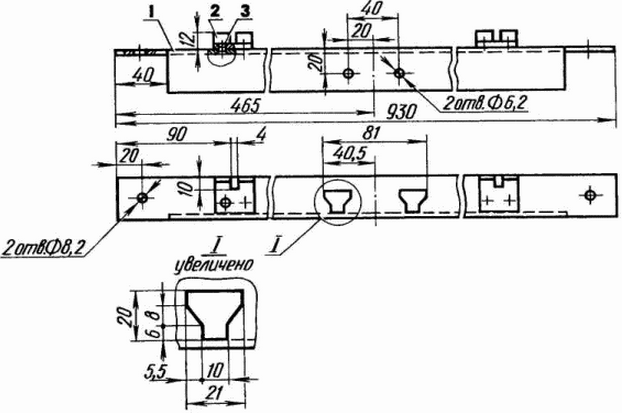
DOWNBOARD (Fig. 16) consists of six main units: a beam, a bracket, a stabilizer for the daggerboard braces, the daggerboard itself and two braces. Make the latter from pieces of a steel cable with a diameter of 2 mm, pieces of a copper tube (crimp) and retaining rings.
DOWNLOAD (Fig. 17) rests on the inner stringers and is attached to them by the third row (counting from the bow of the catamaran) of the M8 bolts of the connecting corners. Make it from duralumin corners 30x30 and 35x35 mm. Be especially careful when sawing the shaped holes for the daggerboard suspension spikes: they must be accurate.
SCREW BRACKET (Fig. 18) can be solid, cut from a duralumin brand of suitable dimensions, or composite, riveted from several simpler profiles. Here it is not important. The main thing is that the spikes of the centerboard bracket fit tightly into the holes of the centerboard beam assigned to them, and the radius hook securely holds the bracket on the beam.
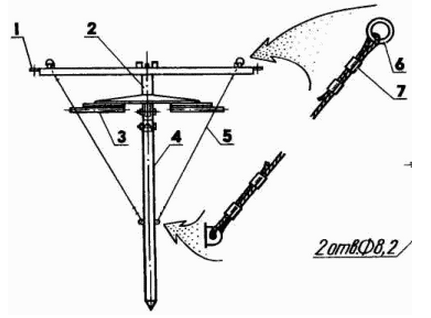
STABILIZER stretch marks (Fig. 19) - the most necessary part of the centerboard device. It provides the same cable tension in any position of the centerboard. Then the centerboard effectively resists the transverse (lateral) forces trying to tip the catamaran on board. In the lowered state of the daggerboard, the stabilizer tubes keep the cables taut, preventing the daggerboard from moving backward with increasing speed (the emphasis does not let it go forward) and thereby changing the position of the center of the lateral resistance of the catamaran. The design of the stabilizer is simple and does not need special comments.
SCREW (Fig. 20). For its sheathing, a duralumin sheet 2 mm thick is most suitable. From such a sheet, the centerboard will turn out to be heavy, but it will not cause anxiety while traveling. Calculate the dimensions of the sheet, taking into account the profile and the inclined position of the centreboard. At the bend of the sheet, select a groove with a round file with a diameter of 5 mm without a handle. Do not make the groove too deep, otherwise the leading edge of the centerboard will turn out to be sharp, which is undesirable according to the laws of aerodynamics; moreover, the formation of a crack is possible. Do not make the groove too shallow, otherwise you will not be able to cope with the shape of the profile, and it will no longer be possible to repeat the fold in this place - the sheet will inevitably crack. Rivet the "tail" of the centerboard. Fasten the centerboard in a clamp with plywood linings and insert the console - a duralumin pipe with a diameter of 30 mm (a piece of an athletics pole for jumping). It may not reach the bottom of the centerboard. Connect the console and trim with rivets. This can be done using either long through, or co- mouth rivets. For short rivets, insert them from the inside of the console, first into the holes of one future riveted seam, then insert a mandrel into the console - a steel water pipe of a suitable diameter (it should fit tightly into the console!) And rivet the protruding ends of the rivets. Remove the pipe and repeat these operations on the other side of the centerboard. Profiled fairings are necessary to ensure that the centerboard is optimally washed in both shallow and deep water settings. Cut foam fairings, wrap with several layers of epoxy soaked gauze, and glue into the centerboard. Please note: between the leading edge and the lower fairing there is a small drainage hole through which water that has entered inside is drained from the centerboard, since the centerboard is not airtight for simplicity. The daggerboard is pivotally connected to the centerboard bracket with the help of several intermediate parts, the design of which is clearly visible in Figure 18, so I will not dwell on them in detail.
How the centerboard is fixed in the lowered state is shown above. In the raised state, the centerboard is held by a wooden pin inserted into the hole of a special corner bracket attached to the stern edge of the third frame (Fig. 21). Next to this bracket are also hinged stoppers of the boom-sheet and the duck of the main-halyard.
REMOVABLE CHASSIS (Fig. 22) - a very useful attachment to a large (stern) locker. It allows one person to easily transport a disassembled catamaran on it. The chassis design is shown here without details, since simpler versions are also possible. Wheels with a diameter of 220 mm with tires 50 mm wide - from a cargo trolley. Of course, such wheels are heavy, but they are more reliable than light "dutiks" that can fail at the most inopportune moment. The chassis is a shaft to which a casing (U-shaped profile) is screwed, giving rigidity to a rather long shaft, and a platform (sheet metal rectangle). Corner brackets and belts are riveted to the latter. In this form, the chassis is attached to the bottom of a large (stern) locker with two M8 through bolts on wing nuts.
In addition, this locker has a non-removable swivel device with a smaller diameter wheel at the front. Today it is difficult to get a quality rotary device. The ones that are sold are nice looking, but are made of soft metal and are not designed to carry a lot of weight. Therefore, I propose a schematic drawing of such a device and its attachment to the locker (Fig. 23). But before putting the rotary device in its place, reinforce the bottom and front wall of the locker with steel plates 4 mm thick. In conclusion, a few recommendations. Well, if you can divide the construction of a catamaran into three stages. The results of each of them will bring you joy. The first stage is the manufacture of the frame, deck, floats, lockers-seats and oars. As a result, you have a four-seater collapsible rowing boat! The second stage is the attachment of a steering gear and a light mast with a brief - a rectangular sail. Now you are a tourist on any river! And the third stage, the most important and difficult one, is the manufacture of a profiled duralumin centerboard, a high, durable mast, and the sewing of an aerodynamic sail. From now on, you are a full-fledged yachtsman on a big river, a wide reservoir! To collect on the road, make a list of all parts of the catamaran, grouped by places to be transported. If it is not there, you risk returning without a ride. Pay special attention to the little things. Divide the bolts and pins in the kits into separate bags and put them all in a bag. The larger pieces—beams and stringers—bind four at a time, wrapped in a canvas deck, and fastened with two bamboo-handled straps. There also remove the centerboard beam in the "stocking". Metal corners - in cases. Lay parts of the mast and stern chocks with metal ends in one direction, fasten with three straps with plywood placed under them so that nothing dangles, and fold into a narrow case with the metal forward. There also place the oars and the handles of the oars, inserted one into the other. Pack everything else at your discretion, only the tool, first aid kit, spare parts, knife and money should always be at hand. Insert a small (fore) locker into a large (stern) locker, put camping equipment in it. Place the disassembled catamaran on the locker. All cargo "places" must be in a certain order, covered with covers, strapped with bamboo handles and tightly fastened with lap belts. From above, tie a daggerboard in a case with cables threaded into canvas "trousers", a case with connecting corners and a stabilizer for stretch marks, and all the rest of the little things. Crown your luggage with a backpack, why carry it on yourself? Haven't forgotten anything? Go! Upon arrival, start assembling the catamaran from the frame, inserting the beams into the deck pockets. Don't tighten the wing nuts very tight - spare the tree. Do not forget that overly inflated floats dampen worse on the wave along the board, do not increase the carrying capacity and can burst when the sun "wants" to increase their volume. At first, assembling and disassembling a catamaran will take you a lot of time. Do not despair! I alone can now do this work in three hours. Going on a trip, remember that a person on the water is weaker than a cat - and he must pay for pleasure with the strictest observance of safety rules on the water. A catamaran is a strong and reliable watercraft, but only when it is properly assembled. A catamaran with a float that is not attached to the inner stringer shakes off the unlucky crew on the water, and with a float not attached to the side, it can overkill and cover it with all its mass. Therefore, life jackets are mandatory for children and non-swimmers, preferably two-section inflatable ones. A life buoy is also required on board. In order to competently handle a sail, read the relevant literature and gain practical skills. Weather conditions on the water change quite often and dramatically, and within a short time. Remember that when the wind speed increases, for example, three times the aerodynamic force of the sail increases nine times! In the meantime, if you don’t have these skills, learn how to quickly lower the sail and switch to the oars, they are powerful - their lever is close to the lever of the oar of a racing boat. In recent years, discipline on the water has become much tougher, and competent behavior is required from each participant in the water movement. Therefore, never "run across" the road in front of large courts. The passenger ship is going much faster than you think, and you, on the contrary, are much slower than you think. By the way, in order to enter a large navigable river, you need to pass a technical inspection and get a ship's ticket. And the last. In order to fall in love with water tourism, you need a certain warehouse of character. Not everything is always good: either you make a mistake in the weather forecast, or you don’t calculate the speed of the current or the strength and direction of the wind. In addition, there are often gross errors in mileage on the maps, dams and locks are not indicated. In this regard, many will prefer a calm walk in the park to an unexplored route, and a warm bath in the evening, but they will never experience the same experiences that fall on the lot of a water tourist. When it is quiet around and the catamaran glides silently over the water surface, the soul is filled with amazing feelings. Those that encourage Italian gandoliers to sing, and Schubert was inspired to create a barcarolle - one of the pinnacles of world musical art. But then the wind sharply increases - and foamy "lambs" appear on the blackened water. The catamaran, however, continues its confident run on the waves. You feel this confidence, it is transmitted to you, kindling the excitement of the struggle and the joy of victory over the elements. Author: D.Vahlamov
▪ Even Ichthyander will approve
Energy from space for Starship
08.05.2024 New method for creating powerful batteries
08.05.2024 Alcohol content of warm beer
07.05.2024
▪ Humpback whales will teach helicopters to fly ▪ The blackest color for a BMW car ▪ Where does the rumor come from
▪ section of the site Protection of electrical equipment. Article selection ▪ article Sparrow night. Popular expression ▪ article How does blood circulate? Detailed answer ▪ article Maid. Job description ▪ article Fixatories for hair. Simple recipes and tips
Home page | Library | Articles | Website map | Site Reviews
www.diagram.com.ua |


 See other articles Section