 Free technical library
We construct a shadow. Tips for the home master

Directory / Builder, home master
 Comments on the article
The so-called architecture of small forms is undeservedly forgotten in garden plots. For example, pergolas and trellises are light openwork structures, usually entwined with plants and forming free-standing "green" walls, gazebos or covered alleys. Organically fitting into the surrounding plantings, they create cozy corners, protected from direct sunlight.
In this issue of KDM, we want to tell readers how to make a gazebo and a veranda using a pergola - a lattice canopy.
The gazebo should be located in a quiet area of \uXNUMXb\uXNUMXbthe garden plot near the house. It must be oriented so that the slats of the pergola canopy are located in the latitudinal direction (west - east), and the wall with the blinds is on the south side. In this position, the pergola will provide the highest protection from the sun's rays. In addition, it will give a beautiful carved shadow.
Before starting construction, it is necessary to carry out earthworks: level the site, place the axles and dig holes about 1 m deep for the pillars. Then the bottom of each pit is covered with gravel with a layer of 200-300 mm and pillars are installed. A cord stretched between the pegs along the outside of the poles will help to maintain the exact dimensions between them. In the ground, it is best to fill the pillars with concrete, having previously covered their underground part with bitumen to protect them from decay. Until the concrete of the foundation has completely set, the upper ends of the pillars must be temporarily fixed - nail the rails on the nails. Do not remove them later, when they begin to install the flooring. To begin with, grooves for the logs are selected at the bottom of the pillars, which are then inserted into them and nailed. The lags are placed in the direction of the axes indicated in the drawings by letters. Floor boards are laid over the lag. After that, the entire flooring along the perimeter is sheathed with a plinth board so that its upper edge coincides with the floor level.

Rice. 1. Arbor with a pergola (general view) (click to enlarge): 1 - pergola slats, 2 - bearing run, 3 - frontal board, 4 - front run, 5 - pillar, 6 - sidewall of the bench back, 7 - tsarga, 8 - folding back, 9 - seat, 10 - deck boards, 11 - logs, 12 - lower horizontal board, 13 - retaining board, 14 - plinth board, 15 - vertical blinds, 16 - upper horizontal board
Now you can proceed with the installation of the ceiling - pergola. First, girders are fixed - floor beams - between the pillars in the direction of the axes marked in the drawings with letters. They are located on both sides of the pillars and are bolted together. Bearing runs differ from facade ones in that they have sockets for attaching pergola rails. And the latter cover all the knots and form the architectural appearance of the facade of the gazebo. The slats are installed in special sockets of the bearing runs and fixed with nails with oblique slaughter. Along the edges, in the direction of the axes indicated in the drawings by numbers, all the runs are pulled together with frontal boards. It remains only to equip the interior of the gazebo - to make a bench and a wall with blinds.
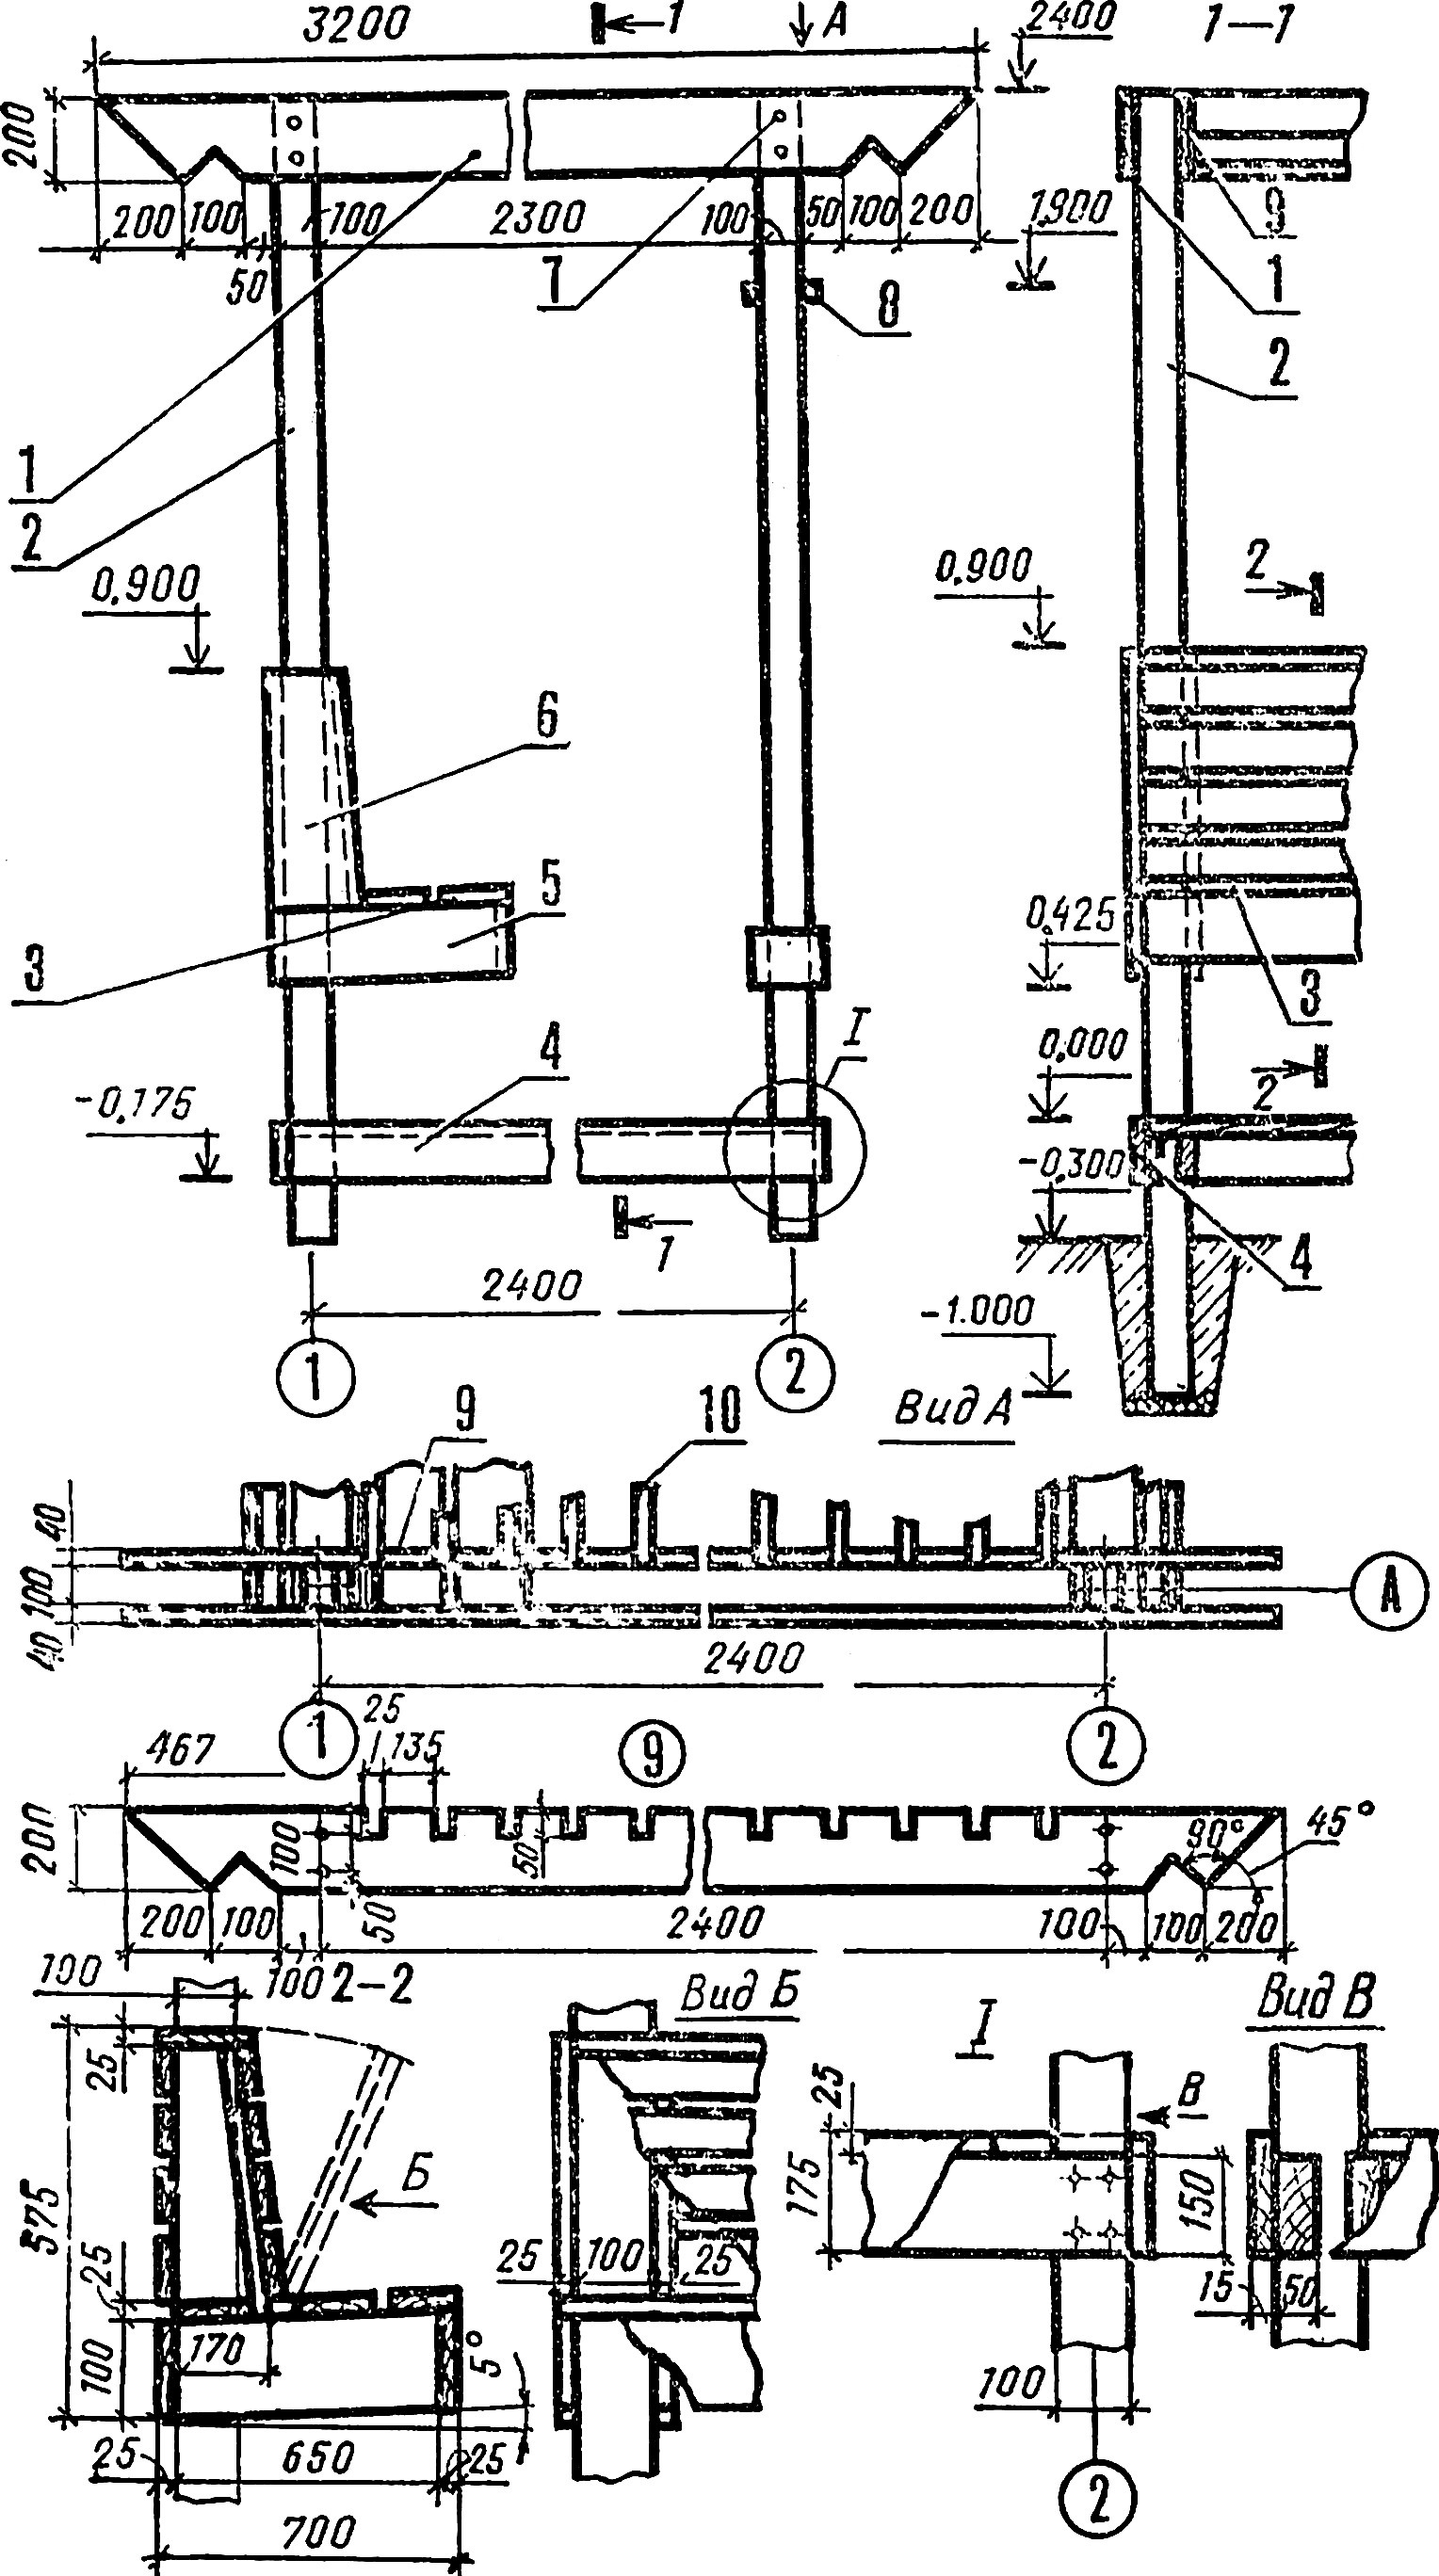
Rice. 2. Pergola with pergola (facade 1-2) (click to enlarge): 1 - facade run, 2 - pillar, 3 - seat, 4 - plinth board, 5 - drawstring, 6 - sidewall of the backrest, 7 - fixing bolt, 8 - upper horizontal board, 9 - bearing run, 10 - pergola slats

Rice. 3. Pergola with pergola (facade A - B) (click to enlarge): 1 - frontal board, 2 - pergola slats, 3 - facade run, 4 - upper horizontal board, 5 - vertical blinds, 6 - lower horizontal board, 7 - retaining board, 8 - basement board, 9 - pillar
The bench is assembled from the sidewalls of the back and the side of the seat, attached to each post on both sides. Seat boards are stuffed on top of the drawers, and the back is assembled from separate shields that are hinged to the seat, forming a container door for storing small garden tools. Outside, the back is upholstered with boards.
Then a wall with blinds is made. On the horizontal bottom and top boards mark the installation locations of the vertical rails. It is convenient to do this according to templates cut out of cardboard or whatman paper. Prepared boards are nailed to the posts at the top and bottom. So that the wall does not sag under the weight of the rails, two more retaining boards are nailed under the lower horizontal board. Then, vertical slats are installed in the intended places and fixed with nails.
The gazebo is ready. It remains only to carefully clean the ends of the boards and cover the entire building with waterproof varnish. The natural color of the tree will harmonize well with the surrounding greenery of the garden.
If you decide to build a veranda attached to the house according to the same principle, then the depth of the structure should be reduced by 1200 mm so that the veranda does not dominate the facade of the building, but only gives it more expressiveness. It is a little easier to make it, since two pillars dug into the ground are enough to support one side. Another support will be the wall of the house.
Author: N.Pomytkin
 We recommend interesting articles Section Builder, home master:
▪ electric boiler
▪ Economy car wash
▪ magic furnace
 See other articles Section Builder, home master.
Read and write useful comments on this article.
<< Back
 Latest news of science and technology, new electronics:
Machine for thinning flowers in gardens
02.05.2024
In modern agriculture, technological progress is developing aimed at increasing the efficiency of plant care processes. The innovative Florix flower thinning machine was presented in Italy, designed to optimize the harvesting stage. This tool is equipped with mobile arms, allowing it to be easily adapted to the needs of the garden. The operator can adjust the speed of the thin wires by controlling them from the tractor cab using a joystick. This approach significantly increases the efficiency of the flower thinning process, providing the possibility of individual adjustment to the specific conditions of the garden, as well as the variety and type of fruit grown in it. After testing the Florix machine for two years on various types of fruit, the results were very encouraging. Farmers such as Filiberto Montanari, who has used a Florix machine for several years, have reported a significant reduction in the time and labor required to thin flowers.
... >>
Advanced Infrared Microscope
02.05.2024
Microscopes play an important role in scientific research, allowing scientists to delve into structures and processes invisible to the eye. However, various microscopy methods have their limitations, and among them was the limitation of resolution when using the infrared range. But the latest achievements of Japanese researchers from the University of Tokyo open up new prospects for studying the microworld. Scientists from the University of Tokyo have unveiled a new microscope that will revolutionize the capabilities of infrared microscopy. This advanced instrument allows you to see the internal structures of living bacteria with amazing clarity on the nanometer scale. Typically, mid-infrared microscopes are limited by low resolution, but the latest development from Japanese researchers overcomes these limitations. According to scientists, the developed microscope allows creating images with a resolution of up to 120 nanometers, which is 30 times higher than the resolution of traditional microscopes. ... >>
Air trap for insects
01.05.2024
Agriculture is one of the key sectors of the economy, and pest control is an integral part of this process. A team of scientists from the Indian Council of Agricultural Research-Central Potato Research Institute (ICAR-CPRI), Shimla, has come up with an innovative solution to this problem - a wind-powered insect air trap. This device addresses the shortcomings of traditional pest control methods by providing real-time insect population data. The trap is powered entirely by wind energy, making it an environmentally friendly solution that requires no power. Its unique design allows monitoring of both harmful and beneficial insects, providing a complete overview of the population in any agricultural area. “By assessing target pests at the right time, we can take necessary measures to control both pests and diseases,” says Kapil ... >>
| Random news from the Archive Dangerous sequins
20.10.2021
Scientists from New Zealand have called for a complete ban on the use of glitter for any purpose. The researchers said that glitter could cause an environmental disaster.
The main danger lies in the fact that, in fact, sparkles are microplastic particles that extremely pollute the oceans. If you count by the piece, then they make up more than 92% of all plastic products floating in the seas and oceans.
Animals mistake them for plankton and eat them, damaging their livers and hastening the extinction of many species. In addition, the fish that swallowed the sparkle may end up on our table, the scientists emphasized.
Glitter is made from a polymer called polyethylene terephthalate, it is also used to produce, for example, bottles and other packaging, all kinds of films. In addition, the shiny layer is usually aluminum.
The situation is aggravated by the fact that sparkles absorb toxic substances. Moreover, the process of their decomposition in nature takes thousands of years.
|
Other interesting news:
▪ Working at night is hazardous to health
▪ New bonding material for batteries
▪ Billiard cue with laser sight
▪ The mercury we breathe
▪ Optical resolution limit exceeded
News feed of science and technology, new electronics
Interesting materials of the Free Technical Library:
▪ site section Power supply. Article selection
▪ article And he, rebellious, asks for a storm. Popular expression
▪ article Which American president lost the code to open the nuclear suitcase for a long time? Detailed answer
▪ article Big spoon of nature. Children's Science Lab
▪ article A simple frequency synthesizer. Encyclopedia of radio electronics and electrical engineering
▪ article Power amplifier for QRP transceiver. Encyclopedia of radio electronics and electrical engineering
Leave your comment on this article:
 All languages of this page
Home page | Library | Articles | Website map | Site Reviews

www.diagram.com.ua
2000-2024


 Arabic
 Bengali
 Chinese
 English
 French
 German
 Hebrew
 Hindi
Hindi Italian
 Japanese
 Korean
 Malay
Malay Polish
 Portuguese
 Spanish
 Turkish
 Ukrainian
 Vietnamese

