|
|


 Arabic
 Bengali
 Chinese
 English
 French
 German
 Hebrew
 Hindi
Hindi Italian
 Japanese
 Korean
 Malay
Malay Polish
 Portuguese
 Spanish
 Turkish
 Ukrainian
 Vietnamese
|
BOOKS AND ARTICLES Basic camcorder settings
REC button Present on almost any video camera, usually red. What should be remembered about this button? The fact that the reaction time is somewhat different from the trigger of the machine. The delay between the moment when you press this button and how the first frames of information begin to be written on the film is about half a second (it varies for different models), and therefore: you should not even try to shoot an important moment directly from its very, very beginning. It is much easier to find this moment later, during editing: I assure you, in our time it is not as difficult as it might seem. The risk of losing the most important frames is too great. Start shooting a few seconds before the intended event. For example, opening a bottle of champagne should be filmed as soon as a person touches the wire lock, otherwise you risk getting on the video only an echo of enthusiastic screams, and the remains of foam on the wallpaper and clothes. EXPOSURE button and wheel Adjusts exposure - the amount of light entering the camera. A very important parameter, from which difficulties begin. The brightness of the picture in the camera and camcorder can (hereinafter - it is theoretically possible, since not all manufacturers of amateur camcorders allow the user to interfere with the settings) can be adjusted by three parameters. This:
As written above, usually a consumer video camera does not allow the user to choose the aperture, shutter speed and gain independently (usually such options are found only in the most advanced amateur cameras and are mandatory for semi-pro and above), but the user can adjust the overall exposure. This is what I advise you to do on your own, without relying on the machine. Why? I'll explain now. The automatic exposure of modern cameras is arranged according to a very simple principle - the overall picture, if you mix all the colors, should be gray, i.e. not white and not black, but exactly in the middle. Gray.
It is these changes in the picture that we observe when successively blurring the still frame of a video camera shooting in automatic exposure mode. Well, video cameras do not currently have artificial intelligence, and all exposure adjustment is done in such a simple way. Now I will deliberately take a few shots in conditions in which the automatic exposure is guaranteed to be wrong. It is not difficult to create such conditions, it is enough to try to shoot a brightly lit object against a dark background, or vice versa, try to place a light backdrop behind the object being shot. Here, see what happens if you try to shoot, for example, a rock concert "on the machine":
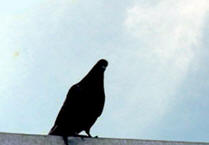
The machine worked as it was set up (the blurry picture is still gray), but in the picture, firstly, noise appeared in the dark area (as a result of the camera’s attempts to make the dark background light due to amplification), and secondly, the musician’s face almost invisible, it is overexposed. And here is an attempt to shoot a bird against a bright sky. Honestly, this bird was the usual gray color!!!
Now let's do the same experiment on several freeze frames, the quality of which (in terms of exposure) is beyond doubt, but in order to get them, we adjusted the exposure manually:
On the one hand, we see that in the pictures, it seems, the amount of light is just right, and on the other hand, if the pictures are blurred, then the first frame turned out to be dark, and the second - light. What guidelines should be followed when setting the exposure manually? We'll talk about setting the exposure manually. All the illustrations above are intended to show the importance of one of the main rules of video shooting: the measure of exposure in the frame is the illumination of the main object. And the main object in the frame in the overwhelming majority of cases is a human face, so the exposure (i.e., adjusting the brightness of the resulting image) should be set exactly according to the human face. I cannot name real cases where it makes sense to completely trust the exposure automaton in the hope of getting a good shot. Even if you find a scene where your tastes match exactly with the autoexposure settings, there's always a chance that a foreign object will appear in the frame that will make the autoexposure react. We get a visible jump in brightness. A typical example: you are shooting indoors, a camera flash fires nearby. Autoexposure will immediately react to the flash - it will abruptly remove the camera sensitivity, and immediately after the flash we will see, for several frames, a noticeably darkened picture. The camera blinked. In manual mode, the flash will, of course, be visible, but we will not see the subsequent darkening. After turning on the camera, immediately lock the exposure and set it as you like. In order for the exposure automaton to start producing jumps of brightness that are unpleasant for the viewer, sometimes it is enough just to enter the frame for a person in light or dark clothes, for someone to block a bright light source (pass in front of a window, for example), etc. In semi-pro cameras, the exposure lock button and its adjustment wheel are placed in the most convenient place; manufacturers cannot imagine any other approach to professional video shooting. However, when developing amateur models, the same manufacturers often hide this function in the menu settings, guided, firstly, by design considerations (well, who will buy an ugly camera?! Yes, and with a bunch of incomprehensible buttons!), And secondly, it is logical believing that most users will not deal with all this. As an alternative to this function, manufacturers often offer the user a lightweight option - two Spotlight and Backlight buttons. These shooting modes suggest other autoexposure algorithms. Spotlight mode is suitable for shooting shots such as the rock concert shot above. The autoexposure error was precisely in the fact that the camera did not distinguish between the musician and the stage, and tried to achieve a picture where bright and dark colors would be balanced. In Spotlight mode, the exposure will be set in such a way that not a single large area of the frame is overexposed. Backlight mode, on the contrary, is designed for shooting such as a portrait against the sky. Not a single significant part of the picture will be dark. Sometimes this mode is called "Snow and Sand", indeed, the exposure in this mode when shooting in the snow, where everything around is white and white, will work noticeably more correctly. These functions, of course, will not replace manual exposure, and if you need a really high-quality result, I do not recommend using them (again, with any change in the picture, the automatic will give an unpleasant leap for the eyes), but for non-professional shooting, the use of these modes is great plus. On some camcorders, on the contrary, the user is given the opportunity to adjust the exposure state in more advanced ways. For example, by separately controlling the degree of aperture opening (IRIS) and shutter speed (SHUTTER), or by providing the user with aperture priority (Av) or shutter priority (Tv) modes. The meaning of these modes is to give the user control not only over the exposure, but also to get additional "tuning" of the picture, for example, to extract additional clarity of details while shooting fast sports events (shutter priority mode, in which the shutter speed is set as fast as possible, or the "Sport" mode ) or to achieve a "cinematic" blurring of the background behind the main object. The digital recording format, in comparison with film, along with many conveniences, also brings several pitfalls for the user. One of them is that overexposed footage is very difficult and often impossible to correct. If you don't know how to precisely adjust the exposure in a given scene - it's better to underlight than overexpose, underlight is much easier to "treat" during editing. FOCUS MANUAL button or switch and focus ring/knob Just as simple as auto exposure, autofocus mode also works. It should be noted that in amateur cameras this machine does an excellent job in a large number of cases. By the way, you should not flatter the manufacturers of video cameras - the good work of autofocus is also due to the fact that the matrices of consumer cameras are too small in size, and it is very difficult to get a small depth of field on them. Those. in the same position of focus, both the flower standing on the window and what we see in the window will turn out sharp. This is not as good as it might seem at first glance. If you watch professional feature films, you will see that filmmakers are happy to blur the background, play with sharpness in order to focus the viewer's attention on a specific object or person. I advise you to switch to manual focus mode when:
WHITE BALANCE button or switch The ability of the human eye to adapt to any, the most difficult lighting conditions is still inaccessible to video cameras. When the camcorder gets into such difficult conditions, it starts to give out errors. We have already talked about focus and exposure, now let's talk about the so-called White Balance, aka White Balance or WB. Look at the picture below. Well, yes, of course, the color of the incandescent lamp turns yellow, we know this. But this does not prevent us from feeling comfortable in such a room. However, when viewing such a picture on TV, yellow-red tones catch our eye.
The fact is that the human psyche easily makes a correction, and an already corrected picture gets into our consciousness. Take a closer look. Where did you see the "blue moonlight" sung by poets or the "pearl smile" really? In my opinion, the situation was best described by such a person who is far from video as Carlos Castaneda: a person from childhood is accustomed to a picture of the world invented by mankind once and for all, any visual information is intercepted by the subconscious, and instead of a real picture, the viewer receives an already corrected one. The camera, on the other hand, is devoid of such stamps, and a white shirt bathed in yellow light from an incandescent lamp will appear yellowish. A paradox arises - we know that the shirt is white, but we see on the screen that the shirt is yellowish. And the faces are yellowish, and in general everything is in heavy yellowish-reddish tones. What the TV screen shows us is perceived by the psyche without any correction. What needs to be done so that the camera perceives the picture in the same way as we do? Yes, just explain to her what color to consider white under these specific conditions, just as our psyche does. After that, a lot falls into place:
There are usually several WB setting modes on cameras. First, automatic. The camera itself tends to ... That's right, so that both cold and warm tones are absent in the picture. What's good about an automatic? Automatism, pardon the tautology. If you do not have time to rebuild the camera - well, shoot on the machine. General plans of nature without a clear predominance of any color will turn out well, I assure you. Just don't be surprised why, when you shoot a forest for a few seconds, the colors will somehow begin to fade, and the friend who appears in the frame will have a purple tint to the face. The camera will do its job quite well - to achieve such a white balance setting that when mixing all the colors, it turns out ... you guessed it? Grey colour. It is especially contraindicated to shoot on automatic balance if you are going to do editing. For each camera movement, the color will be gradually corrected, but if you interchange a few frames, we will notice an abrupt change in shades. Therefore, at the first opportunity, be sure to adjust the white balance using one of the presets (presets) or “beat off” manually. I will tell you about this now. Outdoor preset. Usually it can be indicated by an icon with a symbolic image of the sun. Designed for shooting outdoors, outdoors. The specialist will tell you that among professionals it is also called "5 500". This means (from a physics course) that a perfectly black body heated to 5500 degrees Kelvin will give just such light. In principle, it is logical, if we remember that the temperature of the surface of the Sun, according to astronomers, is about 6 degrees Celsius. If you compare the picture that the machine camera gives on the street with the frames obtained in the same place using this preset, you will most likely find that, for example, human skin has acquired a more natural tone. Not to mention the fixed tone throughout the shoot, which will allow us to rearrange shots during editing. The Indoor preset, usually indicated by an icon in the form of a light bulb, among professionals sometimes responds to the call sign "3 200". It is with this light temperature that, according to the calculations of imported engineers, incandescent lamps should shine. It is with this preset that they suggest shooting indoors, where light from the street does not penetrate. In our country, traditionally (I don’t know where it came from, most likely the notorious “thrifty economy”), incandescent lamps shine with a lower light temperature, about 2 degrees, so in a “domestic” room the picture often still turns yellow, but that’s all. anyway, it's noticeably better than shooting on the machine. For particularly sophisticated users who are not satisfied with the quality of the presets, many camera designers offer to set the white balance manually. Manual White Balance Adjustment Manual WB. In the menu of video cameras, this mode is indicated by such an incomprehensible icon at first glance:
Setting WB in this mode is done as follows: the camera is aimed at any white surface and the function button is pressed. It is held until the moment when, after blinking, the icon appears again, and the picture in the viewfinder (if it is color) shows the white color as it should be, according to the camcorder manufacturers. This procedure should be written in the instructions for the video camera, but here’s what they don’t write there: if you can’t tune in in the indicated way (when you enter the room, you have to immediately find a white piece of paper, or hope that the ceiling is not a fashionable now pastel color, or just the count goes for seconds)... ...you can point the camera as wide as possible just at the upcoming scene, trying only to avoid uniform colored surfaces in the frame and also press the function key. The result in many cases will be good, and the balance will not "walk", as on the machine. After all, the camera will try to perceive all the surrounding light as neither cold nor warm, and this, with a variety of colors, will guarantee that the shades will be at least juicy. The only case when you have to rely on the automatic is when shooting takes place in a room where the lighting is mixed - the light from the window fills half the room, but the lamps are on. My sympathy for you, there is a lot of work to fix the picture at the time of editing, if you can not get the curtains closed or the lights out. After mastering the basic techniques with the camera, it would be desirable to experiment with this setting: beat WB not on a white sheet, but on a slightly colored one in some tone. The camera will try to give the picture a reverse hue. For artistic purposes, sometimes it makes sense to "fill up the balance", i.e. deliberately introduce distortions, achieving some kind of shade. For example, in a room lit by candles and a flame from a fireplace, having rebuilt the balance on a piece of paper, we will not get a delightful shade of old paper and candles. In general, approach the formation of a picture not dryly "according to the textbook", but creatively. Zoom Lever -ZOOM+ An unattainable dream of photographers. With a slight movement, change the magnification by 10-20 times - such a camera lens costs like a good car and is similar in size to a portable missile system. And we, please. Vzhik - and you're done. But do not rush to flatter yourself. Photographers have significantly higher resolution of their images, more natural color reproduction, usually a shallower depth of field. All this is a consequence of the fact that the matrices of cameras are much larger than ours. And now the most important thing. All the camera settings discussed above had an analogue of human perception. We adapt to the brightness and color of the observed image, focusing our attention on a particular subject. But we don't know how to zoom in. Therefore, try not to use this technique during recording unless absolutely necessary. All zooming (zooming in and out) is very desirable to cut out during editing. Take a closer look at normally made films - with the rarest exception, you will not see such a reception there. Unnatural-s. If you are shooting reportage, and there is no way not to use this technique (you constantly need to show the viewer either the details or the space where the action takes place) - you don’t need to “crawl back and forth” too often, you need to wait about 5-10 seconds without any movement, and only after that perform the opposite action. Zooming in and out does not hurt the eye so much if it is done with the camera turning to the right or left (up and down), otherwise the so-called. "panning". Use this technique if there is no way without zooming. Zooming is rather intended for the convenience of framing the picture in the way we need before recording, than for trying to show the viewer endless arrivals and departures. We show what happens, not how we filmed it. You should be critical of your ability to hold a camera with a large (more than 5x) zoom for some time at least somewhat evenly. Alas, even if you are a Voroshilovsky shooter, for a viewer brought up on films or television shows filmed with cranes and rails, the trembling of your records filmed at high magnification without additional devices (emphasis, tripod, steadicam) will cause irritation and rejection. It is better to come closer or look for an additional support to stabilize the camera, the principles of shooting and video filming are similar here. Image stabilizer on/off button It can have a variety of names, marketers have a rich imagination. Steady Short, Image Stabilize, Crystal-Super-Clear-Stabi-Puper. The meaning does not change, the number of options, too. There are two types of stabilization in cameras: optical and digital. In any case, if the stabilization mode is turned on, then there is usually this icon in the viewfinder:
Optical stabilization (OIS) is when a "liquid" lens is formed inside the lens, eliminating the yaw of the optical axis of the camera (within a small, but in many cases helping out, limits). Digital stabilization, on the other hand, is when the camera processor stretches the picture a little, tries to calculate hand shake and move the picture in antiphase to the calculated fluctuations. The digital stabilizer (EIS), in addition to its significant cheapness, has many disadvantages. Firstly, it is difficult for him to recognize when the user decides to pan, and the picture “sticks” with the inevitable retribution - a sharp jerk, and secondly, he is easily mistaken when any bright objects appear in the frame (for example, sparks from fireworks) and may try to move the axis of even a stationary camera. Of course, the clarity of the picture decreases (due to its stretching). In addition, the use of such a stabilizer in a poorly lit room (and there are a lot of such shootings in everyday life, I assure you) produces additional noise. I do not call for abandoning its use at all, but you must know the features of its use in order to be able to always choose the lesser of the evils. But the optical stabilizer also has its drawbacks (which is why the vast majority of professional equipment is produced without it). This is a decrease in the clarity of the picture, the unpredictability of behavior when panning. Although, in domestic conditions, cases when it is worth refusing to use an optical stabilizer are practically excluded, well, except perhaps to try to save a discharged battery (the stabilizer eats up a rather large percentage of energy). Publication: ixbt.com
▪ Pinnacle Studio. User's manual ▪ Using AVerTV Capture HD in VirtualDub
Artificial leather for touch emulation
15.04.2024 Petgugu Global cat litter
15.04.2024 The attractiveness of caring men
14.04.2024
▪ If an electric vehicle is involved in an accident ▪ Alpine living conditions change human blood
▪ site section Regulators of current, voltage, power. Article selection ▪ article When did the wedding cake appear? Detailed answer ▪ article The functional composition of Orson TVs. Directory ▪ article Nokia 2110, 3110, 8110 pinout. Encyclopedia of radio electronics and electrical engineering
Home page | Library | Articles | Website map | Site Reviews
www.diagram.com.ua |


 See other articles Section