|
|


 Arabic
 Bengali
 Chinese
 English
 French
 German
 Hebrew
 Hindi
Hindi Italian
 Japanese
 Korean
 Malay
Malay Polish
 Portuguese
 Spanish
 Turkish
 Ukrainian
 Vietnamese
|
BOOKS AND ARTICLES Interlacing and how to deal with it
From this material you will learn about what is video interlacing, why you need it, as well as get the initial information on how to achieve the highest quality result in creating your own film. In the examples, Sony Vegas is used as the editing program. Interlacing is one of the difficulties that everyone who makes video or movies at home faces. Many, without understanding the problem, leave it unresolved, as a result of which, when viewed on a computer, their videos look like this:
In especially advanced cases, after editing and encoding, the video can even turn into something like this:
Meanwhile, it is possible to deal with interlacing, it is quite simple - but not always necessary. Let's try to figure out what's what, and do everything so that the quality of the film does not suffer. What is interlacing? First, let's define the opposite of interlacing - progressive video. Such a video is arranged in the way we all imagine from early childhood: a sequence of 25 photographic frames turns into one second of a "moving picture". Interlacing (or interlacing) - this is a tricky trick, thanks to which the video image is transmitted at a frequency of not 25 frames per second, but 50, and each vertical frame is half the size of the video itself. To get the original vertical size of the frame, the even and odd frames are "added" through the line from top to bottom. Thus, if we view interlaced video on a computer without additional processing, we will see two adjacent frames as one - we will get exactly the same effect as in the top picture at the beginning of this article. Even if the scheme of interlacing is not yet fully understood, it is important to know that all television in Russia operates in the interlaced format. Your camcorder works in the same format (otherwise it would cost several thousand dollars, and you would hardly read this material). Computer video cards and monitors, on the contrary, work only in progressive mode, because of which "stripes" appear on them. To understand what interlacing is for, let's take a short digression into history. Where did interlacing come from? Interlacing has its origins in the days of the first cathode ray tube (CRT) televisions. It was needed so that the TVs showed a high-quality picture, and the flickering of the screen was not noticeable. Despite the fact that today's cathode ray tubes are quite capable of displaying a progressive picture (example: CRT monitors for computers), it still all CRT televisions, as well as most consumer DVD players and game consoles, are interlaced. The need to use interlacing was caused by the peculiarity of the operation of cathode ray tubes. The image in them is formed with the help of a beam that "runs" along the inner surface of the screen, causing its dots to glow, which add up to the picture. At the dawn of CRT development, it was physically impossible to make all points on the screen glow at the same time - when the beam "ran" to its lower part, the upper one almost faded away. You can see a similar effect today by filming a CRT TV with a video camera: "blind" stripes will go down its screen from top to bottom. To avoid this, it was necessary to "draw" the beam across the screen faster than 25 times in one second. The speed has been doubled. At first, one frame was simply "drawn" twice, and then, to improve the quality of the video, "extra" frames were added, and the picture began to be displayed on TV screens at a frequency of 50 half-frames (that is, half the vertical resolution) per second . Full frames at a rate of 50 per second are not used due to the fact that such volumes of information would be impossible to transmit in an analog format. The forced introduction of interlacing has also brought benefits. As the frame rate has increased, video on TV screens has become smoother. Surely gamers are familiar with the race for the frame rate in games - it is this positive effect that interlacing gives to TV shows to this day. It is important to note that even high-definition television Full HD 1080i works with interlacing. Why? Because no one would buy a TV, the image on which "slows down" compared to the one to which he has been accustomed throughout his life. And it is still impossible to create an affordable technique that could shoot and play back 50 frames per second at a resolution of 1920x1080. Today's LCD and plasma TVs can display progressive picture, but most of the population, at least in the next few years, will not be massively replacing their TVs with new ones. Thus, we have come to the first important conclusion of the material: video with interlacing is better for playing on any home appliance than without it. This must be taken into account when working on a film. Why do you need progressive video? If interlacing is so good, why do you need progressive video at all? As mentioned above, computer monitors only work with progressive scan. Any video recorded in interlaced mode and played on a computer is converted to progressive using a de-interlacing operation or played back with an unpleasant "comb" effect, such as this:
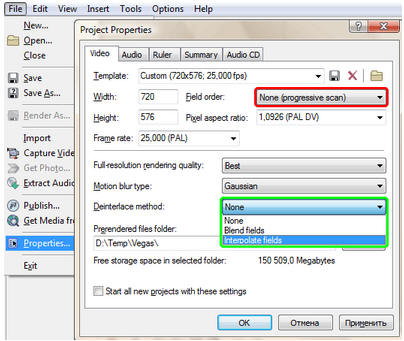
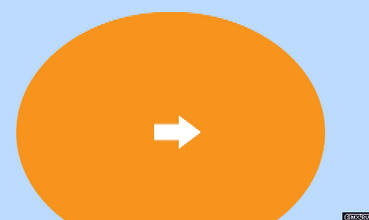
This is a frame from the video in which the orange oval moves across the screen from left to right. In the following, we will use it for examples. All computer programs that play DVDs, as well as programs for watching TV through a TV tuner, do de-interlacing automatically and transparently to the user. However, the same cannot be said about AVI file players, as well as about codecs. It would seem: what prevents software developers from enabling de-interlacing by default? But no - it is impossible to predict how the same Windows Media Player will behave on each individual computer. In addition, it is much easier for the codec to encode progressive video. In this regard, we come to the second important conclusion of the material: for playing on a computer it is better to make a progressive video. For general development, it should be noted that any movie is shot in progressive format by default: after all, it is ultimately a sequence of photographs. Despite the fact that George Lucas used all-digital (and the best) cameras on the shooting of the second and third episodes of Star Wars, the film itself was still printed on ordinary film (otherwise how would it be shown in thousands of cinemas around the world?), and This means that the frame rate in it is standard for any movie - 24 frames per second. In Europe, all household appliances use the PAL standard with a frequency of 25 frames per second, which is not much different from cinema (unlike the American NTSC with a frequency of 29,97 frames per second). The best option, of course, is the initial shooting in progressive format. In this scenario, there will be no problems during editing, and converting to interlaced format will not be difficult. But there are no affordable camcorders on the market capable of making such recordings (the cost of the most "affordable" models fluctuates around two thousand dollars). Therefore, most film lovers will have to do de-interlacing. How to properly de-interlace? We come to the main part of the material: how can you convert interlaced video so that its quality is the best? The answer is obvious: you need to reduce the number of any transformations to a minimum. Since consumer cameras shoot in interlaced mode, You don't need to convert it to play on TV.. However, you will be editing your film on a computer, and you will probably want to show it to people via the Internet, which means that you will need a progressive mode here. How to be? At a very early stage in the production of a film, a decision must be made whether it will be played on TV or whether it will be a purely online-computer spectacle. In principle, the video converted from interlaced to progressive can then be converted again, however, its quality (first of all, smoothness, but actually not only it) will be noticeably worse. Keep in mind that even if you burn a progressive DVD, a regular DVD player connected to the TV will convert video to interlacing automatically. If you don't care how the video will look on the TV screen, you can set the settings right in the video editing program that will de-interlace on the fly. For example, here's how it's done in Sony Vegas:
You need to go to the project properties window through the File > Project Properties menu and on the first tab (Video) set Field Order: "None (Progressive scan)" (highlighted in red). Then below you need to set the de-interlacing method. To do this, in the same window, just below, change the Deinterlace method parameter (highlighted in green). In what methods differ, we will now understand. It is important to make sure that the project properties window is also set to the correct settings for your camera. The default settings in Vegas are for American NTSC standard! Therefore, immediately after installing Vegas, change the project parameters to European PAL! As you can see, Vegas offers two de-interlacing methods: Blend fields and Interpolate fields. There are other de-interlacing methods that can be applied using third-party software, but for most movies, one of the standard methods will work. Method of merging fields, Blend fields, theoretically intended for videos with not too much movement. In this method, two adjacent fields are combined into one, resulting in a progressive picture with almost the same vertical resolution. However, in this scenario, in moments with fast movement behind objects, an unpleasant translucent trail appears: The interpolation method allows avoiding the loop, Interpolate Fields. In it, every odd field is simply deleted, and the remaining 25 fields are stretched vertically to full resolution. The disadvantages of this approach are obvious: the vertical resolution drops by half, as a result of which a "ladder" becomes noticeable on the contours of contrasting objects:
However, there is a trick. You probably won't need a full-resolution video to upload online (for example, sites like Google Videos or YouTube use a picture no larger than 360x288 pixels), which means that the resolution of the finished video can be painlessly reduced by half (just up to 360x288 ). In this scenario, the interpolation method seems to be the only correct one - in fact, you will get a picture originally shot in progressive format. It is important here that you immediately set the reduced frame size when performing interpolation. Reducing a picture from a ready-made "large" video that has passed through interpolation will give a lower quality. You can choose the appropriate de-interlacing method for your movie by making a slice using Blend fields and a slice using Interpolate Fields. The de-interlacing method can be painlessly changed at any stage of editing (as well as the resolution of the resulting video, by the way). Compare the results obtained with both methods and choose the one you like more than the other. At the same time, you can see how the video will look on the TV screen and compare it with the original interlaced version - it's better to see the difference for yourself once than to read a dozen articles on this topic. If you do not plan to release your film for viewing on TVs, then the information given in this material will be quite enough. Finally, we note that if you work with video in other programs, for example, in Adobe After Effects, there you need to set the same settings as in Vegas. Moreover, if you use a video that has already been de-interlaced once, you need to set the "Progressive source" parameter in the settings, and necessarily disable de-interlacing (after all, it has already been done once). Publication: cinemalib.narod.ru
▪ Learning to shoot video - tips for beginners
Artificial leather for touch emulation
15.04.2024 Petgugu Global cat litter
15.04.2024 The attractiveness of caring men
14.04.2024
▪ Weak immune memory makes bacteria stronger ▪ Recreated volcanic lightning ▪ Efficient Magnesium Batteries ▪ Smartphone with infinite memory
▪ site section Acoustic systems. Article selection ▪ article You must eat in order to live, not live in order to eat. Popular expression ▪ article Three-track sled. Personal transport ▪ article Triac power regulators. Encyclopedia of radio electronics and electrical engineering
Home page | Library | Articles | Website map | Site Reviews
www.diagram.com.ua |


 See other articles Section