|
|


 Arabic
 Bengali
 Chinese
 English
 French
 German
 Hebrew
 Hindi
Hindi Italian
 Japanese
 Korean
 Malay
Malay Polish
 Portuguese
 Spanish
 Turkish
 Ukrainian
 Vietnamese
|
ENCYCLOPEDIA OF RADIO ELECTRONICS AND ELECTRICAL ENGINEERING The output stage of the radio station. Encyclopedia of radio electronics and electrical engineering
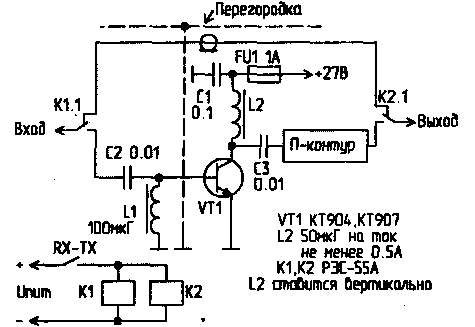
Encyclopedia of radio electronics and electrical engineering / RF power amplifiers Below are two output stages for FM radio stations, proven in practice. Figure 1 shows a diagram of a transistor power amplifier.
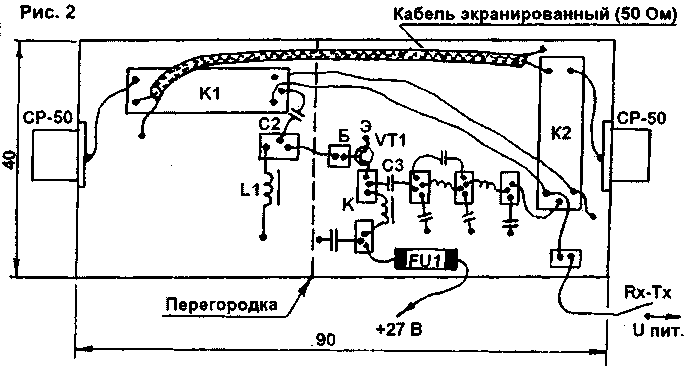
Power amplifier technical data: Rout. Tue 5 The amplifier is shown without a P-loop, which you can calculate yourself. If the PA will be used at frequencies close to 27 MHz, then the P-loop data can be taken from [1]. Figure 2 shows the arrangement of parts in the housing. Installation is carried out on the "patch".
Disconnecting the load during the operation of the PA is unacceptable - the transistor VT1 may fail. The diagram of the second amplifier is shown in Fig.3. In it, in addition to the output stage, a quartz master oscillator and an intermediate amplification stage are shown.
Transmitter technical data: Rout.W 8 Rout. Ohm 50 Upit. V 12,6 Ipot.A 1,5 Efficiency, %, about 60 Dimensions, mm 140x50 The circuits of the RF generator, output and preamplifiers are borrowed from [1, 2] and modified to improve the transmitter parameters. The use of a large number of matching devices facilitates the tuning of stages and reduces the likelihood of transmitter self-excitation. In addition, there is no need to use screens and partitions between cascades. The transmitter works as follows. By pressing the SB1 button, located in the headset of the radio station, the transmission mode is turned on (the supply voltage is removed from the receiver and fed to the transmitter), the RF generator is started, the frequency of which is stabilized using a quartz resonator. Modulation is carried out by applying a 3H signal to the "LF input"; under the influence of this signal, the capacitance of the varicap matrix changes within small limits, which leads to a change in the frequency of the RF generator within 3...4 kHz. Further, the signal from the VT1 collector through C5 is fed to the VT2 KT610A base, which amplifies the radio frequency signal up to 5 ... 8 V, which corresponds to 0,5 ... 1,2 W. The amplified signal is fed to the input of the final amplification stage, assembled on a KT920V transistor. The gain of this cascade is about 10. Thus, the radio frequency signal is amplified up to 8 ... 10 W and enters the antenna with a wave impedance of 50 Ohms (XY4 GP, for example) through a double P-loop. Construction and details. The transmitter is assembled on a board made of double-sided foil textolite, on which patches are cut. The drawing of the board is shown in Figure 4.
The circuit described in [3] can be used as a microphone amplifier (MU). Transmitter transistors KT610A and KT920V can be replaced respectively by KT913A and KT925V (KT934V). Coils L1, L3 and L4 are wound with PEV (PEL, CuAg) wire - 0,5 mm in 1 mm increments on frames with a diameter of 5,5 ... 6,5 mm with a trimmer made of HF ferrite; L1 - 5,5 turns, L3 - 2,5 turns, L4 - 4,5 turns. The inductor L2 is wound on a ferrite trimmer from a coil with a diameter of 3 mm and a length of 10 ... 15 mm and contains 25 ... 30 turns of PEV-2 wire 0,1 mm ... 0,2 mm. L5, L6, L7, L8 are the same as in [2]. Coils L1, L3, L4, L6 are installed vertically, L2, L5, L7, L8 - horizontally. Customization. First of all, you need to set up the RF generator. To do this, disconnect C5 from the VT2 base and connect the oscilloscope input to the right terminal of the capacitor C5 according to the diagram. We supply 12,6 V power to the circuit. Then, by rotating the L1 trimmer, we achieve stable operation of the generator and the maximum amplitude of the output signal. Upon completion of setting up the RF generator, we proceed to setting up the preliminary amplification stage on the KT610A. To do this, we restore the connection C5 - R7 - base VT2 and disconnect C11 from the L5 coil. We connect the equivalent of the antenna to C11, i.e. resistor with a resistance of 50 Ohm (47 ... 51 Ohm) and a power of at least 1 W, which must be non-inductive. We supply power to the circuit and control the amplitude of the signal at the load using an oscilloscope. Then, by rotating the trimmers L3 and L4, we achieve the maximum signal amplitude at the load. In the author's version, the maximum signal amplitude was observed with an almost completely "twisted" L3 core and an almost completely "unscrewed" L4 core. The generator worked well with the L1 core almost completely "unscrewed". The signal amplitude at the load should be about 5 ... 8 V (the more, the better). After setting up the pre-terminal stage, we proceed to setting the output stage. To do this, we restore all connections, connect the equivalent of an antenna with a power of at least 10 W with an impedance of 50 Ohms to the transmitter output. We supply power, and control the amplitude of the signal at the load - it must be at least 18 ... 22 V, which corresponds to 6,5 ... 9,5 W. We correct the signal amplitude using coils L5, L7, L8 and capacitor C12, changing its capacitance within small limits until the desired result is obtained (more on this is written in [2]). Transistors VT2 and VT3 during setup and operation must be installed on a radiator, preferably a large one. This completes the transmitter setup. In conclusion, it remains to test the transmitter together with the receiver, thus checking the modulation quality, range, etc. Literature
Author: S.Sych, Brest region, Kobrin district, Orekhovsky village; Publication: N. Bolshakov, rf.atnn.ru
Artificial leather for touch emulation
15.04.2024 Petgugu Global cat litter
15.04.2024 The attractiveness of caring men
14.04.2024
▪ Danger-signaling plant genes found ▪ Thousands of molecules combined into a single quantum state ▪ Flexible displays make smartphones unbreakable ▪ Construction of houses from grass blocks ▪ The popularity of ultraportable laptops is growing
▪ section of the site Electrician's Handbook. Article selection ▪ article Shelf from an old bucket. Tips for the home master ▪ article How does sap climb up a tree? Detailed answer ▪ Article Predicting the weather on land. Travel Tips
Home page | Library | Articles | Website map | Site Reviews
www.diagram.com.ua |


 Leave your comment on this article: