|
|


 Arabic
 Bengali
 Chinese
 English
 French
 German
 Hebrew
 Hindi
Hindi Italian
 Japanese
 Korean
 Malay
Malay Polish
 Portuguese
 Spanish
 Turkish
 Ukrainian
 Vietnamese
|
ENCYCLOPEDIA OF RADIO ELECTRONICS AND ELECTRICAL ENGINEERING TV transmitter on your own. Encyclopedia of radio electronics and electrical engineering
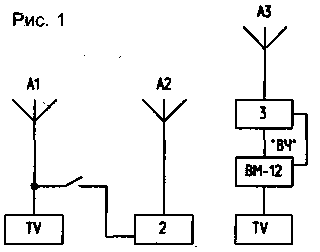
Encyclopedia of radio electronics and electrical engineering / Телевидение By supplementing the VCR with a simple set-top box, you can turn it into a small television center and establish local television broadcasting in a small village, village, or children's camp. The complete block diagram of the device is shown in Fig.1. It is made on common parts, does not require any changes in the VCR and TV.
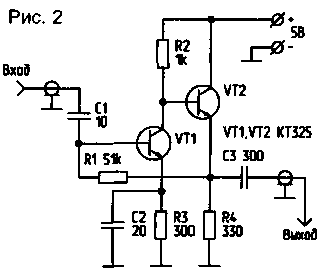
In domestic VMs there is an output "HF", it allows you to broadcast the program to the antenna input of the TV, included in the 6th channel of the meter range. By amplifying the signal, it is possible to transmit it over a distance of several hundred meters. Reception is carried out on an ordinary TV, for which a separate antenna A2 is used, oriented to the transmitting antenna A3. It is desirable to install the latter as high as possible, for example, on the roof of a house. The received signal for more confident reception is amplified by an antenna amplifier, the schematic diagram of which is shown in Fig. 2.
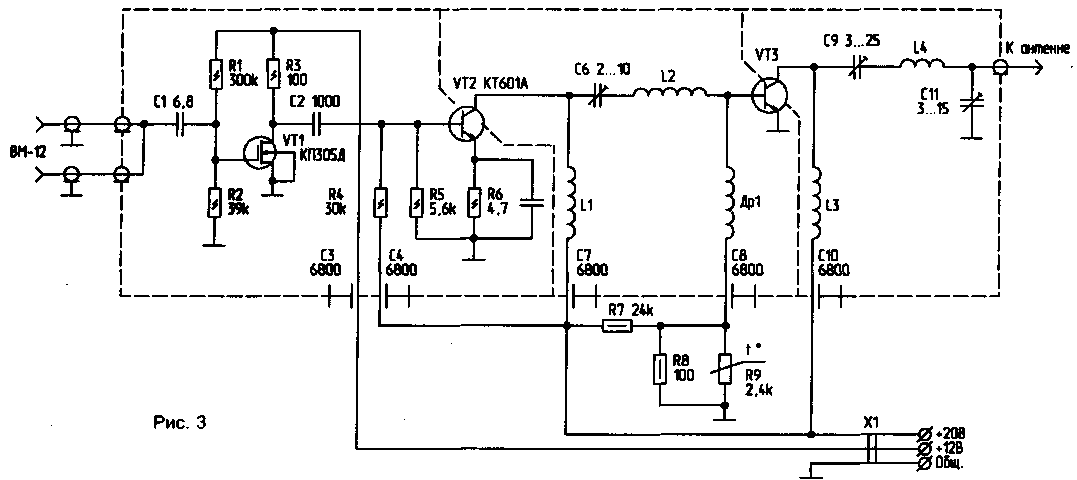
All connections when mounting the amplifier must be of a minimum length. Power supply - from a source with a low ripple coefficient, otherwise moving or standing horizontal stripes may appear on the TV screen. It is best to power the circuit from the power supply of the TV itself through a small voltage regulator. The amplifier works well on all 12 channels of the MB band, so it can also be used to amplify local TV signals. The transmitter is connected to the "HF output" of the VCR, the TV - through an interface device to its "VIDEO" and "SOUND" outputs. The preliminary stage of the transmitting amplifier (Fig. 3) is assembled on a field-effect transistor VT1 with a gain of about 10.
At the input there is a capacitor C1, which has a very small capacitance, so the device practically does not make changes to the output signal of the VCR. The signal is amplified by two stages of a linear power amplifier. The first one, which has the highest gain, uses a VT2 transistor operating in class A. The output stage (its power gain is 5) is made on a VT3 transistor, which has increased electrical strength and good linearity. For the temperature stability of the cascade, a thermistor R9 is used, mounted on a radiator, near the transistor VT3. In addition, the cascades are separated by screens. The transmission coefficient of the whole device is about 40 dB. The amplifier at the same time develops an output power of about 2,5 watts. Its output is designed to connect a load with a resistance of 75 ohms. During installation, the capacitor C1 is directly soldered to the central core of the cable coming from the VCR. Capacitor leads must be as short as possible, as are all other connections. To ensure stable operation, the base circuits of the transistors are separated from the collector circuits. The transistors VT2 and VT3 themselves are placed in recesses on the radiator, and a thermistor R3 is installed next to the transistor VT9. The remaining parts are assembled on a printed circuit board made of double-sided foil fiberglass, mounted on racks on the radiator. The foil on one side is used as a screen. Holes for parts must be countersunk. The screens between the base and collector circuits of the transistors are also made of foil fiberglass. They must be connected to the common screen of the circuit. The following parts are used in the amplifier: thermistor - type KMT-1, trimmer capacitors C6, C9, C11 - type KT4-21V. The Dr1 inductor is wound on a MLT-0,25 resistor with a resistance of 100 kOhm with a PEV-1 0,12 wire in one row until it is filled, about 30 turns. Coils - frameless and wound with silver-plated wire with a diameter of 1 mm, L1 contains 3 turns, the outer diameter of the coil is 10 mm, the length of the winding is 6 mm; L2 contains 4 turns, the outer diameter of the coil is 8 mm, the winding length is 8 mm; L3 contains 3 turns, the outer diameter of the coil is 8 mm, the winding length is 5 mm; L4 contains 4 turns, the outer diameter of the coil is 10 mm, the winding length is 8 mm. You can power the amplifier from any stabilized source that provides a current of about 20 A at a voltage of 0,5 V, and about 12 mA at 80 V. For receiving antenna A2, it is better to use a 5-element antenna of the "wave channel" type (Fig. 4).
Its dimensions are given in Table 1 Table 1
The material for the antenna is aluminum or duralumin tubes. The most suitable diameter: for the carrier boom -18...22 mm, for vibrators - 10...14 mm. A drop cable with a characteristic impedance of 75 ohms is connected to an active loop vibrator through a U-elbow (Fig. 5). Knee length - 530 mm. The connection point of the cable to the vibrator must be insulated by covering it with nitro paint or epoxy resin.
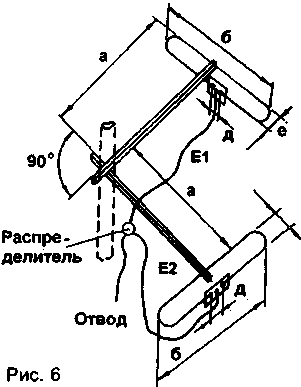
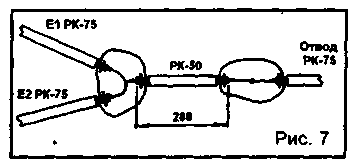
The transmitting antenna A3, if the correspondents are located in the same direction from the transmitter, can be the same antenna that is used on the receiving side (Fig. 4). If the correspondents are located on opposite sides of the "TV center", it is better to use the so-called "circular antenna" (Fig. 6). The lengths of the dowels E1 and E2 are chosen equal and minimal.
The dimensions of the antenna are given in Table 2. Table 2
Vibrators are made of aluminum or duralumin tubes with a diameter of 10...16 mm. To match them with cables E1 and E2, a U-elbow is also used (Fig. 5). The distributor diagram is shown in Fig. 7.
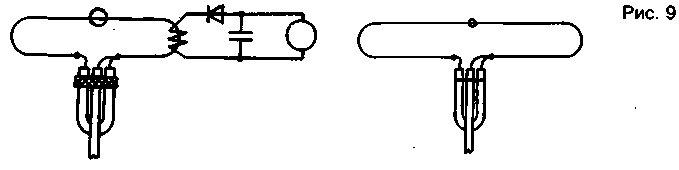
To match the load, a piece of cable with a wave impedance of 50 Ohm (RK-59-4-13, RK-50-2-13, RK-50-2-11) 280 mm long was used, and to reduce it - with a wave resistance of 75 Ohm with small linear attenuation, for example RK-75-9-12 and RK-75-9-13. Setting up the set-top box begins with the transmitting amplifier. First, by adjusting the resistor R1, the current of the transistor VT1 is set within 5 ... 7 mA. Then they proceed to adjust the circuits C6 L2 and C9 L4. The input of the amplifier is connected to the "HF output" of the VCR, and the average power meter MZ-5A is connected to the output of the transmitting amplifier. If this is not available, the circuit shown in Fig. 8 is assembled, and by alternately adjusting the rotors of capacitors C6 and C9, the maximum readings of the device are achieved. Then a working antenna is connected to the output of the transmitting amplifier.
Around the loop vibrator of the antenna, 2 ... 3 turns of wire (any) are wound and the circuit shown in Fig. 9 is assembled.
After adjusting the connection with the antenna (adjusting the capacitor C 1 1), the antennas are oriented towards each other, and if the transmitting antenna is "circular", only the receiving antenna is oriented. If necessary, adjust the channel selector of the television receiver to the 6th channel. You can start transmission. Author: V.Chukhdatiy, Tyumen region, Berezovsky district, Igrim village; Publication: N. Bolshakov, rf.atnn.ru
Alcohol content of warm beer
07.05.2024 Major risk factor for gambling addiction
07.05.2024 Traffic noise delays the growth of chicks
06.05.2024
▪ A new way to control smart watches ▪ The solar wind creates an electrical charge on Phobos ▪ Budget chip for Jelly Bean from Broadcom ▪ The wind generator works in any weather
▪ site section Power supply. Article selection ▪ article by Henry Alfred Kissinger. Famous aphorisms ▪ article Which vertebrate has the largest eyes? Detailed answer ▪ Artocarpus article. Legends, cultivation, methods of application ▪ article Drilling iron. Simple recipes and tips
Home page | Library | Articles | Website map | Site Reviews
www.diagram.com.ua |


 Leave your comment on this article: