|
|


 Arabic
 Bengali
 Chinese
 English
 French
 German
 Hebrew
 Hindi
Hindi Italian
 Japanese
 Korean
 Malay
Malay Polish
 Portuguese
 Spanish
 Turkish
 Ukrainian
 Vietnamese
|
ENCYCLOPEDIA OF RADIO ELECTRONICS AND ELECTRICAL ENGINEERING Antenna orientation device. Encyclopedia of radio electronics and electrical engineering
Encyclopedia of radio electronics and electrical engineering / Телевидение The exact orientation of receiving television antennas at a considerable distance from the transmitting station often causes difficulties. And very often used in such cases, the method of installing them according to the image on the TV screen does not lead to the desired results. And the quality of the image, especially color, significantly depends on the accuracy of the location of the antenna. The device will greatly facilitate the orientation of the antennas. It can be used when installing antennas for collective and individual use on any of the 12 channels of the meter wave range, both in the city and in the countryside. The device also allows you to measure the signal level at the antenna output and determine the possibility of obtaining a good image quality, i.e., the zone of reliable reception, evaluate the health of feeder systems and antenna amplifiers. In the zone of uncertain reception, it can be used to mark the installation point of the antenna on the ground. The device provides measurement of radio frequency (RF) voltage in the range from 60 μV to 1 mV (with a removable divider 1:10 - up to 10 mV). Relative measurement error - no more than 30%. Dimensions - 200X115X100 mm, weight - no more than 1,5 kg. The device is powered by four 3336L batteries, the current consumption is not more than 40 mA. The block diagram of the device is shown in the figure. The measured voltage and,, is fed to the input of the channel selector, where it is amplified and converted into IF oscillations. From the output of the IF amplifier, the signal is fed to the rectifier, and the constant component selected by it is fed to the input of the DC amplifier (DCA), loaded with an output voltage indicator.
The principle of measuring the input voltage Uin is based on determining the angle of rotation of the variable resistor R6 slider in the negative feedback circuit (NFB) embracing the UPT. The value of the angle is directly proportional to the level of the signal Uin, if the same output voltage Uout is set using this resistor on the RA1 device.
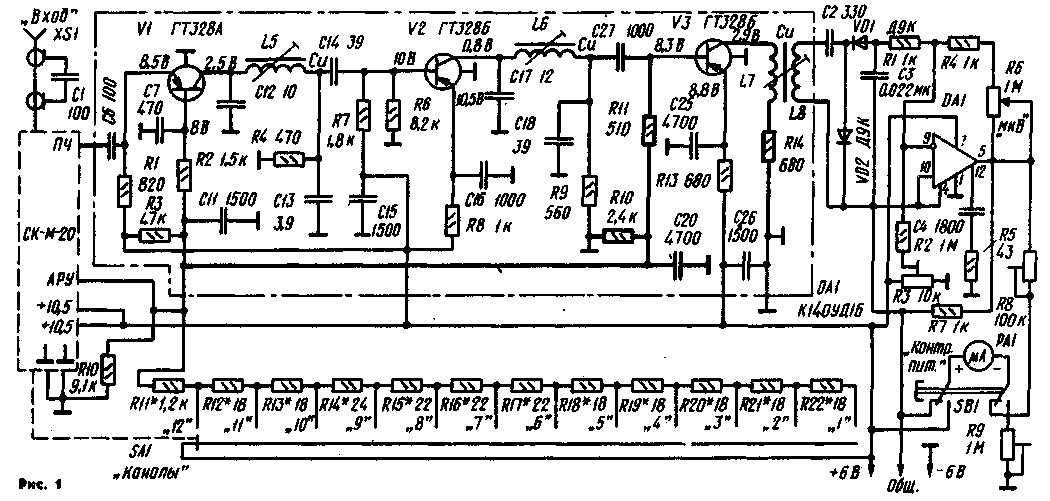
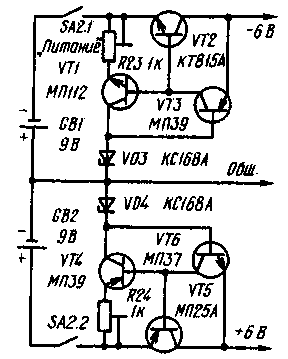
The schematic diagram of the device is shown in Fig.1. It is assembled on the basis of the channel selector SK-M-20 [I]. A three-stage IF amplifier (circled by a dash-dotted line) is made on a printed circuit board from the same selector (amplifier parts are indicated in accordance with its circuit diagram, and new elements and connections are indicated with a thickened line). To obtain the same gain of the device on all channels, the R10-R22 divider and the SA1 switch are used, fixed on the axis of the channel selector and providing a bias voltage to the automatic gain control (AGC) circuit of the selector and to the base circuit of the transistors of the first and third stages of the IF amplifier, depending on channel. The UPT is assembled on the OS DA1, covered by the OOS through the resistors R4, R6. The op-amp is balanced with a trimming resistor R3. A microammeter RA8 is connected to the output of the UPT through the resistor R1 and the SBI button. At the risk of reading, the microammeter needle is set when calibrating the device with a tuning resistor R8. Resistor R9 is used to achieve deviation of the microammeter needle to 12 V in the supply voltage control mode (button SB1 is pressed). The UPT is powered by a stabilized voltage of ±6 V from a bipolar source (Fig. 2), and the channel selector and IF amplifier are supplied from it, but with a voltage of 12 V (the -6 V output is connected to their common wire). The device described in [2] was taken as a basis. The stability of the supply voltage is maintained when the voltage of the batteries GB1 and GB2 drops to 6,7 V. Current. consumed by the stabilizer itself does not exceed 1 mA. The device is operational even when the voltage of each of the batteries is reduced to 5 V, but in this case the sensitivity deteriorates and the scale graduation is disturbed, so the device can only be used as an indicator when orienting the antennas.
At high input signal levels, saturation of transistors in the stages of the channel selector and the IF amplifier may occur. In such a case, a removable divider 1:10 is included between the input of the device and the antenna plug. To ensure safety, the body of the device is connected to the screen of the input coaxial socket XS1 through a separating capacitor C1, and the socket itself is installed on an insulating bar. The device uses resistors SP-1-A-0.5 (R6). SPZ-16 (R3, R8, R9, R23, R24) and VS (others). Button SB1 - P2K without fixation in the pressed position. Microammeter - any with a total deviation current of 50 ... 100 μA, for example, from the Ts437 avometer. Coils L7 and L8 are wound on a polystyrene frame (from the SK-V-1 selector) with a diameter of 5 and a length of 17 mm with a brass trimmer and contain 20 turns of wire PEV-1 0,2. The distance between the coils is 2 mm, the winding is turn to turn. The details of the device are mounted on a vertical duralumin chassis measuring 197X98X2 mm, which serves as a front panel. The case of the device is made of plastic aluminum alloy 1 mm thick. The channel selector case, the front panel and the casing of the device are electrically connected to each other.
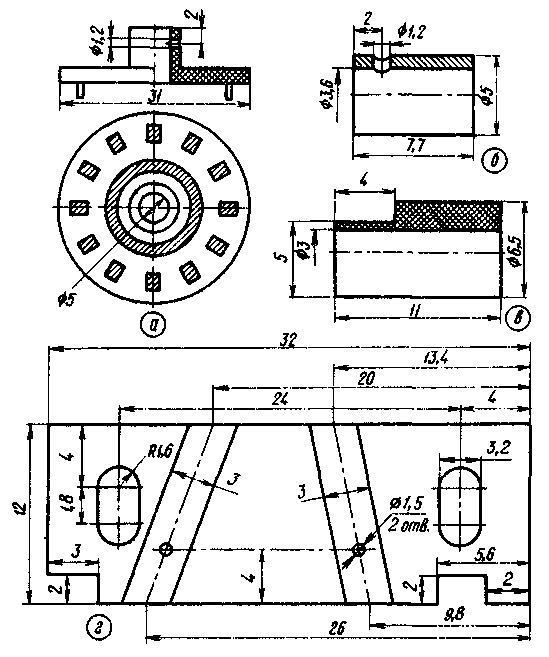
Switch SA1 is fixed on the tail of the axis of the channel selector. Its movable board is a disk from the SK-M-20 channel selector switch, from which the coils are removed, and resistors R 11 - R22 of the divider are soldered between the contacts, which provides the voltage for adjusting the gain of the channel selector and the IF amplifier. The protrusion in the central hole of the disk was removed with a needle file, and the hole itself was reamed to a diameter of 5 mm (see Fig. 3, a, the metal contacts on the disk are shaded conditionally).
When drilling a hole with a diameter of 1,2 mm, a metal sleeve is inserted into the disk sleeve (Fig. 3, b). Then, the retaining spring and brass gasket are removed from the tail part of the channel selector switch axis, the switch disk is put on the axis and a hole with a diameter of 1,2 mm is drilled for the pin. After fixing the disc with a pin, the retaining spring is installed in place. The fixed contacts 3 of the switch (see Fig. 4) are made of current-collecting plates of the SK-M-20 channel selector and are fixed between parts 1 and 2 of the insulating bar, for which purpose grooves 2 mm deep are cut in one of them (0,6) with a file. Parts of the bar are made of ebonite or getinax (part 1 1,6 mm thick, and part 2 3 mm thick) according to the drawing shown in fig. 3, d in the text, and after installing the contacts, they are glued and then fastened with rivets 4 with a diameter of 1,5 mm with a countersunk head. The bar is placed at the place of installation of the high-pass filter of the selector (see Fig. 3), and the filter itself is installed on elongated insulating racks (Fig. 3, c).
The printed circuit board of the IF amplifier is shown in fig. 5. New connections and parts are shown with a dashed line (the shaded areas of the foil are removed from the board). When mounting from the printed circuit board of the SK-M-20 selector, all current-collecting contacts are first removed. Then the RF amplifier on the transistor V1 (see Fig. 1) is switched to the IF amplifier mode according to the OB circuit, for which the inductor in its emitter circuit is replaced with a jumper, and the capacitors C4, C5 are removed. The IF output of the channel selector is connected to the capacitor Sat. Capacitors C9, C10 are excluded from the collector circuit, the output of resistor R4 is connected to the connection point of the coil L5 and capacitors C13, C14 in the base circuit of transistor V2, resistor R5 is soldered. The collector of transistor VI is connected to the connection point of the coil L5 and the capacitor C12, and the jumper connecting the collector to the current-collecting contact of the loop coils is removed. The output of the IF transistor V2 through the capacitor C27 is connected to the base of the transistor V3.
The local oscillator on the transistor V3 is also transferred to the IF amplifier mode, but according to the OE scheme. To this end, capacitors C19-C24, coil L7 and resistors R10, R12 are removed, the resistance of resistor R13 is reduced to 680 ohms, and the capacitance of capacitor C25 is increased to 4700 pF; a divider of resistors R10, R11 and capacitor C20 is included in the base circuit of the transistor, to the midpoint of which the AGC voltage is supplied from switch SA1. The collector circuit of transistor V3 includes coils L7, L8 and resistor R14. The printed circuit board of the IF amplifier is supplemented with a small plate of foil fiberglass 1 mm thick, soldered perpendicular to the main one. It serves to connect the L8 coil to the UPT. The adjustment of the device begins with a voltage stabilizer. To do this, the engines of the tuning resistors R23, R24 are set to the middle position, the stabilizer is disconnected from the power circuits and each source is loaded with a 510 Ohm resistor with a dissipation power of 0,5 W. After connecting the batteries, measure the voltage at the output of the stabilizer and resistors R23, R24 set them equal to +6 and -6 V (± 5%). If this cannot be done, zener diodes VD3, VD4 are selected. Next, proceed to adjust the UPT and the IF amplifier. The slider of the resistor R3 is set to the middle position, the UPT resistor R6 is set to the minimum position, and the resistors R8 and R9 are set to the maximum resistance. Coil L8 is disconnected from capacitor C2 UPT. The channel selector is switched to the 12th channel (usually it has the lowest sensitivity), and a variable resistor with a resistance of 1 kOhm (instead of the resistor R2,7) is soldered to the contacts of the movable switch disk SA11 (instead of the resistor R1), setting its slider to the middle position. Then connect the power source and while pressing the button SB9 "Control, power." trimming resistor R12 set the microammeter needle to any mark on the scale, which will later be used to control the voltage of 3 V. Next, trimming resistor R6 achieves zero readings of the device when the button is released. This operation is repeated by setting the slider of the variable resistor R1 first to the middle, and then to the lowest (according to the diagram) position. After that, by rotating the variable resistor slider connected to the SA8 switch, the initial bias voltage of +XNUMX V is set, supplied to the AGC input of the channel selector and the IF amplifier. Next, by soldering the coil L8 to the capacitor C2, the slider of the variable resistor R6 is again set to the position of minimum resistance and the scale of the dial is calibrated on the axis of the resistor. An unmodulated voltage of 200 ... 500 μV with a frequency equal to the average frequency of the tuned television channel is supplied from the signal generator to the input of the device. By smoothly increasing the resistance of the variable resistor R6, set the microammeter needle to the middle mark of the scale. If this cannot be done, reduce the resistance of the tuning resistor R8. The maximum deviation of the arrow is achieved first by adjusting the local oscillator of the channel selector, and then by alternately rotating the trimmers of the coils L5-L8. And finally, with a variable resistor connected to the switch SA1, they achieve the maximum sensitivity of the device for the largest deviation of the arrow, after which, having measured the resistance of the inserted part of the resistor, they replace it with a constant one. Then the RF voltage at the input of the device is reduced to 60 μV and the handle of the resistor R6 is moved to a position close to the maximum resistance (slightly short of the stop), which corresponds to the maximum sensitivity of the UPT. With a trimmer resistor R8, set the microammeter needle to the middle mark of the scale and mark it with the "Countdown" risk, and put a risk on the limb of the variable resistor R6 opposite the pointer indicating the RF voltage of 60 μV. Similarly, by applying an RF voltage of 100, 200, 500, 1000 μV to the input of the device and each time setting the microammeter needle at the "Countdown" risk with a variable resistor R6, the remaining marks are applied to the resistor limb. In this case, it is necessary to ensure that with an increase in the RF voltage at the input of the device, the radio frequency path is not overloaded. Next, the selector is transferred to the 11th channel, and the limb of the variable resistor R6 is in the "100 μV" position. To the contacts of the SA1 switch in series with the resistor R11 (in place of the resistor R12), a variable resistor with a resistance of 47 Ohms is connected and, having rebuilt the generator to the average frequency of this channel, an RF voltage of 100 μV is applied to the input of the device. By rotating the variable resistor slider, set the microammeter pointer at the "Countdown" risk, after which it is replaced by a constant (R12) of the same resistance. Resistors R13-R22 are also selected on other channels. When orienting television antennas, the device is used as an indicator: by turning the antenna, the maximum deviation of the microammeter needle is achieved. To assess the health of feeder systems and antenna amplifiers, the voltage of the received television signal at their output is measured and compared with the signal level of properly operating devices. In the case of evaluating a color image in the zone of reliable reception, a variable divider n is installed at the input of the TV, reducing the RF voltage with it, achieving such a value at which the overall synchronization and color are still quite stable. After that, the device measures the RF voltage at the output of the divider. Its value can be tentatively guided to assess the zone of reliable reception. When choosing the location of the antenna in the zone of uncertain reception, the RF signal voltages are measured at various points in the area. The antenna is installed in the place of the maximum signal level. Literature
Authors: I. Gladkov, V. Efanov, G. Fazylov, Odessa; Publication: N. Bolshakov, rf.atnn.ru
Traffic noise delays the growth of chicks
06.05.2024 Wireless speaker Samsung Music Frame HW-LS60D
06.05.2024 A New Way to Control and Manipulate Optical Signals
05.05.2024
▪ High Performance Depth Camera ▪ Stable qubit operating at room temperature ▪ Device to quickly stop bleeding ▪ To predict a heart attack, droplets of blood stop
▪ site section Power supplies. Article selection ▪ article Olympus. Popular expression ▪ article Storekeeper. Job description ▪ article Coloring billiard balls. Simple recipes and tips ▪ article Inductance. Code marking. Encyclopedia of radio electronics and electrical engineering
Home page | Library | Articles | Website map | Site Reviews
www.diagram.com.ua |


 Leave your comment on this article: