|
|


 Arabic
 Bengali
 Chinese
 English
 French
 German
 Hebrew
 Hindi
Hindi Italian
 Japanese
 Korean
 Malay
Malay Polish
 Portuguese
 Spanish
 Turkish
 Ukrainian
 Vietnamese
|
ENCYCLOPEDIA OF RADIO ELECTRONICS AND ELECTRICAL ENGINEERING SW radio receiver. Encyclopedia of radio electronics and electrical engineering
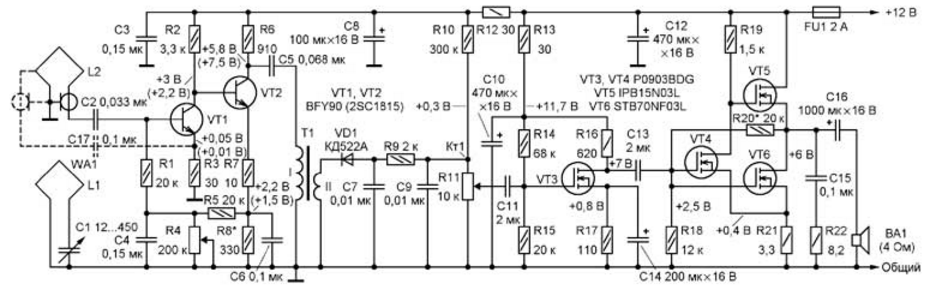
Encyclopedia of radio electronics and electrical engineering / radio reception The radio receiver brought to the attention of readers is designed to receive broadcasts of broadcasting stations in the medium wave (MW) range in the frequency band from about 500 to 1600 kHz. The device is assembled according to the 2-V-2 direct amplification scheme (in addition to the detector, it contains two RF amplification stages and the same number of AF amplification stages). Reception is carried out on a frame (magnetic) antenna. The receiver circuit is shown in fig. 1. The input oscillatory circuit consists of the inductance of the loop antenna L1 and the variable capacitor C1. The received signal through the connection loop L2 and the capacitor C2 is fed to the input of the RF amplifier, assembled on transistors VT1, VT2, amplified by it and through a high-frequency transformer T1 is fed to the detector on the diode VD1. The detected signal through the C7R9C9 filter is fed to the variable resistor R11 (it acts as a volume control), and its engine is fed to the input of the AF power amplifier. To increase the sensitivity of the detector unit, a small voltage of positive polarity is applied to the anode of the diode VD1 through resistor R9 from the divider formed by resistors R10, R11. Variable resistor R4 - RF gain regulator, shunting its capacitor C4 allows you to place this resistor anywhere on the front panel of the receiver.
The AF power amplifier is assembled on transistors VT3-VT6. The first of them works in the pre-amplification stage, the second - in a phase inverter, the third and fourth - in the final stage, loaded with a dynamic head BA1. The output power of the amplifier is 1 W. The receiver is powered by a 12 V source. To reduce the interference of the stages, the RF amplifier and the first AF amplification stage are fed through decoupling RC filters (R12C3C8 and R13C10, respectively). The receiver parts (except KPI, antenna, variable resistors R4, R11 and BA1 head) are placed in a steel chassis basement divided into two compartments: one of them has an RF amplifier and detector board, the other has an AF amplifier board. Installation - hinged. There are no special requirements for the resistors and capacitors of the receiver: all fixed resistors are small-sized of any type and the dissipation power indicated on the diagram, variable R4 - group A (with a linear dependence of resistance on the angle of rotation of the engine), R11 - with an inverse logarithmic dependence of resistance. Capacitor C1 is a dual KPE block with an air dielectric from an old tube receiver (its stator sections are connected in parallel), C2-C7, C9, C11, C13, C15 are ceramic, for example KM, the rest are oxide. Transistors for UMZCH are taken from the motherboards of old personal computers. In addition to those indicated in the diagram, the NTB4N18L transistors were practically tested in operation as VT06, and in the final stage - STB70NF03L (quiescent current - 110 mA), as well as (in the same stages) BE4B1F and STB90N02L (quiescent current - 70 mA). Transformer T1 is wound with PELSHO 0,3 wire on a ferrite ring magnetic circuit with an outer diameter of 10 mm. Winding I contains 50, winding II - 15 turns. The device and winding circuit of the loop antenna are shown in fig. 2. Its frame consists of two horizontal (1) and the same number of vertical (3) planks made of fibreboard (MDF) 6 mm thick. The winding of the frame (according to the scheme - L1) contains 17 turns of a high-frequency stranded wire (litz wire) LESHO 91x0,071. It is permissible to use another wire with cores with a diameter of 0,071 or 0,1 mm and their number 60 ... 100. However, copper wire with a diameter of 2,5 ... 3 mm can also be used. To fix the position of the frame turns, nine holes with a diameter of 1 mm were drilled at each end of the strips 3 and 4 and the same number of grooves were made. First, the inner layer of the frame is wound using the indicated holes for this (the wire is inserted into them not along the axis, but from the side, through sawn slots 3 mm wide), and then the outer one, laying the wire in semicircular grooves 4 wide and 2 mm deep. When winding the frame with a single-core bare wire, insulators 1 are put on it at the points of passage through the strips 3 and 6, which are segments of a PVC tube 8 ... 10 mm long, cut along the generatrix.
The connection coil 5 (L2), which simultaneously performs the function of a structural rigidity element, is bent from a strip of sheet aluminum alloy 2 mm thick and attached to the bars 1 and 3 with bolts 2 (M4) with nuts 9. To isolate the coil from the bars, pieces of PVC- tubes 13 and washers 10 and 11, which are squares with holes in the center made of fiberglass with a thickness of 2 and 3 mm, respectively. The set of bolted connections also includes two metal washers 12. The wires connecting the coil with the RF amplifier are soldered to the petals 8, fixed at the ends of the coil with rivets 7. The numbers on the winding diagram indicate the conditional numbers of the holes and grooves in the strips 1 and 3, through which the wire must pass when winding the frame L1 (the distances between the two are increased for greater clarity of the diagram). The end of the outer layer of the winding should be connected to the common wire of the receiver (this is a kind of electrostatic protection against interference). Before setting up the receiver, make sure that the voltage values \u4353b\u2bconform to those indicated on the diagram (measured by the Ts6 device with capacitors C4 and C12 disconnected, the maximum resistance of the variable resistor R20 and a supply voltage of 2 V; a deviation of up to ± 1815% is permissible). The voltages in parentheses are when using XNUMXSCXNUMX RF transistors in the amplifier). Having remembered the voltage at the control point Kt1, the connections with the capacitors C2, C6 are restored. If the voltage at this point changed sign (became negative), then this indicates self-excitation of the RF amplifier. To get rid of it, try swapping the leads of any winding of the T1 RF transformer. If the result is ineffective or opposite (negative voltage has increased), it is recommended to restore the winding phasing and replace the R7 resistor with a higher resistance resistor (20 ... 51 Ohm). Self-excitation must stop. Establishing UMZCH in the general case comes down to setting at the output of the terminal stage (the connection point of the source of the transistor VT5 with the drain VT6) a voltage equal to half the supply voltage (6 V) by selecting the divider resistors R20R18. To avoid the situation when the voltage at the specified point is +6 V, and the transistor VT6 has not yet opened (the voltage at its source is zero), you should select VT4 and VT6 according to the I-V characteristic slope. The opening voltage of the latter must be lower than VT4. This difference will determine the quiescent current of the final stage. With a quiescent current of 100 ... 140 mA, the sound quality is the best (this is + 0,3 ... 0,5 V at the VT6 source). In conclusion, a few words about the possible improvement of the receiver. To increase the sensitivity, I tried to introduce (not approaching the generation threshold) positive feedback (POS), connecting, as shown in Fig. 1 with dashed lines, the emitter of the transistor VT1 with a tap from about a quarter of the turn of the connection L2 (counting from the end connected to the common wire) through the capacitor C17. To reduce excessive gain, the capacitor C6 was excluded. The POS was regulated by changing the distance between the plane of the coil and the outlet wire. Due to external household interference, this increase in sensitivity could not be realized. Perhaps some of the readers, who are in better reception conditions, will be able to do this, but I was forced to return to the original version. Author: S. Dolganov
Artificial leather for touch emulation
15.04.2024 Petgugu Global cat litter
15.04.2024 The attractiveness of caring men
14.04.2024
▪ Komatsu Electric Micro Excavator
▪ site section Acoustic systems. Article selection ▪ article by André Gide. Famous aphorisms ▪ article Manager for receiving private and commercial ads. Job description ▪ Loudspeaker Design article. Encyclopedia of radio electronics and electrical engineering
Home page | Library | Articles | Website map | Site Reviews
www.diagram.com.ua |


 Leave your comment on this article: