|
|


 Arabic
 Bengali
 Chinese
 English
 French
 German
 Hebrew
 Hindi
Hindi Italian
 Japanese
 Korean
 Malay
Malay Polish
 Portuguese
 Spanish
 Turkish
 Ukrainian
 Vietnamese
|
ENCYCLOPEDIA OF RADIO ELECTRONICS AND ELECTRICAL ENGINEERING SWR meter indicator. Encyclopedia of radio electronics and electrical engineering
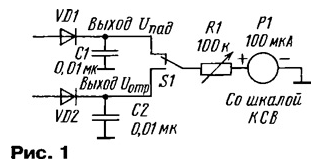
Encyclopedia of radio electronics and electrical engineering / Civil radio communications With all the variety of circuits and designs of SWR meters, they have the same structure: there are direct and reflected wave sensors with detectors at the output. The constant voltages Uad and Uref received from the detectors, which are proportional to the amplitudes of the incident and reflected waves, are fed to the indicator. In the simplest (and most common) case, the indicator has a switch Upad, Uotr and a pointer device with a regulator, as shown in Fig.1. Diodes VD1, VD2 and capacitors C1, C2 form detectors Upad and Uotr.
Everyone knows how to use such an SWR meter. When measuring, you need to do three simple operations:
The scale of the measuring device P1 is calibrated on the basis of the well-known formula:
However, working with such an indicator is not very convenient - you need to do a lot of operations with each measurement. In addition, you need a good and not cheap pointer measuring device with a scale that still needs to be calibrated by disassembling the device. Let's try to solve the indication problem in a different way. To do this, in formula (1) we divide both the numerator and denominator by Upad. As a result, we obtain
Now, to determine the SWR, it is enough to know only the ratio Uref / Upad, and not their absolute values. How can stress be shared? Resistive divider, of course. So let's turn on the variable resistor with a divider, as shown in Fig. 2.
How to use such an indicator? The instruction is not overly complicated: you need to turn the knob of the variable resistor R1 until the device shows zero, and at this moment read the SWR value from the resistor scale. There was only one operation instead of three. And there is no switch. More convenient, easier, faster. There are two requirements for the details of such an SWR meter (they are also convenience): 1. The pointer device should not be a measuring one (with a graduated scale), but an indicator one (with a zero in the middle of the scale and a single mark in this place). In other words, a cheap indicator, for example, an indicator of the recording level of an old tape recorder, can serve as a device, you just have to turn the fasteners to move the arrow to the middle of the scale. 2. The variable resistor R1 must be with a scale, for example, strokes applied with an indelible felt-tip marker on the panel on which the resistor R1 is fixed with a handle in the form of a "beak" are suitable. How does the indicator work? The current through the device P1 is equal to zero in the only case - when the voltages are the same on both terminals of the device. On the left output there is always a voltage Uotr. And on the right output - the voltage removed by the shift of the variable resistor and equal to U0TP. because we set the instrument to zero. In other words, we divided Upad with a variable resistor so that we get a value equal to U0TP. Obviously, in this case, the angle of rotation of the axis of the variable resistor R1 (if it is of group "A") is proportional to the ratio U0TP / Upad, and in accordance with formula (2), the scale of the resistor can be calibrated directly in SWR. In SWR meters assembled according to the traditional scheme, at low power, it is necessary to reduce the resistance of the potentiometer to almost zero. In this case, the load resistance of the detectors is low, which worsens the linearity. In the described indicator, the load resistance of the detectors is constant and high, which ensures the best detection linearity. In addition, unlike meters assembled according to the usual scheme, the variable resistor R1 does not introduce additional errors, since at the time of measurement the current through it is zero, and therefore the device P1 is virtually absent in the circuit (zero current is the absence of influence on the rest part of the device, as if an insulator was included instead of the device). When working with high powers, it makes sense to protect the P1 device from overload by a pair of back-to-back silicon diodes. An ohmmeter is enough to calibrate the scale of the variable resistor R1 (assuming that the voltage detectors Uotr and Upad are linear). By measuring the resistance between the lower and middle (according to the circuit) output of the resistor R1 (having previously disconnected them from the rest of the device), mark the scale of the resistor. This can be done in two ways: 1. The usual linear scale is drawn, like most SWR meters. With a resistance of resistor R1 equal to 10 kOhm, the calibration points of the scale are applied in accordance with Table. 1.
2. An unconventional, but more convenient in practice, non-linear scale is applied in accordance with Table. 2.
Depending on the group of the variable resistor, the type of the scale changes accordingly. For a more accurate reading when measuring high SWR, it is better to use a resistor of group "B", and for the usual scale - group "A". If you have a variable resistor with a resistance different from 10 kOhm, then you need to change the resistance of the resistor R2 accordingly so that the detectors have an equal load, and recalculate the scale markings using the formula
where Rtek is the current resistance value from the ground to the engine; R1 - nominal resistance of the variable resistor; SWR - SWR value corresponding to Rcurrent. For measurements of low SWR, it is convenient to make an extended scale, including in series with the upper terminal of the resistor R1 an additional resistor R3, closed by a switch when measuring high SWR values. SWR values can be obtained by formula (3) by substituting the sum (R1+R1) instead of R3. So, at R3 = R1 = 10 kOhm, the extended scale R1 will have a graduation in accordance with Table. 3. This graduation, in addition to the main one, is also useful to put on the scale of the device.
The SWR meter circuit can be further simplified by completely abandoning the pointer device. After all, in fact, we only need an indicator of zero. And it can be done on the LED Modern red LEDs glow quite noticeably already at a current of 20 ... 30 μA. The forward voltage across the diode in this case is 1,58..1,62 V. If one 1,5 V galvanic cell is connected in series with the LED (in the forward direction), then the ignition voltage of the LED will be only a few tens of millivolts. The fact is that this is only a name: "one and a half volt element." But in fact, the voltage at idle, almost equal to the EMF, for fresh cells is 1,58 .. 1,6 V. Thus, an LED with a series-connected element will light up at a voltage of several tens of mV and a current of 20..30 μA - why not a zero indicator? Replacing the pointer device with it, we get a device, the diagram of which is shown in fig. 3. The instruction for using the meter still consists of one item: by rotating the knob of the variable resistor R1, notice the moment when the LED lights up and read the SWR value from the resistor scale.
Of course, the measurement accuracy when using an LED (Fig. 3) is lower than that of a meter with a pointer indicator (see Fig. 2), especially at low powers, yet an LED is not a pointer device. But the extreme simplicity and cheapness of the device attracts. In addition, in most cases, when tuning antennas, high accuracy of SWR measurement is not required. The design must provide for a light-shielding visor above the LED, because the latter, although it lights up at a current measured in microamps, is naturally not bright. And in bright sunlight, this creates problems. A separate battery switch is not needed - in the absence of signals from the outputs of the detectors, one element is not enough to, in addition to the LED, also open the VD2 diode, so the device does not consume current. Use SWR meters assembled according to the diagrams of fig. 2 and fig. 3, the antenna tuning is much more convenient than traditional ones. There are two reasons: the measurement process is simpler (one operation versus three); the direction of arrow P1 (for Fig. 2) or the direction of change in the brightness of the glow (for Fig. 3) unambiguously indicates the direction of change in SWR. They will object - in a conventional indicator (see Fig. 1), you can also focus on a decrease in voltage Uref. Alas, not always. Let's say Uop decreases. But Upad can decrease even more sharply than Uref (for example, in the case when the load for the transmitter is highly mismatched), which means that the SWR has increased despite the decrease in Uref. Just a decrease in Uop still does not mean anything. It is necessary to compare with Upad. In a conventional indicator, this comparison must be done manually, each time flipping the switch and recalibrating the indicator. In the described device, the comparison of Uotr and Upad occurs automatically - on the variable resistor of the divider and the zero indicator. Of course, such an indicator is not very suitable for direct integration into a transceiver or power amplifier. But in a separate SWR meter, designed specifically for antenna measurements, it is noticeably more convenient than the traditional one. Author: Igor Goncharenko (DL2KQ - EU1TT), Bonn, Germany
Machine for thinning flowers in gardens
02.05.2024 Advanced Infrared Microscope
02.05.2024 Air trap for insects
01.05.2024
▪ LMH6533 - laser diode driver ▪ Addonics 10GbE network adapter
▪ site section Infrared technology. Article selection ▪ article Who are you with, masters of culture? Popular expression ▪ article Which states are second order landlocked states? Detailed answer ▪ article Mobile mortar mixer operator. Job description ▪ Article Miracle phone. Focus Secret
Comments on the article: Michael Very simple and clear, thank you very much for posting.
Home page | Library | Articles | Website map | Site Reviews
www.diagram.com.ua |


 Leave your comment on this article: