|
|


 Arabic
 Bengali
 Chinese
 English
 French
 German
 Hebrew
 Hindi
Hindi Italian
 Japanese
 Korean
 Malay
Malay Polish
 Portuguese
 Spanish
 Turkish
 Ukrainian
 Vietnamese
|
ENCYCLOPEDIA OF RADIO ELECTRONICS AND ELECTRICAL ENGINEERING Laboratory transformer control unit. Encyclopedia of radio electronics and electrical engineering
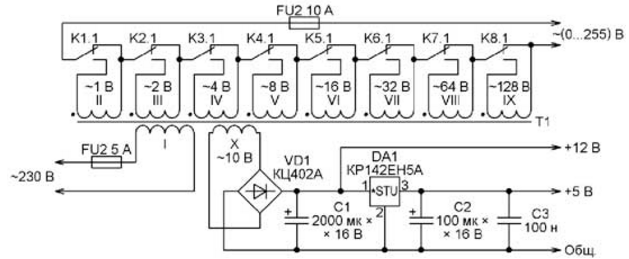
Encyclopedia of radio electronics and electrical engineering / Power Supplies A radio amateur often requires regulated AC voltage. Usually it is obtained using a laboratory adjustable autotransformer (LATR). Unfortunately, the LATR output has a galvanic connection with the network, and its movable electrode (slider) often burns. In addition to damaging the slider itself, this is also fraught with failure of the winding. And the price of a good LATR is very high, and few can make it on their own. There is a long-known way to regulate the voltage at the load, using not an autotransformer, but a conventional transformer with several secondary windings switched by switches. Such a transformer is described, for example, in the article by A. Terskov "In increments of one volt" ("Radio", 1993, No. 9, pp. 24, 25). Its output is galvanically isolated from the mains, and the output voltage can be adjusted in 1 V steps from 0 to 255 V. Unfortunately, the constant need for calculations for the correct switching of the secondary windings of such a transformer to the desired voltage makes it difficult to use it. There is no need to talk about a monotonous increase or decrease in voltage in small steps. But the main disadvantage of such a solution is that setting just one switch to the wrong position can disable the load, especially low-voltage ones. In order to prevent such troubles, as well as to simplify the use of the transformer, a device has been developed, presented below. The goal was to use parts that are likely to be found in the stocks of a radio amateur. The block can be simplified, but this will be discussed later. The diagram of a laboratory transformer (without a control unit) is shown in fig. 1. It differs from the scheme from the above-mentioned article by A. Terskov only in that the manual switches are replaced by electromagnetic relays. Their contact groups K1.1-K8.1 are connected so that when the windings of all relays are de-energized, there is no output voltage. This is done so that during transients that occur when the transformer is connected to the network, voltage does not appear at the output. The maximum voltage (255 V) at the output will be only if all the relays have tripped.
Unlike the original, the transformer T1 has an additional winding X with a diode rectifier bridge VD1 for powering the relay windings and an integrated voltage regulator DA1 for powering the control unit microcircuits. The control unit, the diagram of which is shown in fig. 2, assigns to each of the possible values of the output voltage (from 0 to 255 V in steps of 1 V) an eight-bit (according to the number of relays switching windings) binary code. A one in any digit of this code means that the corresponding relay should work, a zero means that it should release the armature.
When the voltage on the primary winding of the transformer is 230 V, the output voltage in volts is equal to the number set by pressing the buttons SB1 and SB2 on the indicators HG1-HG3. The need during operation to think about the correct switching of the secondary windings is eliminated, which increases the convenience and efficiency of setting the desired output voltage. However, it should be noted that the control unit does not measure the output voltage, but only shows its "theoretical" value on the indicator. For this reason, if the voltage in the network differs from the nominal one and under the influence of the load, the actual output voltage may differ from the value shown by the indicators. Conventionally, the control unit can be divided into several functional units. This is a reversible counter on DD2-DD4 microcircuits with logic controlling it on a DD1 microcircuit, a code converter on a DS1 RPZU microcircuit, an indication unit on DD5-DD7 microcircuits. A pulse generator with a frequency of about 1.1 Hz is built on the logical element DD2. Element DD1.4 inverts the generator signal. The inversion is needed so that the counters DD2-DD4 change state when the buttons SB1 and SB2 are released, and not when they are released. Adjust the voltage with the buttons SB1 (down) and SB2 (up). The R1C3 and R3C4 circuits suppress the bounce of the button contacts. While none of the buttons is pressed, the control input of the generator (pin 1 DD1) is set to a low logic level. When the SB1 button is pressed, a high-level voltage is supplied to this input through the resistor R9 and the decoupling diode VD4. After a while, the generator starts up. If the button is pressed briefly, the generator will not work, but a single pulse will appear at its output in response to each press. With each pulse, the counter is decremented by one. In order to avoid a sharp transition to the 999 state when the counters reach the zero state, when the generator reaches zero, the generator is blocked by the low logic level of the overflow signal from pin 6 of the counter DD7 through the VD4 diode. Further, the generator can only be started using the SB2 button. The operation of this button is similar, but, in addition to starting the generator, it sends a high level to the inputs for controlling the direction of counting (pins 10) of counters DD2-DD4. Upon reaching the maximum value of 255, the voltage level at the output of the DD1.3 element becomes low and, through the VD3 diode, blocks the operation of the generator. Since the device should not respond to the simultaneous pressing of both buttons, a blocking unit has been introduced into it (resistors R2, R6, R7). The voltage from the resistor R2 is applied to the count enable input (pin 5) of the counter DD2. If both buttons are pressed, this voltage level goes high, which disables pulse counting. The R11C12 circuit is used to reset the counters DD2-DD4 when the supply voltage is applied. You can reset them at any time by pressing the SB3 button. Since the outputs of 9 counters are connected to a common wire, the counters operate in decimal mode, generating a three-digit decimal number in binary-decimal code at the outputs - the set value of the output voltage. This number is fed to the address inputs of the PROM DS1. Each value of the output voltage in it corresponds to a memory cell in which the binary equivalent of a binary decimal number is recorded. For example, address 10 0011 0000 (binary decimal representation of 230) is 11100110 (binary decimal 230). The code from the outputs of the RPZU DS1 is applied to electronic keys assembled on transistors VT1 -VT8 and control relays K1-K8. On fig. 2 shows a diagram of only one key, the rest are identical. Keys on discrete transistors can be replaced by a KR1109KT63 (ULN2803A) chip containing eight such keys. The number from the outputs of the counters is also fed to the display unit, consisting of converters of the binary-decimal code to the "seven-element" DD5-DD7 and LED indicators HG1-HG3. The HG3 indicator shows units, HG2 - tens, and HG1 - hundreds of volts. On the transistor VT9, a node for blanking out an insignificant zero in the high-order digit of the indicator is made. The collector of this transistor is connected to the input of the blanking of the indication of the code converter DD7. If the counter DD4 contains the number 1 or 2, then a high-level voltage is supplied to the base circuit of the transistor VT9 through the diode VD18 or VD19, the transistor is open, the HG1 indicator is on. Similarly, on the VT10 transistor, an insignificant zero blanking unit is built on the HG2 indicator. If the number in the counter DD3 is non-zero, a high-level voltage is supplied to the base of the transistor VT10 through the diodes VD20-VD23. A low logic level on the VT10 collector allows the operation of the DD6 code converter and the HG2 indicator. If the counter DD3 is zero, but the transistor VT9 is open (in the counter DD4 1 or 2), then the low-level voltage is supplied to the blanking input of the code converter DD6 through the diode VD24 from the collector of the transistor VT9. The diodes VD18-VD23 could be abandoned by applying signals from the overflow outputs of the corresponding counters to the base circuits of the transistors VT9 and VT10, but in this case, the extinguished insignificant zeros will flash when the SB2 button is pressed. If desired, the indication unit can be excluded, and an AC voltmeter with a measurement limit of 300 V can be connected to the transformer output. In this case, you can also remove the RPZU chip and the DD4 counter, and switch the remaining two to work in binary mode. The signals to the transistor switches that control the relays, in this case, should be given from the outputs of the counters. The accuracy of setting the output voltage with this simplification will depend on the error of the voltmeter. The printed circuit board for the control unit was not developed, however, some of the nodes can be placed on the printed circuit boards shown in Fig. 3 and fig. 4. They were once designed for other devices, but they are also suitable for the one presented in the article. The remaining elements can be mounted on a breadboard by connecting their leads with a mounting wire. Blocking capacitors C5-C10 are installed directly on the power pins of the microcircuits. Please note that in fig. 3, the numbers of points for connecting the indication board to the outputs of the meters are highlighted in color. These numbers match the wire numbers of the corresponding harness in the diagram of fig. 2.
The device uses MLT resistors, all capacitors are imported. Instead of KT315G transistors, you can use any transistors of the same series. In addition, the KT315G transistors (VT1-VT8) can be replaced with 2SC945, and the rest with any low-power npn transistors. Diodes KD522A can be replaced with KD521, KD510 with any letter index or 1N4148. Replacing diodes KD243V - widespread diodes 1N4007. The possibility of replacing microchips of the K176 and K561 series with their imported counterparts was not tested. The KR573RF5 microcircuit must be programmed before installation in the device. It is allowed to replace it with an imported series 2716 or 27C16. Buttons and switches can be anything. The relays used are imported RAS-1215, they can be replaced by others with a winding operating voltage of 12 V and with switching contacts capable of switching the required load current. The winding resistance of the applied relays is 400 Ohm. Transformer T1 can be wound according to the recommendations of A. Terskov, but with an additional winding X for a voltage of 10 V, wound with a wire with a diameter of at least 0,4 mm. But instead of a magnetic circuit PL 25x50x100, it is better to use a close-section magnetic circuit ShL - it is much easier to wind the windings not on two, but on one frame. Establishing the device consists in selecting, if necessary, the frequency of the generator on the element DD1.1. With the values \u2b\u1bof the elements indicated on the diagram, it is about 3 Hz. This frequency should not be set too high, as the relay contacts will spark strongly and burn. It is also advisable to check the correct programming of the ROM. When the indicators HG1-HGXNUMX are set to the value of the output voltage, the binary code of this number should appear at the outputs of the RPZU DSXNUMX. If necessary, you can speed up the voltage setting by introducing an additional switch SA1 and button SB4 according to the diagram shown in fig. 5. With the switch position SA1 shown on it, the device works as usual. When the quick setting mode is enabled, all relays will be turned off, which will make the voltage at the output of the transformer zero. Using the SB4 button, a resistor R5 is connected in parallel with the resistor R35, thereby increasing the frequency of the generator by approximately five times. Now you can quickly set the desired value on the indicator, and then, returning to normal mode, get the required voltage at the output.
The operation of a transformer with the described control unit is accompanied by such an unpleasant phenomenon as burning of the relay contacts (which, however, affects both the LATR slider and the switches). If the transformer load contains an inductive component (for example, a motor or another transformer), then it may be necessary to bypass the relay contacts with protective RC circuits (not shown in the diagram in Fig. 1). Alternatively, you can set the voltage without load, and connect the load after, then the contacts will not burn. In conclusion, I note that the use of the described control unit is not limited to a laboratory transformer, it can be used, for example, in a power supply. In this case, only the primary winding, secondary windings II-VII and X and five relays (K1 - K5) should be left on the transformer. It will be possible to set the voltage from 1 to 31 V in 1 V steps, which is quite enough for most laboratory power supplies. DS1 EPROM programming files in several formats with the same content can be downloaded from ftp://ftp.radio.ru/pub/2016/09/trans.zip. Author: E. Gerasimov
Artificial leather for touch emulation
15.04.2024 Petgugu Global cat litter
15.04.2024 The attractiveness of caring men
14.04.2024
▪ A lens that mimics the human iris ▪ Mellanox Innova IPsec 40GbE Encrypted Network Adapter ▪ Features of the Lytro Camera for Mobile Phones
▪ site section Parameters, analogues, marking of radio components. Article selection ▪ article Rhodes here, jump here! Popular expression ▪ article How widespread was torture by the iron maiden in the Middle Ages? Detailed answer ▪ article A worker at a timber warehouse. Standard instruction on labor protection ▪ article Automotive voltage regulator. Encyclopedia of radio electronics and electrical engineering ▪ article One card in four roles. Focus Secret
Home page | Library | Articles | Website map | Site Reviews
www.diagram.com.ua |


 Leave your comment on this article: