|
|


 Arabic
 Bengali
 Chinese
 English
 French
 German
 Hebrew
 Hindi
Hindi Italian
 Japanese
 Korean
 Malay
Malay Polish
 Portuguese
 Spanish
 Turkish
 Ukrainian
 Vietnamese
|
ENCYCLOPEDIA OF RADIO ELECTRONICS AND ELECTRICAL ENGINEERING Current stabilizer up to 150 amperes
Encyclopedia of radio electronics and electrical engineering / Surge Protectors In the literature, it is not often possible to find descriptions of current stabilizers for 100 ... 200 A, however, in some processes (galvanization, welding, etc.) they are necessary. At first glance, to stabilize such currents, appropriate powerful transistors are also needed. The article describes a 150 A current stabilizer (with smooth adjustment from zero to maximum), made on conventional, widespread transistors of the KT827 series. The applied circuit design makes it easy to increase or decrease the maximum stabilized current. Schematic diagram of the proposed current stabilizer is shown in fig. one.
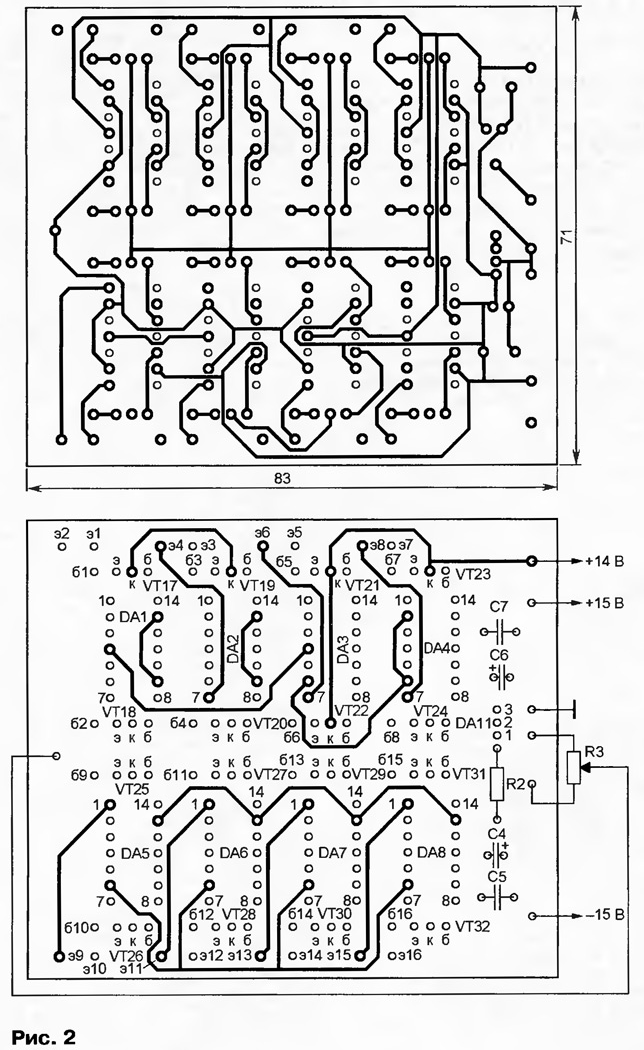
As you can see, the load is included in a somewhat unusual way - in a break in the wire connecting the negative terminal of the VD5-VD8 diode bridge to the common wire of the device. All powerful transistors VT1 - VT16 are connected according to the common collector circuit, but each of them is loaded on its equalizing resistor (R4-R19), also connected to a common wire. Thus, the total current of all 1 transistors flows through the stabilizer load connected to the XS16 socket. The current through each of the transistors VT1 - VT16 is selected to be about 9,4 A, which is much less than the maximum allowable value for KT827A - KT827V. With a voltage drop across the transistor of 10 ... 11 V, the dissipated power reaches 100 watts. The spread of parameters of transistors and resistances of resistors R4 - R19 does not matter, since each transistor is controlled by its own operational amplifier. The outputs of the op-amp DA1.1 - DA8.2 are connected through transistors VT17 - VT32 to the bases of transistors VT1 - VT16, and the feedback voltages are applied to the inverting inputs from the emitters of the corresponding transistors. Op-amps support the inverting inputs (and, accordingly, on the emitters of transistors VT1 - VT16) the same voltages that they have on non-inverting inputs. The non-inverting inputs of all op-amps are supplied with a stable control voltage from a resistive divider R2R3 connected to the output of the integral stabilizer DA11. When the control voltage changes, the current changes through each of the resistors R4 - R19 and, accordingly, through the total load connected to the XS1 socket. The op-amp is fed from a stabilizer made on DA9, DA10 microcircuits and a VT33 transistor. Instead of composite transistors KT827A in the current stabilizer, you can use transistors of this series with indices B, C, G, or a combination of two transistors of the appropriate power (for example, KT815 + KT819 with any letter indices). Dual op amps KR140UD20 are interchangeable with K157UD2 or single op amps KR140UD6, K140UD7, K140UD14 and the like, stabilizer 78L05 - on KR142EN5A, KR142EN5B or 78L09, transistors KT315E - on KT3102, KT603, etc., diodes D200 - on D160. Instead of the transformer TPP232 (T1), it is permissible to use TPP234, TPP253 or any other with two secondary windings for a voltage of 16 ... 20 V. Resistor R1 can be of any type, it is desirable to use stable R2 (for example, C2-29). To regulate the load current, the author used a variable resistor SP5-35A (with high resolution), but you can, of course, use any other that provides the required accuracy of setting the current. Capacitor C3 is made up of ten capacitors K50-32A, C4, C6 - K50-35, the rest are of any type. It is impossible to use one large capacitor as C3, since it will overheat greatly due to the fact that its outputs are not designed for such high currents (there is not enough cross section). Dual op-amps DA1 - DA8, transistors VT17 - VT32, integrated voltage regulator DA11, resistors R2, R3 and capacitors C4 - C7 are mounted on a printed circuit board made according to the drawing shown in fig. 2.
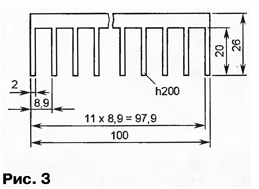
Transistors VT1 - VT16 are fixed on heat sinks capable of dissipating at least 100 watts each. The author used ribbed heat sinks with dimensions of 200x100x26 mm (Fig. 3). All 16 heat sinks are assembled into a battery; four VVF-112M fans are used to cool them. This made it possible to turn on the current stabilizer for a long-term constant load. If the load is short-term or pulsed, smaller heat sinks can be dispensed with.
Resistors R4 - R19 are made of high-resistance (manganin or constantan) wire with a diameter of 1 ... 2 mm and are fixed on the heat sinks of their respective transistors. To cool the VD5 - VD8 diodes, standard heat sinks are used, designed for the installation of D200 diodes (blowing them with a fan is not required). The DA9 chip and the VT33 transistor are placed on small plate heat sinks. When installing a current stabilizer, it must be taken into account that a current of 150 A will flow through some circuits, so they must be made with a wire of the appropriate section. The secondary winding of the transformer T2 should provide a voltage of about 14 V at a load current of 150 A (a welding transformer is well suited). The voltage drop across the load resistance of the stabilizer should be no more than 10 V (the rest of the voltage drops on transistors VT1 - VT16 and resistors R4 - R19). With a larger voltage drop across the load, it will be necessary to increase the voltage of the secondary winding of the transformer T2, however, in this case, it is necessary to ensure that the dissipation power of each of the transistors does not exceed the maximum allowable. The establishment of a device assembled from serviceable parts is reduced to setting the maximum stabilized current by selecting the resistor R2. It is convenient to do this by temporarily replacing the last included rheostat with a tuning resistor with a resistance of 1,5 ... 2 kOhm. By setting its engine to the position of maximum resistance, and the engine of the resistor R3 to the upper (according to the diagram) position and turning on the ammeter in series with the load for a current of 150 ... 200 A (or simply connecting it to the sockets of the XS1 socket), turn on the stabilizer in the network and, by reducing the resistance of the tuning resistor, the ammeter needle is deflected to the corresponding scale mark. Then measure the resistance of the entered part of the tuning resistor and replace it with a constant of the nearest value. At a maximum current of 150 A, the voltage at the emitters of transistors VT1 - VT16 should be about 1,88 V. Therefore, tuning can also be carried out by the voltage at the emitter of any of these transistors, although the accuracy of setting the current will be small due to the spread of the resistances of the resistors R4 - R19. If it is necessary to increase or decrease the maximum current delivered to the load, you can increase or decrease the number of transistors and op-amps accordingly. Thus, on the basis of the described stabilizer, it is possible to create a much more powerful current source. When connecting the load to the current stabilizer, it should be remembered that there will be a positive output of the stabilizer on the "ground" wire. Author: I.Korotkov, Bucha village, Kyiv region, Ukraine
Artificial leather for touch emulation
15.04.2024 Petgugu Global cat litter
15.04.2024 The attractiveness of caring men
14.04.2024
▪ SAMSUNG and LG mobile phones will harm mobile operators ▪ Promising material for lithium-ion batteries ▪ Early retirement negatively affects the brain
▪ section of the site Spy stuff. Article selection ▪ article Canned food. History of invention and production ▪ article Why is there lead in gasoline? Detailed answer ▪ article Monographic method for analyzing the causes of industrial injuries ▪ article VHF local oscillator with PLL. Encyclopedia of radio electronics and electrical engineering ▪ article Digor proverbs and sayings. Large selection
Home page | Library | Articles | Website map | Site Reviews
www.diagram.com.ua |


 Leave your comment on this article: