|
|


 Arabic
 Bengali
 Chinese
 English
 French
 German
 Hebrew
 Hindi
Hindi Italian
 Japanese
 Korean
 Malay
Malay Polish
 Portuguese
 Spanish
 Turkish
 Ukrainian
 Vietnamese
|
ENCYCLOPEDIA OF RADIO ELECTRONICS AND ELECTRICAL ENGINEERING Charger for sealed lead-acid batteries. Encyclopedia of radio electronics and electrical engineering
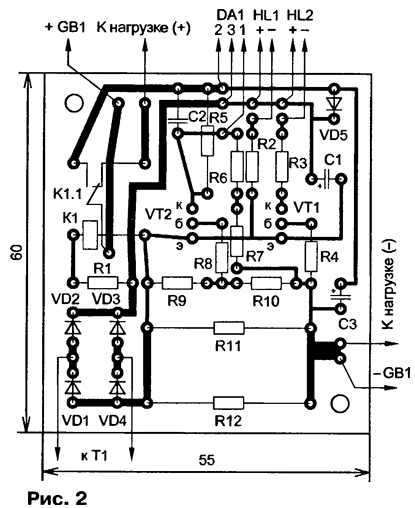
Encyclopedia of radio electronics and electrical engineering / Chargers, batteries, galvanic cells Many of us use imported lanterns and lamps for lighting in the event of a power outage. The power source in them is sealed lead-acid batteries of small capacity, for charging which they use built-in primitive chargers that do not provide a normal mode. As a result, battery life is significantly reduced. Therefore, it is necessary to use more advanced chargers that exclude the possibility of overcharging the battery. The vast majority of industrial chargers are designed to operate in conjunction with car batteries, so their use for charging low-capacity batteries is impractical. The use of specialized imported microcircuits is economically unprofitable, since the cost of such a microcircuit is sometimes several times higher than the cost of the battery itself. The author offers his own version of the charger for such batteries. The article describes an easy-to-manufacture and set-up charger (charger) for sealed lead-acid batteries (AB) of small capacity. On fig. 1 shows a diagram of the device. In fact, this is a voltage stabilizer with a current limit of 0,1C (C is the capacity of the battery, Ah), which is assembled on a KR142EN12A microcircuit, included according to a typical circuit. With the indicated values of resistors R9, R11 and R12, the device provides charging of the most common batteries with a voltage of 6 V and a capacity of 4 Ah. The charger consists of a diode rectifier VD1 - VD4 with a smoothing capacitor C1, a voltage regulator on the DA1 chip and a current limiting unit containing a VT2 transistor and resistors R8-R12.
After the mains voltage is applied, relay K1 is activated and contacts K1.1 connects the battery to the charger. Charging current begins to flow through resistors R11 and R12. If it exceeds the value of 0,1C (0,4 A for the specified AB), the voltage across the resistor R9 will reach 0,6 V. The opened transistor VT2 shunts the resistors R6 and R7, which leads to a decrease in the voltage at the output of the charger and limiting the charging current to the required level. At the same time, the voltage across resistors R11 and R12 opens the transistor VT1. The HL2 LED turns on, indicating that the battery is charging. As the battery charges, the voltage on the battery increases and when the charging current drops below 0.02C (80 mA), the transistor VT1 closes. The HL2 LED goes out, which indicates the end of charging. The voltage on each battery of a fully charged battery is approximately 2,25 V, and in this state the battery can be connected to the device indefinitely. The glow of the HL1 LED indicates that the charger is connected to the network. Capacitors C2 and C3 eliminate the possibility of self-excitation of the DA1 chip. Diode VD5 protects the chip from reverse current when the device is disconnected from the network. The use of a relay is caused by the need to disconnect the load circuits in order to avoid their influence on the charging mode. In addition, it becomes possible to use the charger in emergency power devices, since the battery is constantly recharged in the presence of mains voltage, and in the event of its failure, the load is automatically connected to the battery. If it is necessary to charge a battery with a different voltage or a different capacity, the resistance of resistors R9, R11 and R12 should be recalculated. Let's show this on the example of the above battery with a voltage of 6 V and a capacity of C \u4d XNUMX Ah. Saturation voltage of transistors VT1 and VT2: Ueb usVT1 = Ueb usVT2 = 0,6 V. The charging current, in amps, is equal to 0,1 of the battery capacity, expressed in amp-hours: Izar \u0,1d 0,1С \u4d 0,4 XNUMX \uXNUMXd XNUMX A. The total resistance of resistors R11 and R12 is calculated by the formula R \u2d Ueb usVT0,02 / (0,6C) \u0,02d 4 / (7,5 XNUMX) \uXNUMXd XNUMX Ohm. The power dissipated by these resistors is P \u2d RIzar7,50,16 \u1,2d XNUMX \uXNUMXd XNUMX W. To reduce the degree of heating in the memory, two resistors of 15 ohms with a power of 2 W are used, connected in parallel. Calculate the resistance of the resistor R9: R9 \u2d Ueb HacVT10 R3 / (l2ap-R - Ueb. usVT0,6) \u200d 0,4-7,5 / (0,6-50-XNUMX) \uXNUMXd XNUMX Ohm. We select a resistor with the closest resistance to the calculated resistance of 51 ohms. The device uses imported oxide capacitors. Relay - JZC-20F with a voltage of 12 V. You can use another relay that is available, but in this case you will have to correct the printed circuit board. Diodes 1N4007 (VD1 - VD5) are replaceable by any that can withstand a current at least twice the charger. It is permissible to replace the transistors indicated in the diagram with any of the KT503 (VT1) and KT3102 (VT2) series. Instead of the KR142EN12A microcircuit, you can use an imported analog LM317T. In any case, it must be placed on a heat sink, the area of \u1b\u60bwhich depends on the charging current, the voltage on the capacitor C80 and AB. In the author's version, a heat sink with dimensions of 1x14 mm was used. Transformer T17 should provide an alternating voltage of 0,5 ... 1 V on the secondary winding at a load current of about 2 A. It is possible to use a transformer with a high output voltage, but this will lead to excessive heating of the microcircuit, which will require an increase in the size of the heat sink. LEDs of green (HLXNUMX) and red (HLXNUMX) glow colors can be replaced by any existing ones that provide sufficient brightness for indication. All parts, with the exception of the network transformer, microcircuit and LEDs, are mounted on a printed circuit board made of one-sided foil fiberglass 1,5 mm thick, 55x60 mm in size. Its drawing is shown in Fig. 2.
A properly calculated and assembled device requires minimal adjustment. When the battery is off, power is supplied and, selecting resistor R6, a voltage of 6,75 V is set at the output of the memory. To check the operation of the current limiting unit, instead of the battery, a 2 W resistor with a resistance of about 10 Ohms is briefly connected and the current flowing through it is measured. It should not exceed 0,4 ... 0,45 A. On this, the adjustment of the device can be considered complete. The board together with the transformer can be mounted inside the case of the device powered by the battery. If there is not enough space inside, a suitable connector is installed on the case and connected directly to the battery. The memory in this case is assembled in a separate plastic case. LEDs and a power switch are mounted on its front panel (not shown in the diagram). To improve cooling, it is desirable to place the heat sink outside the device case. The connecting wires leading to the battery must be of minimum length and with a cross section of at least 1 mm2. Author: V.Pedyash, Odessa, Ukraine
Machine for thinning flowers in gardens
02.05.2024 Advanced Infrared Microscope
02.05.2024 Air trap for insects
01.05.2024
▪ Antarctica is getting taller
▪ section of the Electrician website. Article selection ▪ article Hut on chicken legs. Popular expression ▪ article Which scientist and for what purpose cut off the skin from his fingers? Detailed answer ▪ article Scandinavian fjords. Nature miracle ▪ Article Flashlight with LEDs. Encyclopedia of radio electronics and electrical engineering
Comments on the article: a guest What should be the values of resistors R9, R11 and R12 in order to charge a 12 V 7 A battery?
Home page | Library | Articles | Website map | Site Reviews
www.diagram.com.ua |


 Leave your comment on this article: