|
|


 Arabic
 Bengali
 Chinese
 English
 French
 German
 Hebrew
 Hindi
Hindi Italian
 Japanese
 Korean
 Malay
Malay Polish
 Portuguese
 Spanish
 Turkish
 Ukrainian
 Vietnamese
|
ENCYCLOPEDIA OF RADIO ELECTRONICS AND ELECTRICAL ENGINEERING Game indication Maps. Encyclopedia of radio electronics and electrical engineering
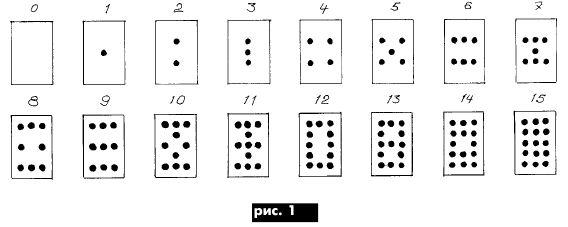
Encyclopedia of radio electronics and electrical engineering / Indicators, sensors, detectors As shown in the example game indication "Domino" [1], digit encoding based on binary numeration has been used for a very long time. After people learned how to make sheet material, games appeared with the application of a digital code on a thin flat surface (cards). In modern playing cards, there are 13 cards in each suit, and 10 of them are digitally marked from 1 (ace) to 10, and three are in the form of pictures, but can also be marked with numbers. I propose a slightly modified marking of cards from 1 to 10 (Fig. 1).
The placement of symbols has the form of a matrix of 5 horizontal rows and 3 vertical ones. The difference from the standard marking is that the numbers 6 and 7 are rotated by 90°. In addition, the numbers from 1 to 7 are placed in a 3x3 matrix, as in the Domino indication, only 8, 9, 10 are placed in a 3x5 matrix. Subsequent numbers from 11 to 15 are placed in the same matrix. The basic principle of placement is central symmetry (relative to the center of the node) and axial symmetry (relative to the horizontal and vertical axes passing through the center of the node). The basic symbols are images of the numbers 1, 2, 4, 8, all the rest are formed by overlaying, for example: 1 + 4 = 5. It is possible to build a mnemonic indicator on LEDs by installing LEDs in the nodes of the matrix (places of suit signs) on the principle of a "card", according to the diagram in Fig.2. The LEDs forming the mnemonic symbols "2", "4", "8" are connected in series chains of two (respectively, one, two and four parallel chains).
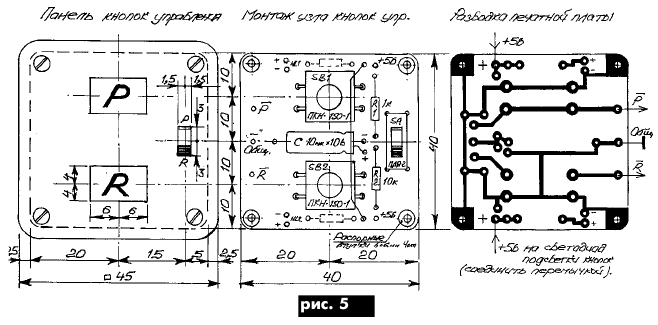
LED "1" forms a separate string. Each chain has its own current-limiting resistors R5-R12. Chains and sets of chains are turned on through their drivers on transistors VT1-VT4. The difference of this circuit from the circuit of Fig. 2 in [1] is in the absence of two diodes VD1 and VD2 and a larger number of LEDs (15 instead of 9). It can be seen that the load on the driver transistor increases in proportion to the weight of the control category, so the transistor VT4 in weight category 8 is desirable to use with a large collector current, for example, KT503, in other categories, KT315 is quite suitable (a printed circuit board is designed for them) or similar ones with a collector current of up to 100 ma. Let's consider two options for controlling the indicator. In the first variant (Fig. 3, a), step-by-step data increment is obtained by pressing the tact buttons U (up) or D (down). Presetting according to the selected switch code is carried out by pressing the SB1 button, and resetting by pressing the SB2 button. There is also an initial setting circuit after supply voltage is applied to the circuit. Moreover, the initial setting can be made either in the state of the counter "0", or in the state corresponding to the previously dialed switch-encoder (preset). The selection of the initial setting option is carried out by the SA switch (Fig. 3, a), which switches the initial setting circuit (C, R1, R2) either in parallel with the R button (initial reset) or in parallel with the P button (initial automatic presetting).
The initial setup unit with the SA switch is assembled on one universal printed circuit board with two P and R buttons.
In the second control variant (Fig. 3, b), a pulse generator is installed, the circuit of which is shown in [1] in Fig. 4, a. Holding down the U (SB3) button will automatically increment the code up to 9 (or 15). Holding the button D (SB4) leads to an automatic reduction of the code to zero. The P and R buttons for preset and reset are the same as the buttons for the first option. In fact, each of the proposed options consists of 4 universal node-boards. Figure 3c shows a meter circuit with additional logic circuits. For counting up to 9, a counter on the K555IE6 chip can be used, for counting up to 15 - on the K555IE7 chip (these counters are in the K155, K531, K1533 series, similar to imported counters 74192 and 74193). The outputs of the counter 1, 2, 4, 8 are connected to the inputs of the drivers Fig.2. The control inputs P, U, G, D, R are shown as outputs in the control diagrams above. Additional logic circuits are designed to limit the count from above (at level 15) or from below (at level 0). State 15, corresponding to code 1111, is detected by the DD2.2 element ("4I-NOT" element), at the output of which, in this case, a log. "0" appears, locking element DD2.1. The receipt of pulses at the input +1 of the counter will stop, and the counter will fix the state 15. In the case of counting up to 9, it is necessary that the DD2.2 element operates at state 9, corresponding to code 1001. Obviously, the 2nd and 3rd digits of the code must be inverted, to get the log "1". For this, there are two free elements DD3.3 and DD3.4. It is only necessary to open the jumpers on the right according to the scheme from these elements and close on the left. The state "0" is fixed by the appearance of a log. "0" at the output "≤0" (pin 13 of the chip). At the same time, a log. "8" appears at pin 3.2 of the DD1 element, which keeps the counter in the zero state at the reset input R. This element "2AND-NOT" (for log. "1") works like an element "2OR-NOT "for log."0" Fig. 4 shows the design development of the code switch panel: Fig. 4, a - front view, Fig. 4, b - view from the mounting side, Fig. 4, c - PCB layout. Fig. 5 shows the design development of the control buttons panel: Fig. 5, a - front view, Fig. 5, b - view from the mounting side, Fig. 5, c - PCB layout.
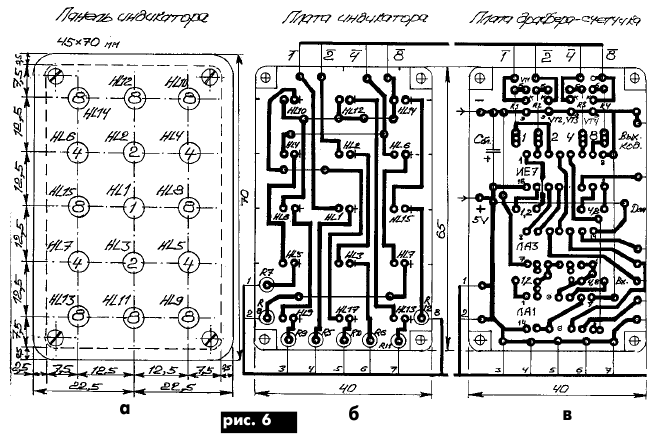
Fig. 6a shows the view of the indicator panel, Fig. 6b, c - respectively, the layout of the indicator board and the driver-counter board.
When testing the indicators, it was noticed that they behave like point light sources with a variable luminous flux. On ultra-bright LEDs, the panel assembled and lying on the table gives on the ceiling (approximately 2 m distance) a light spot of a round shape with a diameter of up to 1 m. References:
Author: Yu.P. Sarazha
Machine for thinning flowers in gardens
02.05.2024 Advanced Infrared Microscope
02.05.2024 Air trap for insects
01.05.2024
▪ The music department was found in the brain ▪ 12 new satellites discovered around Jupiter ▪ Longevity Elixir from Easter Island ▪ Gallium Arsenide Amplifiers MGA-61563 and MGA-62563
▪ site section Electrical work. Article selection ▪ article Plastic siphon instead of cast iron. Tips for the home master ▪ article Why is Friedrich Nietzsche attributed to anti-Semitic views? Detailed answer ▪ article Budra ivy. Legends, cultivation, methods of application ▪ article Toroidal welding transformer. Encyclopedia of radio electronics and electrical engineering
Home page | Library | Articles | Website map | Site Reviews
www.diagram.com.ua |


 Leave your comment on this article: