|
|


 Arabic
 Bengali
 Chinese
 English
 French
 German
 Hebrew
 Hindi
Hindi Italian
 Japanese
 Korean
 Malay
Malay Polish
 Portuguese
 Spanish
 Turkish
 Ukrainian
 Vietnamese
|
ENCYCLOPEDIA OF RADIO ELECTRONICS AND ELECTRICAL ENGINEERING Battery charger/discharge device. Encyclopedia of radio electronics and electrical engineering
Encyclopedia of radio electronics and electrical engineering / Chargers, batteries, galvanic cells Powering household radio equipment from batteries instead of galvanic cells should reduce the cost of its operation hundreds of times. However, this is often not achieved. Batteries quickly lose capacity, the number of charge-discharge cycles guaranteed by the manufacturer is not maintained. Let's try to figure it out. Consider sealed cadmium-nickel batteries with a capacity of 0,06 to 0,55 Ah or more. Usually, the voltage of one battery is not enough to power the radio equipment; you have to complete a battery of 2-10 batteries. That's where all the trouble comes from. Battery capacity is the main and almost the only parameter that determines its performance. All batteries that make up a battery must have the same capacity and the same state of charge. The second requirement is more or less met, but the first is often violated. The nominal capacity indicated on the battery case is for freshly manufactured batteries (and even then with a certain tolerance). With proper storage, this capacity is stored for a long time. Competently - this means storing them in certain climatic conditions and periodically recharging them. All this is very troublesome and almost never done. As a result, the batteries lose their capacity, and in reality it becomes less than the nominal one, though not by much. Much more destructive is the illiterate operation of batteries. The literature [1, 2] indicates the inadmissibility of deep discharge of batteries (to a voltage below 1 V), since in this case they irrevocably lose their capacity. In practice, the discharge voltage of batteries is never controlled (devices that control the discharge voltage, the author met only in amateur radio developments). The fact is that even control does not save the situation. To understand this, consider the process of reducing the "life" of the battery using an example. Suppose a battery is made up of seven batteries, among which one has a real capacity that is less than the others. When discharged, this battery will reach a voltage of 1 V before the rest. Even if the discharge voltage is controlled, this fact will not be noticed and the discharge will continue. A "weak" battery will be in a deep discharge and further reduce its capacity. With subsequent cycles, the depth of discharge increases more and more, eventually it will be discharged to zero. If the voltage of each of the other batteries is more than 1,16 V, then again this fact will not be noticed (1,16x6 = 7), and the discharge will continue. A "weak" battery will start charging in the opposite polarity to the rest of the batteries - a "weak" polarity reversal will occur. As the saying goes: "There's nowhere else to go!" The voltage on the battery will be equal to 7 V, and the discharge will stop, while the voltage of each of the six batteries is 1,16 V, i.e. they are a little more than half empty. The dependence of the battery voltage on the discharge time by the rated discharge current is shown in Fig. 1.
If the battery is a monoblock, for example 7D-0,125, then one might think that the battery has lost almost half of its nominal capacity and can be thrown away. But it has six quite serviceable batteries! And one "innocently ruined" by deep discharges, which could work and work if it were not allowed to be deeply discharged. And this is when the discharge voltage is controlled! And without control, the situation is even worse. Charge-discharge device The need to determine the actual battery capacity is undeniable. But it takes a lot of time and trouble. It is necessary to constantly monitor the processes of charge-discharge, time, etc. The charge-discharge device (CHD) eliminates all this hassle. In practice, the time spent on determining the actual capacity of the battery is reduced many times over. By turning on the charge (discharge) of the battery, the UZR can be left unattended, doing other things. Disconnection of the charge (discharge) will occur automatically when the battery reaches the specified final voltage. At the same time, the duration of the charge (discharge) is fixed. It remains only at a convenient time for you to record the results of measurements. Initially, the UZR was conceived as a pure charger. The discharge mode was introduced as an additional service function, since this was achieved by simply switching the blocks included in the RCD. But practice has shown that the main advantage of the LRM is the ability to determine the real capacity of the batteries, moreover, without a lot of time. In addition, with the help of SRM it is easy to identify such battery malfunctions as an increase in the resistance of connections, both inter-accumulator and intra-accumulator. In the latter case, such batteries have to be thrown away. UZR allows you to charge (discharge) a battery containing from one to ten batteries with a capacity of 0,06 to 1 Ah, as well as determine the actual capacity of the batteries with an accuracy of no worse than 5%. The UZR is powered by a 220 V network. The principle of operation of the SRM USR consists of separate blocks, all of them participate both in the charge (Fig. 2) and in the discharge (Fig. 3), only their mutual connection changes.
1. A chain of identical resistors R1R10, powered by a stabilized voltage. Each resistor drops a "quantum" of voltage, corresponding to one battery. Switch SA1 can set the number of "quanta", equal to the number of batteries in the charged (discharged) battery. 2. Scaling battery voltage divider Rmas, R15. When charging, the resistance of the resistor Rmas is such that the comparator is triggered at a voltage of slightly more than 1,35 V per battery. When discharging, the resistance Rmas is such that the comparator operates at a voltage of 1 V. 3. A comparator that compares the battery voltage with the reference coming from the SA1 switch. When they are equal, the comparator triggers and produces a signal, which, after amplification, enters the relay and turns off the charge (discharge) circuit. 4. Time counter, fixing the duration of the charge (discharge). 5. Current-stabilizing two-terminal network, which ensures the invariance of the charging (discharging) current. Of course, there is a power supply (it is not shown in the diagram). Schematic diagram of the SLM I’ll make a reservation right away that not all circuit solutions are optimal, since they were determined primarily by the presence of an element base. The circuit is assembled on separate printed circuit boards. In this case, this is justified: in the presence of a large number of elements placed outside the boards, a dozen extra board-to-board connections will not make a difference, especially since we are not talking about mass factory production. In addition, the placement of blocks on separate boards is organically combined with their necessary switching. Consider the circuit diagram for each board separately. Comparator board An operational amplifier 140UD8A was used as a comparator (Fig. 4). Resistors R13, R14, together with diodes VD2, VD3, protect the inputs of the comparator from surges, and together with capacitor C1, from impulse noise. The comparator is very sensitive to interference, which penetrates mainly from the network, it is especially sensitive at the end of the charge (discharge), when for a long time the voltage difference at its inputs is very small and amounts to tens and even units of millivolts.
Resistors R16, R17 form Rmas in the discharge mode (board pins 7, 10 are shorted). The use of two resistors allows you to select the resistance of the resistor Rmas with an accuracy of 1%, using resistors with a 10% tolerance. Resistors R29, R11 complement Rmas to the desired value when charging. Resistor R11 trimmer, output "under the slot" on the front panel. The fact is that the real capacities of the batteries of the battery are always somewhat different from each other, and the voltage of 1,35 V (the highest voltage that is possible on a charged battery) is formed on them at different times. Fully charged batteries cease to perceive the charge, and polarization of the terminals begins in them, as a result, the voltage on the battery rises by several hundredths of a volt. The polarization of the terminals does not harm the battery [2], but it allows you to equalize the degree of charge of batteries that differ slightly in real capacity. The polarization voltage is not standardized, so the voltage at which the charge circuit should be turned off must be determined empirically within the range of 1,36-1,4 V per one battery. Resistor R29 allows you to stretch these limits over the entire range of resistance R11. Note. The process of depolarization of the terminals lasts 3-4 hours. After this period (from the moment the charge is completed), the voltage on each battery turns out to be 1,35 V. Such batteries can be used as exemplary cells with which voltmeters are calibrated all over the world. You, too, can test your tester to know how "lying" it is. Just do not delay this procedure, do it within 3-4 hours after the end of the depolarization process. The positive potential at the output of the comparator in its initial position, when the comparator is triggered, drops to -7 V. Since the subsequent stages operate within 0-18 V, the comparator output signal at ground level is limited by the R19, VD7 circuit. In addition, resistor R19 protects the comparator output from overload. However, this chain can be omitted by slightly increasing the resistance of resistors R18, R25. But what's done is done, I didn't want to redo it. Transistor VT1 amplifies the power signal to ignite the HL1 LED, which is connected to pin 8 of the board (not shown in Fig. 4). It indicates the state of the comparator. Transistor VT2 is a DC amplifier that amplifies the power signal to operate the relay. Relay type RPS-20, two-winding, polarized, has two stable states. When turned on, the relay is set to a position in which contacts 1, 4 connect the charge (discharge) circuit to the battery. When the comparator is triggered, the current of the transistor VT2 flowing through the I winding of the relay puts it into another stable state, and the charge (discharge) circuit is turned off. Winding I of the relay is connected to the transistor through relay contacts 5, 9, i.e. she immediately de-energizes. This allows the use of a relay with an operating voltage that is much lower than the transistor can deliver (up to 16 V). The multiple current overload of the winding that occurs in this case turns out to be short-term, i.e. admissible. The fact is that remote small-sized switches (as such relays are called) are not very common, scarce, and it is not always possible to get a relay for the desired operating voltage. True, the manufacturer prohibits turning on the relay windings through opening contacts: this can cause the relay armature to "hang" in an intermediate position. Capacitor C4 allows you to bypass this prohibition, the charge current of which, after breaking contacts 5, 9, flows through the winding, completing the transfer of the armature. Diode VD9 significantly reduces the negative voltage surge at the collector of the transistor, protecting it from breakdown. The use of a rare relay is explained as follows. When the charge circuit is disconnected, the battery voltage decreases, and when the discharge circuit is disconnected, it rises. In both cases, the comparator returns to its original state. When using a conventional relay, a self-oscillating process occurs. Disconnecting the battery, and not the charge (discharge) circuit, does not save the situation and adds new difficulties to the start-up process. It would be possible to solve the problem by introducing a hysteresis into the comparator circuit according to the operation levels. To do this, it is enough to turn on the resistor between the output of the comparator (pin 7 of the microcircuit) and pin 6 of the board (the resistance of this resistor should exceed the resistance of the resistor R15 by 8-10 times). But the comparator works with a wide range of input voltages (1...9 V). The feedback circuit would also have to be switched, including its own resistor for each switch position SA1. This complicates the circuit. However, the RPS-20 relay can be replaced with two conventional ones, which will be discussed below. From the zener diode VD8, the time counting prohibition signal is removed when the charge (discharge) circuit is turned off. While it is connected, and the VT2 transistor is closed, the voltage on its collector is close to zero, since it is grounded through the low-resistance relay winding. When the transistor opens and the relay winding is turned off, the transistor current flows through the zener diode, and a positive inhibit signal is sent to the time counter. Resistor R26 guarantees the issuance of this signal when the relay winding is turned off and the transistor is locked. In the absence of a resistor, the collector potential would be determined by the leakage currents of a closed transistor, a zener diode, a printed circuit board and would not be predictable. Transistors VT3-VT6 with accompanying elements form a negative voltage source of -8 V to power the microcircuit. Stabilization of this voltage is carried out by the chain R28, VD4. Time counter (Fig. 5) is assembled on two boards. On one board, the meter itself is assembled according to a typical scheme for household clocks with slight differences: the daily cycle (24 hours) is not allocated, there is no need for this; in the master oscillator of the counter (microcircuit 176IE12) there are no elements for adjusting the frequency of the quartz oscillator, since the required counting accuracy (0,1%, i.e. 10-3) is much lower than the frequency deviation of the quartz oscillator (10-4).
Second pulses (pin 4 of the 176IE12 microcircuit) are used to highlight the comma between the digits of hours and minutes, this allows you to indicate the counting process. LED digital indicators must be visible, so they are mounted on a separate board (Fig. 6).
Resistors R33-R61 (1,6 kOhm) limit the currents through the indicator LEDs. The choice of the values of these resistors is a compromise between two conflicting requirements: to take as little current as possible from the microcircuits (no more than 5 mA per output) and to ensure sufficient brightness of the indicators. Stable Current Generator (GST) (Fig. 7). The requirements for the GTS are very strict. It must operate in the voltage range from 1 to 18 V and stabilize currents up to 100 mA. Therefore, the simplest circuit with a minimum number of p-n junctions [3, Fig. 46] was chosen, moreover, a germanium transistor was used, and instead of a resistor in the diode circuit, its own "local" HTS on a field-effect transistor [3, Fig. 49]. The power dissipated in the VT8 transistor is quite small, and its heating without a heat sink does not exceed the permissible value. But at high stabilization currents during the first 10-20 minutes of operation, the current increases by 20-30%.
Later, after setting the heat balance, the current does not change. With the installation of a transistor on a radiator with a total area of about 150 cm2, the thermal balance occurs with less heating, and the current increase does not exceed 10%. The reason for the noted shortcoming is that this GTS is purely parametric, and the parameters of the GTS are determined mainly by the parameters of the transistor. And these parameters, as you know, are very temperature dependent. The best results could be expected from a HTS containing a voltage amplifying stage with deep negative feedback, for example [3, Fig. 51]. As you know, in such circuits, the influence of the parameters of individual elements on the parameters of the entire device decreases by about K times, where K is the gain of the amplifier stage. I tested such a circuit, it showed excellent results, but I could not get it to work in the required voltage range. The charge (discharge) current can be set with a resistor R 63 and controlled by a milliammeter (Fig. 7). I don’t give a drawing of the printed circuit board of the GTS, as well as the power supply described below, since the configuration of the board depends on the size and shape of the heatsink used, moreover, the circuit diagram is quite simple. Power supply unit (Fig. 8) generates two stabilized voltages.
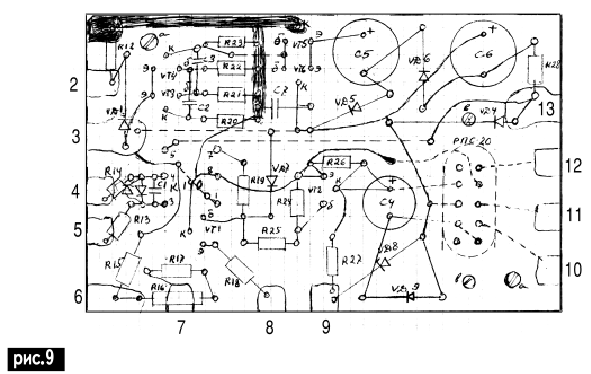
The "+18 V" circuit (power supply for the comparator and charge circuit) is stabilized by a simple transistor filter based on the VT9 transistor; the "+9 V" circuit (power supply for the time counter) is stabilized by a circuit based on VT11 transistors. The reference voltage in this stabilizer is the base-emitter voltage of the VT11 transistor, which changes very little over the entire stabilization range. Chains R64, C9 and R66, C12 significantly reduce the output voltage ripple at high load currents. Transistors VT9 and VT10 are equipped with radiators with a total area of about 40 cm2 each. The printed circuit board is shown in Fig. 9 (aa - holes for mounting the board; bb - for mounting the relay).
Construction and details The time counter board (see RE 4/2000) and the placement of elements are shown in Fig. 10.
The UZR is mounted on two panels of plywood 8 mm thick, fastened with screws (Fig. 11) and constituting the front panel and the base of the case.
The distribution of parts is shown in Fig. 12: the comparator and power supply boards are located on the bottom panel, everything else is on the front. Due to the high density of installation, it is performed on temporarily disconnected panels. Mounting of each panel is reduced to 16-pin combs connected by a one-to-one wiring harness. Finally, the panels are fastened after installation and debugging. The remaining walls of the case are also plywood, the side walls are 8 mm thick, the top and rear are 4 mm thick.
The placement of parts on the front panel is shown in Fig.13.
The outer dimensions of the case are 290x115x130 mm. Purpose of the switches: SA1 - selection of the number of batteries in the battery; SA2.1 - switching the GTS input; SA2.2 - HTS output switching; SA2.3 - shorting R29, R11 during discharge; SA2.4 - switching the inverse input of the comparator; SA2.5 - switching direct input of the comparator. Switch SA1 - biscuit, type 11P1H. Resistors R1-R10 are soldered directly at the switch terminals. Two 2P2N biscuits are involved in the SA4 switch. I paralleled the three "extra" directions with the directions SA2.1, SA2.2, SA2.3. I assumed it couldn't get any worse. Switches, of course, can be of any design. As a comparator, I used a 140UD8A operational amplifier in a round case. It can be replaced with almost any operational amplifier, taking into account the pinout. It is only important that its input current be three orders of magnitude (1000 times) less than the current flowing through the chain of resistors R1-R10. Transistor VT2 does not need a radiator, it can be replaced according to the diagram in Fig. 14.
Both transistors must be p-n-p conductivity, transistor VT2.1 of any power, VT2.2 - high power. Transistors VT1, VT3-VT6 any appropriate conductivity. Transistor VT7 type KP303A with any letter index can be replaced by KP302 also with any letter index, it is only important to remember that the higher the current cutoff voltage of the transistor, the better the stabilizing properties of this "local" HTS. Transistors VT9-VT11 can be replaced with KT817, and the transistor VT8 type GT701A can be replaced with any germanium, high power, p-n-p conductivity (P213, GT905, etc.). Diodes VD11-VD14 of type KD105 with any letter index can be replaced with any with a current of 1 A, diode VD10 of type KD223 - with D104, in extreme cases - with any silicon. All other diodes are any silicon. Zener diodes can also be any for the appropriate stabilization voltage. LED HL any. LED digital indicators of the ALS324A type can be replaced with ALS321A, ALS337A, ALS338A, ALS342A, as well as ALS334 or ALS335 with letter indices A or B. All of them are with a common cathode and have the same pinout. They can be replaced with the same indicators with a common anode, they have indexes B or G. It should be noted that they have a different pinout; apply a voltage of +9 V to the common output of the indicators; change the polarity of the output signals of the microcircuits to the opposite, i.e., apply a voltage of +6 V to the conclusions of 176 microcircuits 176IEZ and 4IE9. The RPS-20 relay (passport RS4.521.752) with an operating voltage of 10 V can be replaced with the same relays with the last digits of the passport -753, -757, -760, -762, as well as with the RPS-23 relay with the passport PC4.520.021 ( he has the same pin). Relay type RPS can be replaced by two conventional ones, according to the diagram in Fig. 15.
When the "Start" button is pressed, relay K2 is self-locking by contacts K2.1, the same contacts prepare the circuit for turning on relay K1, and contacts K2.2 turn on the charge (discharge) circuit. When the transistor VT2 is opened, relay K1 is activated and contacts K1.1 unlocks relay K2. Resistor R plays an important role. Relay K2 is energized for a long time and thanks to the resistor, the current through it is significantly reduced, because the holding current is 4-6 times less than the operation current. In addition, with open contacts K2.1 and a closed transistor VT2, a current flows through the relay windings in the circuit: +18 V, series-connected relay windings (with winding K1 shunted by an open diode VD9), resistor R27, zener diode VD8. Relay K2 may work. By the way, in this circuit there is no need for a resistor R26 (see Fig. 4). Capacitors of any type, C1-C3, C8-C12 - ceramic, the rest are electrolytic. All resistors are 10% and 20% tolerance except R1-R10 which must be 1% tolerance. If there are none, it doesn’t matter, you can pick up resistors with a large tolerance using a conventional tester. Although the accuracy of the latter rarely exceeds 5%, the similarity of resistors can be determined with much greater accuracy. The resistance of these resistors is from 510 Ohm to 30 kOhm. Let me remind you that when choosing a rating, you need to take into account that the current flowing through the resistors must be at least 1000 times higher than the input current of the operational amplifier (comparator). A special conversation about the resistor R63, which regulates the GTS current. Such low-resistance variable resistors (70 ohms) are usually wire-wound, their resistance changes in jumps when the engine moves from turn to turn. At high stabilization currents, the resistance of this resistor is 5-7 ohms, as a result, percentage jumps become prohibitive, and it is difficult to set the current with the required accuracy. An external sign of a satisfactory resistor is the diameter of its case, it should not be less than 4 mm. Good results are obtained by connecting in series with resistor R63 a variable resistor with a resistance of 3-5 ohms. Such resistors regulated the filament current of radio tubes 60 years ago, they were called filament rheostats. The milliammeter was used from the cheapest, the M4-2 device, the total deflection current of the arrow is 22,5 mA, the frame resistance is 3,3 ohms. The universal shunt provides two measurement limits: 030 and 0-300 mA. Let me remind you the advantage of a universal shunt: the contact resistance of the contacts of the measurement limits switch is not part of the shunt, it is connected in series with the resistance of the device frame. This significantly reduces the measurement error with an increase in the contact resistance of the switch contacts due to their oxidation. When determining the parameters of an existing device, it is useful to remember that, according to GOST, the voltage falling on the resistance of the device frame with a full deflection of the arrow is 75 mV. The shunt resistors are soldered directly on the terminals of the device (through the petals). As a power transformer, an output frame scan from a tube TV "Record 6" was used. As a power one, it is rather weak, when a current of 0,4 A is taken from the secondary winding, the voltage across it drops to 14 V. But nevertheless, it performs its functions. Desirable, of course, more powerful. If you have the opportunity to make a transformer yourself, then its optimal parameter is the ability to deliver a current of 0,3-0,4 A at a voltage of 30-33 V. In this case, it is advisable to assemble the power supply according to the scheme in Fig. 16. This eliminates the need for a local -8 V supply on the comparator board. When winding the transformer, wind between the mains and secondary windings and shielding. Additional protection from a coffee grinder turned on in the kitchen or from electric welding in the stairwell will not hurt.
Debugging URM It is advisable to debug on separate boards, before mounting the circuit in the case. Moreover, until the debugging is completed, you should not start manufacturing the case at all. It is desirable to power the boards during debugging - from the "native" power supply, so debugging should be started from it. Debugging is about finding and fixing bugs. If there are none, the board immediately starts working. The actual debugging consists in setting the levels of the comparator operation voltages, selecting the shunt of the milliammeter, setting the limits for adjusting the GTS current. To debug the comparator board, you should:
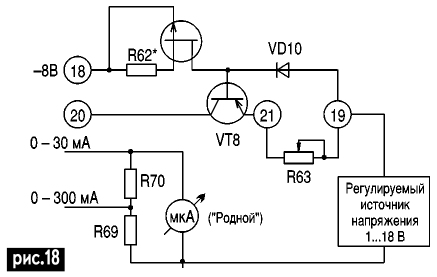
Focusing on the extinction of the LED, check the voltage of the comparator in the discharge mode. If it differs from 1 V per battery, select resistor R17, and if necessary, resistor R16. You can check at any position of the SA1 switch, but more accurately it will turn out at the position corresponding to 7-10 batteries. After setting the lower level of operation of the comparator, you need to check the limits for adjusting the upper level (operation in charge mode). To do this, cut the board pins 7, 10 and temporarily connect resistors R29, R11. In the extreme positions of the engine of the resistor R11, the response voltage should be approximately 1,3 and 1,5 V. If necessary, select the resistor R9. The time meter boards must be immediately connected with a wiring harness, determining its approximate length. The time counter should start working immediately. To make sure that the digital indicators are wired correctly, you should let the meter run until it overflows, observing the images of the numbers. To speed up this process, you should temporarily apply second pulses to the counter input, the process will be reduced to 1 h 40 m. Before debugging the HTS, you should select a universal milliammeter shunt in order to further debug the HTS in tandem with it. Resistors R69, R70, constituting the shunt, are selected by the method of successive approximations. In the GCT, you must first set the diode current VD10. To do this, turn on the GTS according to the diagram in Fig. 17, use a tester as a milliammeter.
By selecting resistor R62, set the diode current to 1,5-2 mA (for diodes D223, D104) or 3,5-4 mA (for all other types). If the resistor is less than 100 ohms, then replace the field effect transistor with the same one with a larger current cutoff. Turn on the GTS according to the scheme in Fig.18. Make sure that resistor R63 can set the transistor current from 4-5 to 100 mA.
The last stage of debugging is setting the upper level of the comparator operation. It is carried out after the complete installation of the RCD and its placement in the housing. A battery (710 batteries) is connected to the RCD and charged for 13-15 hours. In this case, the resistor R11 should have a maximum resistance. At the end of this period, the resistance of the resistor R11 begins to decrease with the minimum possible jumps with a period of 23 s until the charge circuit is turned off. On this debugging can be considered complete. The device has the following disadvantages. 1. Increasing the GTS current during the first 10-20 minutes of operation due to the heating of the VT8 transistor. This is a small problem. The concept of "battery capacity" is not clear enough. The value of this capacitance significantly depends on the charge (discharge) mode [1, 2]. The normalization of the charge (discharge) current (0,1 of the nominal capacity, expressed in Ah) is designed to make it possible to compare batteries, the parameters of which were measured in different places, by different people. Our goal is to identify batteries with the same capacity, and in what ratio it is with the nominal, as they say, "the tenth thing." It is important to ensure the same charge (discharge) conditions, albeit somewhat different from the generally accepted ones. You can, for example, follow these rules:
Well, if you need to objectively determine the real capacity of the battery, then do not regret 10-20 minutes of time at the beginning of the charge (discharge) to adjust the GTS current. 2. The end of the discharge is determined by the voltage of the entire battery. If the battery contains batteries that supposedly have a small real capacity, then their deep discharge is possible. Therefore, in such cases, you should be "on the alert" and periodically monitor the voltage of each battery. This shortcoming can be eliminated by installing a comparator for each battery in the RCD, connecting them so that the end of the discharge is determined by the "weakest" battery. But the SRM scheme becomes more complicated in this case. The production of such an SRM is justified only if it is used by professionals. 3. The method for determining the end of the charge (discharge) by the final voltage is sensitive to the resistance of the inter-accumulator connections. Therefore, it is necessary to pay attention to the condition of the contacts between the batteries. However, there is also a “reverse side of the coin”: with the help of the UZR, it is easy to identify battery malfunctions in the form of increased resistances of inter-accumulator connections. This is especially important for monobloc batteries where access to these connections is not possible. References:
Author: E.S. Kolesnik
Machine for thinning flowers in gardens
02.05.2024 Advanced Infrared Microscope
02.05.2024 Air trap for insects
01.05.2024
▪ Traco Power TMG - compact AC-DC modules per board ▪ High-voltage ultra-bright LED drivers from IR ▪ Preservation of the properties of transparent electrodes when heated ▪ The largest iceberg began to drift
▪ section of the Garland website. Article selection ▪ article Bunin Ivan Alekseevich. Famous aphorisms ▪ article Shcheritsa. Legends, cultivation, methods of application ▪ article Removing the most common stains from clothes. Simple recipes and tips
Home page | Library | Articles | Website map | Site Reviews
www.diagram.com.ua |


 Leave your comment on this article: