|
|


 Arabic
 Bengali
 Chinese
 English
 French
 German
 Hebrew
 Hindi
Hindi Italian
 Japanese
 Korean
 Malay
Malay Polish
 Portuguese
 Spanish
 Turkish
 Ukrainian
 Vietnamese
|
ENCYCLOPEDIA OF RADIO ELECTRONICS AND ELECTRICAL ENGINEERING Switching power supply for a soldering iron with a thermostat. Encyclopedia of radio electronics and electrical engineering
Encyclopedia of radio electronics and electrical engineering / Ham Radio Technologies Soldering with an electric soldering iron has been and remains, perhaps, the most common operation in the work of a radio amateur. The temperature of the tip, its adjustment and stability, the heating rate of the soldering iron are the main parameters that determine the quality of soldering and ease of use. In amateur radio literature [1,2], the designs of soldering irons and power supplies for them have already been described, in which the temperature sensor of the tip is a thermocouple. All of them deserve attention, have their advantages and disadvantages. The electric soldering iron described in [1], although connected to the power supply by a two-wire cable, cannot provide maximum temperature stability, since the thermocouple does not have direct contact with the soldering iron tip. The power supply as a whole turns out to be rather complicated: only 5 integrated circuits are used in the electronic regulator, in addition, 3 supply voltages must be provided, two of which must have at least the simplest stabilizers. A more successful construction was proposed in [2]. Thanks to the non-traditional inclusion of an operational amplifier (no feedback, ripple voltage supply), the author managed to minimize the number of parts in the power supply. The design of the soldering iron turned out to be simple, but reliable. All this is important for a beginner radio amateur. Someone who has some experience in designing switching power supplies can make an electronic unit with pulse-width (PW) soldering iron power control. Due to the absence of a low-frequency transformer, the power supply has a smaller weight and dimensions. In addition, unlike the previously described designs that operate on the principle of "periodic heating - cooling", here a smooth change in power is used with the help of SHI control, due to which there are no periodic temperature fluctuations. The soldering iron power supply circuit is shown in Fig. 1. For convenience, two functional units can be distinguished in it: analog and digital.
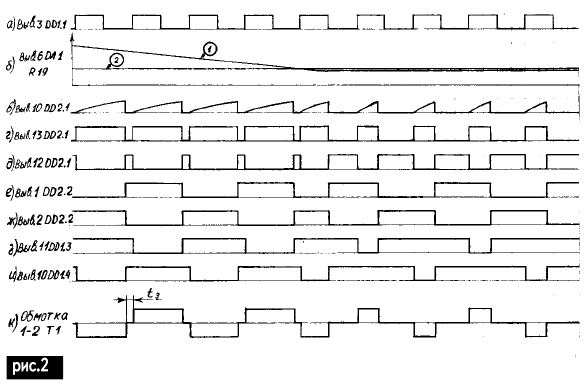
The basis of the analog part is a differential amplifier, assembled on the operational amplifier DA1. The thermocouple leads of the soldering iron are connected in the indicated polarity to contacts 1-2 of connector X1 through resistors R5, R6 to the inputs of the op-amp. The divider R2, R3 creates an artificial case - an analog common wire. If the pairs of resistors R4, R9 and R5, R6 are equal, the gain is determined by the ratio R4/R5 or R9/R6. The signal from the DA1 output through the low-pass filter R14 C10 R15 is fed to the emitter of the transistor VT3, a reference voltage is applied to its base, taken from the engine of the resistor R19. With the values of resistors R18-R20 indicated in the diagram, the reference voltage can be changed from 3,8 to 11,2 V (relative to pin 4 of DA1). Approximately within the same limits, the amplified thermocouple signal at pin 6 of DA1 should change when the temperature of the soldering iron changes in the range of specified temperatures. For this purpose, op amp balancing is used using pins 1 or 5 (in this case, pin 1). For the stability of the amplifier and the elimination of interference from the side of the voltage converter, capacitors C2-C5, C8, C9 are used. They narrow the amplified bandwidth "from above", improve common-mode attenuation, but do not affect the gain, since the circuit is a DC amplifier (strictly speaking, a slowly varying current amplifier). The operation of the digital node - the scheme for generating the SHI signal - will be considered using the simplified oscillograms shown in Fig. 2.
The generator of rectangular pulses (Fig. 2, a) is assembled on logical elements DD1.1, DD1.2. The pulse frequency is determined by the elements R1, C1 and is set to about 40 kHz during tuning. On the edge of each pulse arriving at the clock input of the trigger DD2.1, the latter switches to a single state (at pin 13 - high, at pin 12 - low). From this moment, the charge of the capacitor C7 begins through R12, R16, VT2. When the voltage at C7 reaches the trigger reset threshold at input R, DD2.1 switches to zero, and the high-level voltage at pin 12 opens transistor VT1, which quickly discharges capacitor C7. The R8C6 chain forces this process. The charging time of C7, and hence the width of the pulses generated by the trigger, is regulated by the transistor VT2. In Fig. 2b, curve 1 depicts the output voltage of the thermocouple amplifier (pin 6 DA1), straight line 2 corresponds to the voltage on the resistor R19 engine. In the initial period of time, when a cold soldering iron is connected to the network, its temperature rises continuously, and the voltage of the DA1 amplifier decreases. When this voltage becomes 1-1,2 V less than the reference voltage set on the engine resistor R19, the transistor VT3 opens. The collector current VT3 is the base current of the transistor VT2, which, opening during a high voltage level at pin 13 DD2.1, increases the charging rate of capacitor C7 to the threshold voltage (Fig. 2, c). In this case, the pulses generated by the trigger DD2.1 become shorter (Fig. 2d). These pulses from the output 13 DD2.1 are fed to the inputs of the elements 2I-NOT DD1.3 and DD1.4. Pulses from the output 12 DD2.1 are fed to the divider DD2.2. Divided by 2 anti-phase signals are fed to other inputs of the elements DD1.3, DD1.4. The operation of the circuit is illustrated by the corresponding waveforms in Fig. 2, taken relative to the output of 7 digital ICs DD1, DD2, except for the last waveform. Figure 2, k shows the shape of the voltage applied to the winding 1-2 of the transformer T1. Pulses of alternating polarity with pauses between them are applied through T1 to the bases of the key transistors VT4 and VT5 of the half-bridge converter and open them one by one. As can be seen from Fig. 2, when the soldering iron is heated, the pauses between pulses are minimal (they are needed to eliminate the through current VT4, VT5), and the power released by the heating element is the largest. As soon as the tip of the soldering iron has heated up to the set temperature, the pauses increase, the pulses are shortened by the same amount, as a result of which the power decreases and the temperature stabilizes. The whole circuit is powered by a rectified voltage of 220 V passing through the filter L1 L2 C17 C18. The heating element of the soldering iron is connected to the winding 3-4 of the T2 transformer. A separate winding 1-2 is also used for galvanic isolation of the thermocouple. The voltage of this winding is rectified by the bridge VD4, charges the capacitor C13 to a voltage close to the amplitude of the pulses and little dependent on their width. Power is supplied to the microcircuits from C13 through the parametric stabilizer R21 VD3. To start the converter, briefly press the SA1 button. In this case, the voltage of 300 V from the capacitor C16 through the current-limiting resistors R22, R26 is connected to the zener diode VD3, supplying the initial supply voltage to the microcircuits. The converter, having started, provides power to the circuit from the winding 12 T2 after releasing the SA1 button. Although R23, R26 provide electrical safety, you should avoid touching the tip of the soldering iron and pressing the start button at the same time. After releasing the last soldering iron has a complete galvanic isolation from the network. The HL12 LED is connected to the winding 2 of the transformer T22 through R1, it not only signals the inclusion of the soldering iron, but also serves as a kind of indicator of the thermal stabilizer operation mode: when the soldering iron is turned on, the LED lights up with the highest brightness (maximum power), when the tip is heated to the stabilization temperature, the brightness of the glow is slightly decreases, signaling the readiness of the soldering iron for work. The device can use MLT resistors indicated on the power diagram. R19 - any small-sized variable. It should be noted that the dependence of temperature on the angle of rotation of the knob R19 will be the same as the resistance, therefore, if a linear temperature scale is desired, a group A resistor is used. Capacitors C14, C15, C17, C18 type K73-17; C12, C13, C16 - K50-27, K50-29, K50-35. The rest are ceramic. Transistors VT4, VT5 can be replaced with KT858A, KT859A, KT872A and other high-voltage, K561LA7, K561TM2 microcircuits - with the corresponding ones from the 564, 164 series. SA1 switch - any small-sized without fixation. Coils L1, L2 are wound on a K16x10x4,5 toroidal magnetic circuit made of M2000HM1 ferrite and contain 20 turns of PELSHO-0,25 wire folded in half. For transformer T1, the same core is used as in L1, L2. Winding 1-2 contains 150 turns of PELSHO-0,15 wire, windings 3-4, 5-6 - 14 turns of PELSHO-0,25 each. The T2 transformer is wound on a K28x16x9 ring made of M2000HM1 ferrite. First, the winding is wound 5-6 - 230 turns of PELSHO0,25 wire. Winding 1-2 contains 53 turns of PELSHO-0,15. The winding 3-4 is wound last with a PEV-2 1,0 wire. For a soldering iron with a heating element resistance of 15 ohms, winding 3-4 contains 42 turns, and the maximum power is about 40 watts. So that soldering irons with a different heater resistance can be powered from the manufactured block, the winding 3-4 is made with taps. The design of the power supply is arbitrary. It all depends on the taste and abilities of the radio amateur. I managed to place the device in a case measuring 85x80x20 mm, glued from polystyrene and closed with a metal lid. The installation turned out to be very dense - printed-hinged. The electronic unit was pre-assembled, adjusted and tested on a breadboard. The soldering iron can be made using the technology described in [2]. True, in my opinion, the choice of a light bulb current supply stand for making a thermocouple is not entirely successful: the wire there is too thick and its length is insufficient. For this purpose, it is more convenient to use a wire with a diameter of 0,2-0,3 mm. To establish the device, an external DC source of 30-35 V is connected to the capacitor C13 ("plus" of the source - to the "plus" of C13), the thermocouple of the soldering iron - to sockets 1-2 (in the indicated polarity) of the X1 connector. To adjust the temperature of the soldering iron, its heating element is energized from the LATR. First, the op-amp is balanced with resistor R11 and, if necessary, the gain is adjusted by selecting resistors R5 and R6, keeping them equal. When the mode is correctly set, the voltage at pin 6 relative to pin 4 of DA1 changes from 10-11 V (at the minimum temperature of the soldering tip) to 3-4 V (at the maximum). To determine the temperature, for example, the melting of polyethylene (lower limit) and lead (upper limit) can be used. Next, using an oscilloscope, they check the presence of the corresponding oscillograms at characteristic points (Fig. 2). Particular attention should be paid to the pulse width (Fig. 2, e), which corresponds to the guard interval t3 - the time interval when the transistors VT4 and VT5 are closed, t3 is set equal to 4-5 μs with a cold soldering iron by selecting R16. In conclusion, the external power source is disconnected from C13, the soldering iron heater is connected to slots 3-4 of the X1 connector and, having turned on the power supply, start it by pressing the SA1 button, while the HL1 LED should light up. Winding tap 3-4 T2 is selected so that the soldering iron heats up to operating temperature in 30-50 s, and the power supply is in temperature stabilization mode in any position of the R19 regulator knob. You can verify this in this way. In the steady state, turn the temperature control knob a small angle in one direction and then in the other direction, while the brightness of the LED in one case should noticeably decrease, in the other increase. Having placed the device in the housing, calibrate the scale of the temperature controller. References:
Author: I.N.Tanasiychuk
Artificial leather for touch emulation
15.04.2024 Petgugu Global cat litter
15.04.2024 The attractiveness of caring men
14.04.2024
▪ Military drone Loyal Wingman with artificial intelligence ▪ Women are more sensitive to stress than men ▪ A revolutionary discovery for the production of beer ▪ Satellites for registering gravitational waves
▪ site section Indicators, sensors, detectors. Article selection ▪ article Safety and sexual culture. Basics of safe life ▪ article How not to thank the Danes? Detailed answer ▪ article Weather Records. Heat. Tourist tips
Home page | Library | Articles | Website map | Site Reviews
www.diagram.com.ua |


 Leave your comment on this article: