|
|


 Arabic
 Bengali
 Chinese
 English
 French
 German
 Hebrew
 Hindi
Hindi Italian
 Japanese
 Korean
 Malay
Malay Polish
 Portuguese
 Spanish
 Turkish
 Ukrainian
 Vietnamese
|
ENCYCLOPEDIA OF RADIO ELECTRONICS AND ELECTRICAL ENGINEERING Advanced pulse metal detector on microcircuits. Encyclopedia of radio electronics and electrical engineering
Encyclopedia of radio electronics and electrical engineering / metal detectors Like other types of metal detectors, PI (Pulse Induction) type metal detectors are constantly being improved. As a result of the use of new circuit solutions, it is possible to achieve even higher sensitivity of these devices. According to the author, the design of the proposed device is quite complicated for repetition by novice radio amateurs. In addition, certain difficulties may arise when adjusting this device. It is necessary to pay special attention to the fact that errors during installation and incorrect setting of the device can lead to the failure of expensive elements. Schematic diagram The schematic diagram of the proposed improved pulse metal detector can be divided into two parts, namely: the transmitter unit and the receiver unit. Unfortunately, the limited volume of this book does not allow us to dwell in detail on all the features of the circuit solutions used to create this device. Therefore, the basics of functioning of only the most important nodes and cascades will be considered below. As already mentioned, this metal detector is an improved version of the device discussed in the previous section of this chapter. Certain changes have affected the pulse shaping and synchronization module, the transmitter and the voltage converter. The receiver block scheme has undergone more significant changes (Fig. 3.18). The transmitter unit includes a pulse shaping and synchronization module, the transmitter itself, and a voltage converter.
The main component of the entire design is the pulse shaping and synchronization module, made on the AT1C89 microprocessor IC2051 of the ATMEL company and providing the formation of pulses for the transmitter, as well as signals that control the operation of all other units. The operating frequency of the microcontroller IC1 is stabilized by a quartz resonator (6 MHz). At the specified value of the operating frequency, the microprocessor generates a periodic sequence of control pulses for various stages of the metal detector. Initially, a control pulse for transistor T1 is generated at the output of IC14 / 6 of the microprocessor, after which a similar pulse is generated at the output of IC1 / 15 for transistor T7. This process is then repeated one more time. As a result, the voltage converter starts up. Further, sequentially on the conclusions of IC1/8, IC1/7, IC1/6, IC1/17, IC1/16 and IC1/18 the transmitter start pulses are formed. In this case, these pulses have the same duration, but each subsequent pulse is delayed relative to the previous one by several cycles. The beginning of the first pulse generated at pin IC1/8 coincides with the middle of the second pulse at pin IC1/15. Using switch P1, you can select the delay time of the transmitter start pulse in relation to the start pulse. A few cycles after the end of the pulse at pin IC1/18, a short strobe pulse for the analyzer amplifier is generated at pin IC1/2. In contrast to the previously considered circuit, in this device, a second strobe pulse is formed at the same output of the microcontroller after several cycles. In addition, the microprocessor outputs IC1/12 and IC1/13 generate control signals for transistors T31 and T32 of the receiver unit. The middle of the control pulse for transistor T31 coincides with the middle of the first gate pulse at pin IC1/2, but the pulse width at pin IC1/12 is almost twice as long. In this case, the indicated pulse has a negative polarity. The beginning of the control pulse signal at pin IC1/13 almost coincides with the middle of the second pulse at pin IC1/14 of the microcontroller, but it ends a few cycles after the end of the second strobe pulse generated at pin IC1/2. Then, at the output of IC1 / 11, a control signal is generated for the transistor T35 of the acoustic signaling circuit of the receiver unit. After a short pause, the sequence of control pulses at the corresponding outputs of the microcontroller is formed again. The +5 V supply voltage, previously stabilized by IC2, is applied to the IC1/20 pin of the microcontroller. The voltage converter, made on transistors T6-T8 and stabilizer IC3, provides the formation of a supply voltage of +5 V, which is necessary to power the cascades of the receiving part. The control signals for transistors T7 and T8 are generated at the corresponding pins of the microcontroller IC1, while this signal is fed to transistor T8 through a level converter assembled on transistor T6. Further, the generated supply voltage is stabilized by the IC3 microcircuit, from the output of which the +5 V voltage is supplied to the receiver stages. The output stages of the transmitter are made on powerful transistors T1, T2 and T3, operating on a common load, which is the coil L1, shunted by a chain of resistors R1-R6. The operation of the transistors of the output stage is controlled by the transistor T4. The control signal to the base of the transistor T4 is supplied from the corresponding output of the processor IC1 through the transistor T5. As in the metal detector considered in the previous section, the pulse generated by the microprocessor IC1 in accordance with the program stored in its memory is fed through the switch to the input of the transistor T5 and further, through the transistor T4, to the output stages of the transmitter, made on transistors T1-T3, and then - to the transceiver coil L1. When a metal object appears in the coverage area of the L1 coil, eddy surface currents are excited on its surface under the influence of an external electromagnetic field initiated by the transmitter pulse. The lifetime of these currents depends on the duration of the pulse emitted by the coil L1. Surface currents are the source of the secondary pulse signal, which is received by coil L1, amplified and fed to the analysis circuit. Due to the phenomenon of self-induction, the duration of the secondary signal will be greater than the duration of the pulse emitted by the transmitting coil. In this case, the shape of the secondary pulse signal depends on the properties of the material from which the detected metal object is made. The processing of information about the differences in the parameters of the pulses emitted and received by the coil L1 provides the formation of data for the indication unit about the presence of a metal object. The receiver unit (Fig. 3.19) includes a two-stage input signal amplifier, exemplary signal amplifiers, an analyzer amplifier, an active narrow-band filter, a low-frequency filter, a bias voltage generation circuit, switching circuits, and a sound indication circuit.
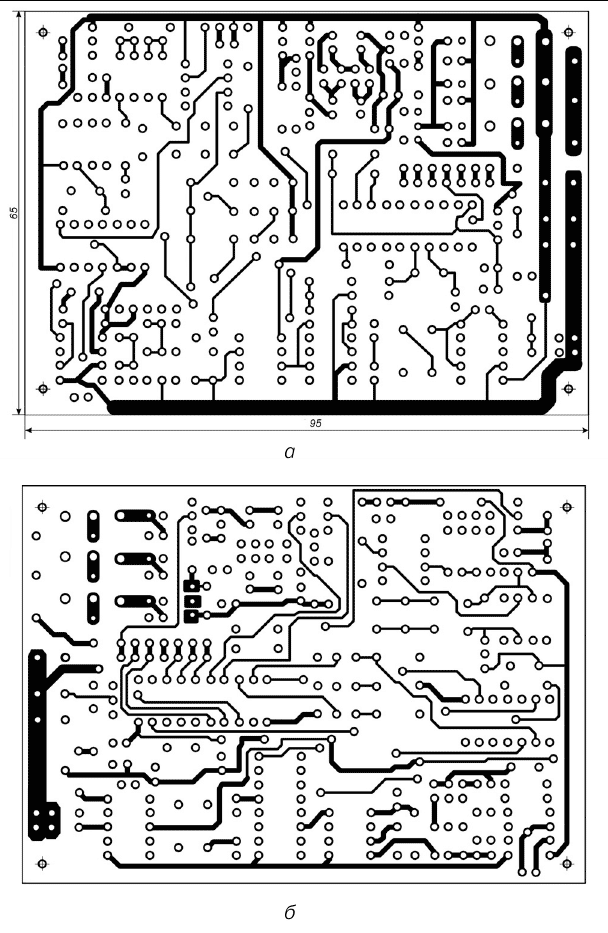
The signal from a metal object is received by coil L1 and through a protection circuit made on diodes D1 and D2 is fed to an input two-stage capacitive feedback amplifier made on operational amplifiers IC31 and IC32. From the output of the IC32 chip (pin IC32 / 6), the amplified pulse signal is fed to the analyzer amplifier based on the IC33 chip. During the operation of the device, the amplifier IC33 is constantly turned off, and the supply voltage is applied to it only when strobe pulses arrive at the corresponding input (output IC33 / 8). At the end of the supply voltage at the output of the amplifier (pin IC33 / 5), for several seconds, the level of the received signal is maintained, fixed during the exposure to strobe pulses. The signal level retention time depends on the capacitance of the capacitor C65. Thus, the received pulse signal is applied to one input of the amplifier (pin IC33 / 3), and the corresponding gate pulse from the pulse shaping and synchronization module (pin IC33 / 8) is supplied to the second input (pin IC64 / 1) through capacitors C2. Next, the selected signal passes through an active filter, made on the IC34a element and tuned to a frequency of 6 MHz. To achieve the parameters of individual elements of this filter indicated in the circuit diagram, it is recommended to use parallel connection of resistors and capacitors. So, for example, the value of the capacitance of the capacitor C67 (0,044 μF) indicated on the diagram is achieved by connecting two capacitors in parallel with a capacity of 0,022 μF each. It should be noted that when using a Q1 quartz element with an operating frequency other than 6 MHz, the values of the individual filter elements must be recalculated. From the filter output, the signal is fed to a synchronous detector, at the input of which an inverting amplifier with a gain of 1, made on the IC34b element, is installed. At the same time, by closing the corresponding pairs of contacts of the IC37 microcircuit (terminals IC37 / 1,2 and IC37 / 3,4), the negative signal supplied to the integrating circuit with the capacitor C71 is switched. The control signals for the IC37 microcircuit are formed by cascades made on transistors T31-T33. From the output of the integrating circuit, the pulse signal passes to the input of the amplifying stage, which is made on the IC35 chip and simultaneously performs the functions of a low-pass filter. The voltage drop at the output of the operational amplifier (pin IC35 / 6) leads to the opening of the transistor T34 and the connection to the common wire of headphones BF1. When a control signal is received from the corresponding output of the microcontroller (pin IC1 / 11) to the T35 transistor, an audio frequency signal will be heard in the phones. Resistor R77 limits the current flowing through the BF1 headphones. By selecting it, you can adjust the volume of the acoustic signal. The signal from pin IC35/6 is also fed to the input of another op-amp (pin IC36/2), whose task is to reset the output signal. Its use is explained by the fact that at the output of the IC33 microcircuit, a time-varying output signal will be formed even in the absence of metal objects in the search coil L1 coverage area, so the amplitude of the resulting signal will be different from zero. With the help of resistor R86, a bias voltage is applied to the input of the second amplifying stage (pin IC32 / 2) precisely at the moment the first strobe pulse arrives. The required level of bias voltage depends on the level of the output signal at pin IC35 / 6, its formation is provided by the integrating circuit C73, R78-R80 and the amplifier stage on the IC36 chip. The bias voltage generation circuit functions only during the closing of the corresponding contacts of the IC37 chip (IC37 / 9,8 pins). The duration of this time segment is three cycles. In this case, the control signals for the IC37 microcircuit come from cascades made on transistors T31-T33. This ensures the leveling of the levels of the signals generated at the time of arrival of the first and second strobe pulses. By pressing the S2 button, the time of the zeroing process can be significantly reduced. Details and construction All parts of the device under consideration (with the exception of the search coil L1, switch P1, switch S1 and button S2) are located on a printed circuit board (Fig. 3.20) with dimensions of 95x65 mm, made of double-sided foil getinax or textolite.
There are no special requirements for the parts used in this device. It is recommended to use any small-sized capacitors and resistors that can be placed on a printed circuit board without any problems. It should be noted that in order to achieve the parameters of individual elements indicated on the circuit diagram, parallel connection of resistors and capacitors should be used (Fig. 3.21). Additional space is provided on the printed circuit board to accommodate such elements.
Chips like LF356 (IC31, IC32) can be replaced by LM318 or NE5534, however, as a result of such a replacement, problems with adjustment may occur. As an amplifier IC35, in addition to the IL071 type microcircuit indicated on the diagram, you can use the CA3140, OP27 or OP37 microcircuits. Chip type R061 (IC36) is easily replaced by CA3140. As transistors T1-T3, in addition to those indicated in the circuit diagram, transistors of the BU2508, BU2515 or ST2408 type can be used. The operating frequency of the quartz resonator should be 6 MHz. You can use any other quartz element with a resonance frequency of 2 to 6 MHz. However, in this case, it will be necessary to recalculate the parameters of the filter elements made on the IC34a element. To mount the microprocessor IC1, use a special socket. In this case, the microcontroller is installed on the board only after all installation work is completed. This condition must also be observed when carrying out adjustment work related to soldering when selecting the values of individual elements. Particular attention should be paid to the manufacture of coil L1, the inductance of which should be 500 μH. The design of this coil is practically no different from the design of the L1 search coil used in the metal detector discussed in the previous section. It is made in the form of a ring with a diameter of 250 mm and contains 30 turns of wire with a diameter of not more than 0,5 mm. When using a wire of a larger diameter, the current in the coil will increase, but the parasitic eddy currents will increase even faster, which will lead to a deterioration in the sensitivity of the device. It should be recalled that it is not recommended to use varnished wire for the manufacture of the L1 coil, since the potential difference between adjacent turns during the emission of a pulse reaches 20 V. If, during the winding of the coil turns, there are conductors nearby, for example, the first and fifth turns, insulation breakdown is practically guaranteed. In turn, this can lead to failure of the transmitter transistors and other elements. Therefore, the wire used in the manufacture of the L1 coil must be at least PVC insulated. The finished coil is also recommended to be well insulated. To do this, you can use epoxy resin or various foam fillers. Coil L1 should be connected to the board using a two-core well-insulated wire, the diameter of each core of which should not be less than the diameter of the wire from which the coil itself is made. It is not recommended to use coaxial cable due to its significant inherent capacitance. The source of sound signals can be either headphones with an impedance of 8 to 32 ohms, or a small loudspeaker with a similar coil impedance. It is recommended to use a rechargeable battery with a capacity of about 1 Ah as a power source for B2, since the current consumed by this metal detector exceeds 200 mA. The printed circuit board with the elements located on it and the power supply are placed in any suitable housing. Switch P1, connectors for headphones BF1 and coil L1, as well as switch S1 and button S2 are installed on the housing cover. Establishment This device should be adjusted in conditions where any metal objects are removed from the search coil L1 at a distance of at least 1,5 m. The peculiarity of setting and adjusting the metal detector in question is that its individual blocks and cascades are connected gradually. In this case, each connection operation (soldering) is performed with the power supply turned off. First of all, it is required to check the presence and magnitude of the supply voltage at the corresponding pins of the socket of the IC1 microcircuit in the absence of a microcontroller. If this voltage is normal, then you should then install a microprocessor on the board and use a frequency meter or oscilloscope to check the signal at pins IC1/4 and IC1/5. The frequency of the pilot signal on these pins must match the operating frequency of the used quartz resonator. After connecting the transistors of the voltage converter (without load), the current consumption should increase by about 50 mA. The voltage across the capacitor C10 in the absence of load should not exceed 20 V. Then you should connect the transmitter stages. The operating modes of transistors T1-T4 must be the same and are set by selecting the values of resistors R13-R16. The resistance of the coil L1, shunted by resistors R1-R3, should be approximately 500 ohms. In this case, the conclusions of the coil and resistors must be well soldered, since a contact failure in this circuit entails the failure of the output transistors of the transmitter. To check the operation of the transmitter stages, you can hold the L1 coil near your ear and turn on the power to the metal detector. Approximately half a second later (after resetting the microcontroller), a low tone signal can be heard, the occurrence of which is due to the microvibration of individual turns of the coil. In this case, an unmodulated pointed pulse with a duration of about 1-3 μs will be formed on the collectors of transistors T10-T20, the shape of which can be controlled using an oscilloscope. An increase in the resistance of resistors R1-R3 leads to an increase in the amplitude of the output pulse with a decrease in its duration. To select the resistance value of the shunt of coil L1, it is not recommended to use a variable resistor, since even a short-term violation of the contact of the engine with the current-carrying track can damage the output transistors of the transmitter. Therefore, it is desirable to gradually change the value of the shunt in steps of 50 ohms. Before replacing parts, be sure to turn off the power supply to the device. Next, you can proceed to configure the receiving part. If all the parts are in good order, and the installation is done correctly, then after turning on the metal detector (approximately 20 μs after the end of the start pulse), an exponentially increasing signal can be observed using an oscilloscope at the output of the IC31 microcircuit (pin IC31 / 6), turning into a constant level signal. The edge distortion of this signal is eliminated by selecting resistors R1, R2 and R3, shunting the coil L1. After that, you should check the shape and amplitude of the signal at the output of the IC32 chip (pin IC32 / 6). The maximum amplitude of this signal is set by selecting the value of the resistor R64. In the process of establishing the bias voltage on the IC32 / 2 pin can be supplied from a separate voltage divider, which can be used as a variable resistor with a nominal value of 5-50 kOhm, connected, for example, between the IC32 / 4,7 pins. The potentiometer slider is connected to the resistor R86. At the output of IC33 (pin IC33/5), a rectangular signal can be observed, the amplitude of which is controlled by a temporarily connected potentiometer. Next, you need to check the signals at the outputs of the elements IC34a and IC34b. In this case, the outputs of IC34 / 6,7 must have the correct sinusoids. As a result, a constant voltage is formed on the capacitor C71, which is fed to the input of the IC35 microcircuit. During the tuning process, you can observe the reaction of the device to a change in the position of the engine of a temporarily connected potentiometer, after which the divider R84, R85 should be soldered instead. Operating procedure The procedure for working with a metal object detector does not differ significantly from using a metal detector discussed in the previous section. Before practical use of this metal detector, switch P1 to set the minimum pulse delay. If in the course of work in the area of action of the search coil L1 there is any metal object, then an acoustic signal will appear in the headphones. Switching to the operating mode with a longer pulse delay will ensure the exclusion of the influence of not only the magnetic properties of the soil, but also eliminate the reaction of the device to all kinds of foreign objects (rusty nails, foil from cigarette packs, etc.) and the subsequent futile search. Author: Adamenko M.V.
Artificial leather for touch emulation
15.04.2024 Petgugu Global cat litter
15.04.2024 The attractiveness of caring men
14.04.2024
▪ World's deepest fish discovered ▪ Code Composer Studio - Platinum Edition
▪ site section Field strength detectors. Article selection ▪ article by Ludwig van Beethoven. Famous aphorisms ▪ article Who can be killed by the largest leeches on the planet? Detailed answer ▪ article Tansy balsamic. Legends, cultivation, methods of application ▪ article Freeing the rope and jacket. Focus Secret
Comments on the article: Vladimir Dear, the search engine will never be an electronics engineer. It's two in one for two lives... a guest And where can I find the firmware for at least the old version? Without it, it's just a scheme...
Home page | Library | Articles | Website map | Site Reviews
www.diagram.com.ua |


 Leave your comment on this article: