A simple way to make a scale of homemade pointer instruments. Encyclopedia of radio electronics and electrical engineering

Encyclopedia of radio electronics and electrical engineering / Ham Radio Technologies
 Comments on the article
During the manufacture of one of my devices, as always, I stumbled over the scale (it’s disgusting to do poorly, it’s very troublesome to do it professionally and efficiently). The device was not intended for the exhibition and it was not required to direct any special prettiness. And it was required as quickly as possible, without hassle, as long as possible. I found a solution that was ridiculously simple and for a long time wondered why I had not thought of it before.
We take food-grade aluminum foil (we bake the chicken in it), obviously larger, stick double-sided tape (which is thin) on it. It is reasonable to cut one of the edges along the ruler. We seal the desired section of the scale with this foil, with the cut edge to the axis of the measuring mechanism. If you haven’t done this before, I advise you to practice on an extraneous piece, since a good adhesive tape immediately sticks tightly, and you still need to bring it under the arrow. If the scale is easily removed, then it is better to do it. I am not writing these lines to intimidate. I did it like that. No mistakes, no trials. But, if the scale is large, and the gap under the arrow is small, it will be easier. Yes, and the risk of demolishing the arrow is less. If you have a choice, it is better to take a thicker foil.
Cut off the excess along the contour. It is convenient to do this with a clerical knife with "sawing" movements, pressing in such a way as to press the foil against the scale.
The base is ready. We begin the calibration of the device.
We submit the calibration values and with the tip of the needle we put marks on the scale opposite the arrow. I did it under a magnifying glass. If you make several attempts to average, then put barely noticeable dots, and then push the mark. I advise you to immediately write down on paper what mark you made, there will be fewer mistakes (risks can be confused).
Having put down the necessary marks, we impose a ruler so as to cross the axis of rotation of the frame and the desired point, with the tip of the needle we push the risk of the desired length. You can get by with a dot for intermediate values. If the needle is too sharp, dull the tip slightly. And so on, until all the marks are applied. If desired, you can push through the line with a compass, resting one of the needles on the central screw of the mechanism.
We push the necessary inscriptions and, in principle, that's all.
Believe me, the scale is quite distinguishable, but if you want to make it more contrast, paint over the risks directly on top with a dark permanent marker and almost immediately erase the excess with a dry cotton swab with movements transverse to the risks. Keep in mind that the marker will fade over time. In Fig. 1 part of the scale is shaded.
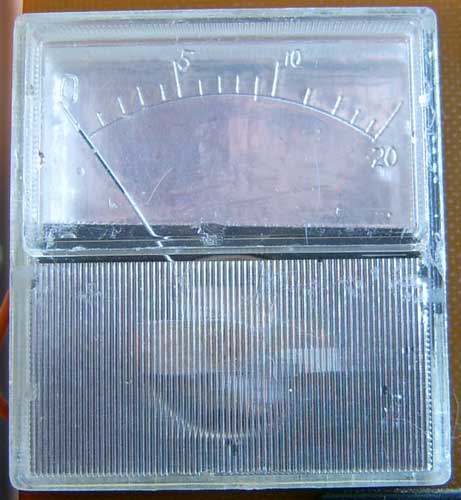
On fig. 2 you can understand how the scales look at different angles.
In addition to simplicity and speed, this method of manufacturing a scale, along the way, alleviates the problem of statics and the arrow will no longer "stick" tightly in an arbitrary place on the scale.

Like any medal, there is a downside. In case of an error, it will not be easy to separate the adhesive tape from the native scale. You will need to remove the scale from the measuring mechanism. It will not be possible to make inscriptions not by hand. Or combine the scale with a separate label with inscriptions. But I wouldn't.
It is better to fix the needle in something for convenience. I have it inserted into the stem from the old syringe and clamped through the PVC tube with a cone head from the cooker. This is one of my most used tools.
On time, together with graduation, I kept within an hour! True, the scale is small and simple. I have never made scales faster and easier, if not to talk about hand-drawn on paper. If the adhesive tape is of high quality, then the scale is eternal. In the pictures, the foil is not very even, this is due to the fact that I found only a crumpled residue at home, I was too lazy to run for a new one, I had to level it.
Yes, this method does not replace the "professional" methods, but in some cases it makes life much easier. And the fight against static sticking.
Author: Trishin A.O., Komsomolsk-on-Amur; Publication: cxem.net
 See other articles Section Ham Radio Technologies.
Read and write useful comments on this article.
<< Back
 Latest news of science and technology, new electronics:
Artificial leather for touch emulation
15.04.2024
In a modern technology world where distance is becoming increasingly commonplace, maintaining connection and a sense of closeness is important. Recent developments in artificial skin by German scientists from Saarland University represent a new era in virtual interactions. German researchers from Saarland University have developed ultra-thin films that can transmit the sensation of touch over a distance. This cutting-edge technology provides new opportunities for virtual communication, especially for those who find themselves far from their loved ones. The ultra-thin films developed by the researchers, just 50 micrometers thick, can be integrated into textiles and worn like a second skin. These films act as sensors that recognize tactile signals from mom or dad, and as actuators that transmit these movements to the baby. Parents' touch to the fabric activates sensors that react to pressure and deform the ultra-thin film. This ... >>
Petgugu Global cat litter
15.04.2024
Taking care of pets can often be a challenge, especially when it comes to keeping your home clean. A new interesting solution from the Petgugu Global startup has been presented, which will make life easier for cat owners and help them keep their home perfectly clean and tidy. Startup Petgugu Global has unveiled a unique cat toilet that can automatically flush feces, keeping your home clean and fresh. This innovative device is equipped with various smart sensors that monitor your pet's toilet activity and activate to automatically clean after use. The device connects to the sewer system and ensures efficient waste removal without the need for intervention from the owner. Additionally, the toilet has a large flushable storage capacity, making it ideal for multi-cat households. The Petgugu cat litter bowl is designed for use with water-soluble litters and offers a range of additional ... >>
The attractiveness of caring men
14.04.2024
The stereotype that women prefer "bad boys" has long been widespread. However, recent research conducted by British scientists from Monash University offers a new perspective on this issue. They looked at how women responded to men's emotional responsibility and willingness to help others. The study's findings could change our understanding of what makes men attractive to women. A study conducted by scientists from Monash University leads to new findings about men's attractiveness to women. In the experiment, women were shown photographs of men with brief stories about their behavior in various situations, including their reaction to an encounter with a homeless person. Some of the men ignored the homeless man, while others helped him, such as buying him food. A study found that men who showed empathy and kindness were more attractive to women compared to men who showed empathy and kindness. ... >>
| Random news from the Archive Flexible battery recharged by human sweat
22.08.2021
Scientists around the world are constantly working on the creation of original methods for recharging wearable mobile gadgets. An unusual way to replenish battery energy using human sweat was proposed by specialists from NTU Singapore University.
The experimental flexible elastic battery measuring 2 by 2 cm has a flat shape, can be attached to a fabric that collects sweat, and quickly connects to any mobile gadgets, including smart watches, medical sensors and other devices.
During testing, a volunteer fastened an elastic battery on his wrist and rode a bicycle for 30 minutes. During the experiment, the element generated a voltage of 4,2 V at a power of 3,9 mW, which allows you to feed the temperature sensor and provide data transfer from the sensor to a smartphone via Bluetooth. The battery does not contain harmful or corrosive materials that are harmful to human health or the environment.
New batteries are able to support the autonomous operation of any wearable gadgets using the energy generated by the human body. At the same time, there is no danger of environmental contamination with harmful elements that are present in almost all modern batteries.
NTU's invention is based on a printer ink that contains silver flakes and hydrophilic polyurethane acrylate (HPUA). When the silver flakes come into contact with human sweat, the chloride ions and the increased acidity of the sweat initiate a chemical reaction during which the flakes combine to increase electrical conductivity and also generate an electric current between the electrodes.
The flexible battery uses a textile fabric capable of accumulating human sweat, which provides the battery with the ability to generate electricity even when a person is at rest and does not sweat. Also, according to the developers, the new battery has a longer life than modern batteries.
|
Other interesting news:
▪ Schumacher battery collection
▪ Electric car climbs faster
▪ space catapult
▪ Self-control lulls the memory
▪ The moon gradually increases the length of the day on Earth
News feed of science and technology, new electronics
 Interesting materials of the Free Technical Library:
▪ site section Indicators, sensors, detectors. Article selection
▪ article Soar in the empyrean. Popular expression
▪ article How many percent of the biological species of our planet are open and classified? Detailed answer
▪ article Theory of snowmobiles. Personal transport
▪ article Amplifier on the chip TDA2009, 2x10 watts. Encyclopedia of radio electronics and electrical engineering
▪ article Switching power supply for memory devices. Encyclopedia of radio electronics and electrical engineering
Leave your comment on this article:
 All languages of this page
Home page | Library | Articles | Website map | Site Reviews

www.diagram.com.ua
2000-2024


 Arabic
 Bengali
 Chinese
 English
 French
 German
 Hebrew
 Hindi
Hindi Italian
 Japanese
 Korean
 Malay
Malay Polish
 Portuguese
 Spanish
 Turkish
 Ukrainian
 Vietnamese