|
|


 Arabic
 Bengali
 Chinese
 English
 French
 German
 Hebrew
 Hindi
Hindi Italian
 Japanese
 Korean
 Malay
Malay Polish
 Portuguese
 Spanish
 Turkish
 Ukrainian
 Vietnamese
|
ENCYCLOPEDIA OF RADIO ELECTRONICS AND ELECTRICAL ENGINEERING Microbubble bath for etching printed circuit boards. Encyclopedia of radio electronics and electrical engineering
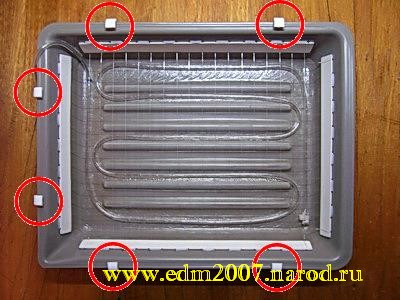
Encyclopedia of radio electronics and electrical engineering / Ham Radio Technologies Entry I don’t think I’ll be revealing a big secret if I say that the speed and quality of printed circuit board etching are influenced by several main factors. For example: if the etching process occurs in a ferric chloride solution at room temperature, then it usually lasts from 40 minutes. up to 2,5 hours (depending on the saturation of the solution). If the solution is heated, then the etching process itself can be reduced in time by one and a half times. And in general, ideally, the solution itself should be stirred periodically, in which case the process occurs even faster. These factors directly affect the etching rate. If we talk about the quality of the boards, then this applies primarily to those radio amateurs who transfer the design to the textolite using the “laser printer and iron” method. Despite the fact that the toner adheres to the foil quite firmly, if the etching process is delayed in time, then ferric chloride still gets under the toner. In this case, the tracks turn out to be “porous,” which in turn deteriorates the quality of the board itself and the device as a whole. Technically, the process of mixing the solution can be carried out in several ways (it all depends on the ingenuity and “sharpening” of your hands), but the most optimal, in my opinion, is the “microbubble bath” method. This is how factory boards are made. The essence of the method is quite simple, but very effective. At the bottom of the ferric chloride tank there is a plastic tube in which holes are punched at regular intervals. The tube is plugged at one end and compressed air is supplied at the other. As a result, air bubbles rising from the bottom of the tank naturally mix the ferric chloride solution, thereby speeding up the etching process. However, there is no provision for heating the solution, but since the etching process occurs quite quickly (5 - 10 minutes), this option, in principle, does not make sense, the solution is simply preheated and poured into the tank already warm. So, with this introduction you can complete and proceed directly to the implementation of your plans. Storage tank As a reservoir for this design, of course, you can use any convenient container, but I came across cuvettes for developing photographs. They look like this:
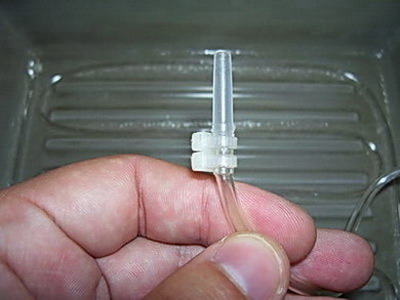
A tube You can also use any convenient tube, but it seemed to me the most optimal to use a tube from a regular medical dropper; you can buy it at a pharmacy for only 15 rubles. It is glued with regular Moment Crystal glue. Holes are made with a sewing needle, in increments of approximately 1 cm:
Naturally, on the one hand, the tube is pre-muffled, on the other hand, a tip from the same dropper is fixed, for a more convenient connection to the air source (about it a little later):
At this stage, it is still necessary to check the operation of the device itself, simply by pouring water into the container. The fact is that everything depends on the pressure of the compressor, the diameter and pitch of the holes directly dance from it, so you may have to experiment:
Сетка Perhaps this point will seem superfluous to some. The fact is that it will talk about a mesh stretched at a distance of about 1,5 centimeters from the bottom of the tank (a gap between the tube and the board blanks is still necessary). It is not at all necessary to make a grid; to ensure the required gap, you can simply insert 4-6 matches into the holes of the boards (preferably in those that are intended for fastening the board in the device) so that they form racks. You can make a grid, again, in several ways. My method is as follows: strips approximately 1 centimeters wide and slightly shorter than each side of the tank are cut out of plastic approximately 1,5 mm thick. The result is two long and two short stripes:
On each strip, cuts are made for half the thickness of the plastic, in increments of one centimeter:
Further, these strips are glued to each side of the container used:
Moreover, they are glued in such a way that the cuts are turned towards the tank wall, and a thin fishing line passes through this cut:
Further, a mesh is stretched from the fishing line according to the following scheme. First between long opposite planks:
Then between the short ones:
The result should be a net similar to the one stretched on a tennis racket:
Cap Actually, we could have ended there, but when testing this unit with water, one not entirely pleasant feature became clear. The fact is that a working unit sprays very small drops in different directions. Perhaps for some this will not be a problem, but personally I had a desire to make a lid. According to the dimensions of the cuvette, a blank was cut out of plastic, in which holes were drilled sufficient for ventilation, but not sufficient to pollute the surrounding space:
The cuts on the lid are made due to the fact that a tube comes out on one side, and there is a drain on the other (by the way, it has become much more convenient to drain the solution with the lid closed, there is less chance of spilling it). The lid is ready, it remains to make fasteners for it on the tank. It is not made quite standardly: clips are glued to the cuvette, designed to fasten the coaxial cable:
There are six in total...
...two on each side as lid guides...
... and two more as a stopper with the lid completely closed:
Compressor. Now we can talk about the source of air. The most common is a plastic bottle with a valve, into which air is pumped with a pump. A variant with a car camera is also possible. In my case, an ordinary microcompressor for an AEN-3 aquarium is used as an air source, which has been slightly modified for greater performance:
Actually, the refinement was reduced to the most optimal location of the magnet in the field of the coil (whoever disassembled such devices at least once will understand what is at stake). Through such simple manipulations, it was possible to increase the compressor capacity by about two times, which turned out to be quite enough. Thus, as a result of all the work, a simple unit appeared ...
... which, nevertheless, increased the quality and speed of manufactured devices by several times. PS Perhaps, to some, much in this design will seem unnecessary, because instead of a mesh you can use matches, instead of a lid - a piece of plywood or an old magazine (just not on radio electronics, this is a matter of principle), and instead of a compressor, your own lungs are quite suitable, but All of the above will definitely not add comfort during work. However, this is just my purely personal opinion, and if all of the above is useful to someone, then I can say with complete confidence that I fulfilled my goal one hundred percent. Author: Electronic Affairs Master, edm2007@mail.ru, ICQ: 207-368-632; Publication: edm2007.narod.ru
Artificial leather for touch emulation
15.04.2024 Petgugu Global cat litter
15.04.2024 The attractiveness of caring men
14.04.2024
▪ Google Assistant is better at recognizing songs ▪ Mandatory disposal of satellites ▪ Wearable device for emergency call of rescuers
▪ site section Indicators, sensors, detectors. Article selection ▪ article at your fingertips. Popular expression ▪ shoe shine article. Job description ▪ article Rope and handkerchief. Focus Secret
Comments on the article: Ghosh I do something like this, but this is necessary for the house of the fine-grained production. Right now, no one needs it. Young people are lazy to do something. But I liked it. Neat, aesthetically pleasing. Vasya Is the board laid on the grid with foil or bare textolite?
Home page | Library | Articles | Website map | Site Reviews
www.diagram.com.ua |


 Leave your comment on this article: