|
|


 Arabic
 Bengali
 Chinese
 English
 French
 German
 Hebrew
 Hindi
Hindi Italian
 Japanese
 Korean
 Malay
Malay Polish
 Portuguese
 Spanish
 Turkish
 Ukrainian
 Vietnamese
|
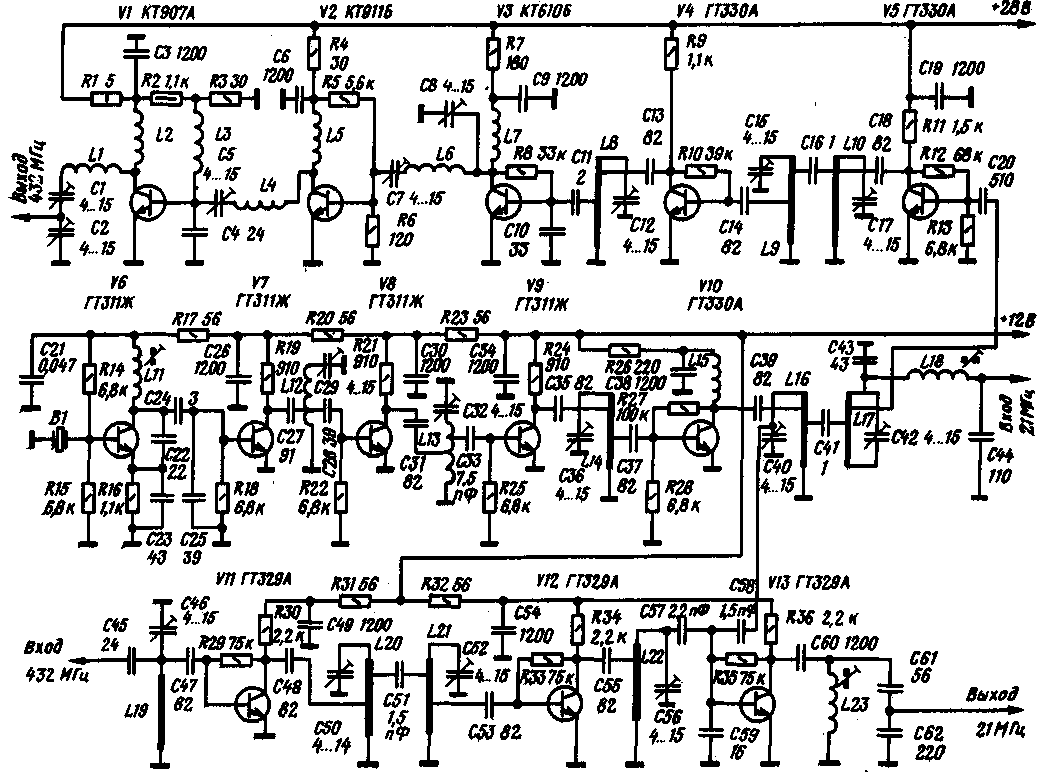
ENCYCLOPEDIA OF RADIO ELECTRONICS AND ELECTRICAL ENGINEERING 430 MHz transverter. Encyclopedia of radio electronics and electrical engineering
Encyclopedia of radio electronics and electrical engineering / Civil radio communications The transverter is designed to work with a KB transceiver having 21 or 28 MHz bands. The specific section of the VHF range 430 ... 440 MHz, which will cover the transverter, depends on the choice of the frequency of the quartz resonator in the local oscillator and the used KB range of the transceiver. It should be noted here that radio amateurs in the 430 MHz band usually operate above the frequency of 432 MHz, therefore this Transverter covers the 3.. .432 MHz section (range 432.5 ... 21 MHz) or 21.5 ... 432...433.5 MHz). The output power of the transverter is 28 W with an input power of about 29.5 mW. Noise figure in the receive mode - (5...1) kTo. The schematic diagram of the transverter is shown in the figure in the text. It consists of receiving (transistors V11 - V13) and transmitting (V1 - V5) paths and a local oscillator common to them (V6 - V10). Local oscillator - five-stage. The oscillator is made on the transistor V6. Quartz resonator B1 7611,1 kHz (7481.5 kHz) (hereinafter, frequencies are indicated in parentheses when using a transceiver in the 28 MHz band.) is excited at the third mechanical harmonic. From the RF oscillator, the voltage is supplied to a chain of multipliers (a tripler on the transistor V7, a doubler on V8 and a tripler on V9). The signal with a frequency of 411 MHz (404 MHz) from the last multiplier goes to the amplifier (transistor V10), and from it to the receiving and transmitting paths. The receiving path contains a two-stage RF amplifier (transistors V11, V12) and a mixer on the transistor V13. The frequency response of the path is mainly formed by the band pass filter L20C50C51L21C52 and the circuit L22C56. The transmission path begins with a mixer made on the transistor V5. From the mixer output, a signal with a level of about 2 mW through a bandpass filter L9C15C16L10C17 is fed to a four-stage amplifier (V4 - V1) with a total gain of 33 ... 34 dB. The first two stages (on transistors V4 and V3) operate in class A mode and amplify the signal up to 100 mW. The other two stages operate in class AB mode. Transistor V2 amplifies the signal to about 1W, and transistor V1 to 5W. Construction and details. The transverter is mounted on a board made of one-sided foil fiberglass with a thickness of 1...2 mm and dimensions of 165X210 mm. Installation was performed on the reference points according to the method described in the article VHF transverter" (Radio 1-79). The dotted line in the figure shows the conductors located on the reverse side of the board. The resonators are made of silver-plated wire with a diameter of 1,2...1,5 mm. The gap between the line and the board is about 1 mm. Mounting the resonator to the reference point will increase the initial capacitance and slightly reduce the quality factor of the resonator (due to losses in fiberglass), so it is better to limit yourself to soldering the line to the output of the trimmer capacitor. Powerful transistors are equipped with a common radiator in the form of a copper (or duralumin) strip or a corner 2 ... 4 mm thick. To improve heat dissipation, the edge of the strip (corner) should be screwed to the wall of the transverter housing. Under the KT907A transistor, it is necessary to put a strip of copper foil, the ends of which should be soldered to the board. Low-power transistors must be inserted into the holes on the back of the board so that the bottom of the case is at the level of the foil. The transverter uses capacitors KM, KT and KD. Chokes L2, L3, L5, L7, L15 and LI coils. L4, L6, L12 and L13 frameless. The inductors are made of pieces (about 70 mm long) of PEV-2 wire with a diameter of 0,3 ... 0,4 mm, wound on a mandrel with a diameter of 2 mm. The winding length does not play a significant role. Frameless coils are made with silver-plated wire with a diameter of 0.8 mm. For L1, L6 and L4, a mandrel with a diameter of 5 mm was used, for L12 - 9 mm, for L13 - 7 mm. L1, L6 contain 2 turns each (2 mm pitch), L4 - 3 (2 mm pitch), L12 - 8 (winding length 11 mm) with a tap from the 1,5th turn, counting from the grounded terminal, L13 - 4 ( winding length 7 mm) with taps from 1,5 and 3,5 turns. Coils L11, L18, L23 are wound on frames with a diameter of 5 mm with trimmers made of carbonyl iron with an M4 thread with PEV-2 0,2 wire. L11 contains 18 turns, L18 and L23 - 12 each. Winding is ordinary. In the transverter, in addition to the transistors indicated in the diagram, transistors of the same types with other letter indices can be used. And in the receiving path without changing the circuit, you can use the GT341. GT362, KT371, KT382, etc. The establishment of the transverter is carried out by the methods described in the article mentioned above. Capacitor C25 is selected so that the DC voltage at the collector of transistor V7 is 5 ... 6 V. After that, the L12C29 circuit is tuned to a frequency of 68,5 MHz (67.3 MHz). By changing the connection location of the capacitors C27 and C28 to the L12 coil, a constant voltage is set on the collector of the transistor V8 within 5 ... 6 V. Then the L13C32 circuit is tuned to a frequency of 137 MHz (134,7 MHz). By mixing the connection point of the capacitor C31 to the coil L13, the DC voltage on the collector of the transistor V9 is 6 V.
Establishing an amplifier on a V10 transistor comes down to setting the collector current within 7 ... 27 mA by selecting a resistor R14. After that, they proceed to tuning the L36C16 circuit and the L40C41C17L42C411 bandpass filter to a frequency of 404 MHz (XNUMX MHz) The receiving path begins to be established by checking the modes of transistors V11 - V13. Choosing resistors R29. R33 and R35, set a constant voltage of about 6 V on the collectors of the corresponding transistors. After that, the mixer is connected to the KB input of the receiver and the L23C61C62 circuit is tuned to the maximum noise. Then, using an RF probe, the L22C56 circuit is first tuned to the local oscillator frequency, and then it is slightly detuned in the direction of increasing the frequency (to the maximum of noise). The L21C52 circuit is tuned to minimize noise. In this case, the coupling capacitor C51 is temporarily turned off. The L20C50 circuit is tuned for maximum noise by restoring the open circuit. Setting the input circuit L19C46 is not critical, you just need to achieve the best signal-to-noise ratio at the output of the receiver. The transmitting path, just like the receiving path, begins to be adjusted by setting the transistor mode to direct current. Selecting the resistor R12, set the voltage on the collector of the transistor in the range of 9 ... 10 V (current 12 mA). Then, by selecting the resistor R10, the collector current of the transistor V4 is set to 18 mA (collector voltage is 9 V), and by selecting R8, the current is set. transistor V3, equal to 55 mA (18 V). The mode of operation of the last two stages of the power amplifier is better controlled by the voltage drop across the resistors R1 and R4. The initial current of transistor V2 should be 30 mA (voltage across resistor R4 is 0,9 V), and transistor V1 should be 50 mA (voltage across resistor R1 is 0.25 V). The next step is to set up the contours. The initial tuning is made to the local oscillator frequency of 411 MHz (404 MHz) using a probe. alternately connected to the coils L10, L9 and L8. The probe connection point should be chosen as close as possible to the "cold" output of the lines. After that, a signal with a frequency of 21,2 (28,2) MHz must be applied to the input of the transmitting path of the transverter and increased until the operating mode of the V5 transistor changes in direct current. The local oscillator signal at the output of this stage should then noticeably decrease. Then using a probe connected to the L10 coil. it is necessary to find the maximum corresponding to the frequency of 432,2 MHz. This should be the closest maximum in the direction of decreasing the capacitance of the SP capacitor. Set up the other two circuits in the same way. Next, they proceed to matching the cascades on transistors V3 and V2. By successively adjusting the capacitors C7 and C8, the maximum current of the transistor V2 is achieved. It should be taken into account that the degree of coupling depends on the position of the rotor of the capacitor C8 and the capacitor C7 serves to tune the matching circuit into resonance. Further tuning is carried out with a load connected to the output of the transmitter, since otherwise the transistor V1 may fall into a dangerous overvoltage mode. The undervoltage mode, corresponding to a low load resistance, is less dangerous for transistor V1, since this transistor is used only at 50% of its maximum capabilities. Next, you should adjust the capacitor C5, achieving the maximum collector current of the transistor V1, and then the capacitors C1 and C2, getting the maximum voltage at the load. After that, it is useful to once again adjust all the circuits and check the operating modes of the transistors in the maximum power mode. The modes of transistors V3 - V5 should depend slightly on the signal level. The collector current of the transistor V2 should increase to 150...170 mA, and V1 - up to 280...320 mA. You should also make sure that the output power changes smoothly when adjusting the 21,2 MHz (28,2 MHz) input signal level. The presence of jumps indicates the existing regeneration or self-excitation of one of the cascades. In this case, the setting must be repeated, varying the connection between the cascades. Author: S. Zhutyaev (UW3FL); Publication: N. Bolshakov, rf.atnn.ru
A New Way to Control and Manipulate Optical Signals
05.05.2024 Primium Seneca keyboard
05.05.2024 The world's tallest astronomical observatory opened
04.05.2024
▪ Transmission of optical communication without wires over long distances ▪ 32-bit ARM Cortex-M7 processor for high performance microcontrollers ▪ SNSPD camera for photon research
▪ section of the site Microphones, radio microphones. Article selection ▪ article Puller for corn cobs. Drawing, description ▪ article Why fruits can ripen on their own? Detailed answer ▪ article Carrying out demonstration experiments in biology. Standard instruction on labor protection
Home page | Library | Articles | Website map | Site Reviews
www.diagram.com.ua |

 Leave your comment on this article: